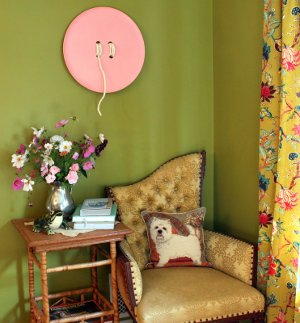
Stop and Stare Wall Art
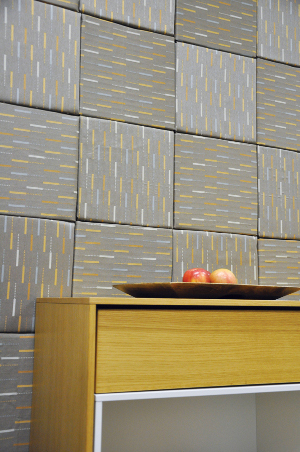
Create an amazing wall display with this Stop and Stare Wall Art. Using Design Foam Soft Tiles and your favorite fabric patterns, you can easily decorate a wall without using paint. This is a great way for home renters and dorm dwellers to still decorate their space without damaging the wall underneath. You could also use the foam squares to tack up your favorite pictures or inspirational quotes. Take decorating to a whole new level with this awesome splash wall art.
Primary TechniqueFabric Crafts

Materials:
- Design Foam Soft Tiles – 12”x12”x1”, to fill your space
- Home Decor Fabric – 16x16” squares, enough to fill your space
- Rotary cutter (you can use a pinking rotary blade for a cleaner edge)
- Quilting ruler
- Cutting mat
- Glue gun
- Level
- Utility knife
- Metal straight edge or ruler
Instructions:
Making a Basic Tile
- Place fabric on a clean hard surface, and center 1 Design Foam tile on top with the stickybase™ side up.
- Peel back the stickybase™ liner along one side of the foam, and wrap fabric around it. Replace the liner, and repeat on the other 3 sides, wrapping like a present. At the corners, trim fabric as desired to reduce bulk, and secure on the stickybase™. Use a glue gun to better secure corners.
- Set aside the finished tile with stickybase™ liner still in place. Repeat until you have enough tiles to fill your space. Plan to make smaller tiles at the end of your project to fill in the small spaces along your edges.
Tips for Installation
- When covering an entire wall make a plumb line both vertically and horizontally and start in the center of the wall. This will ensure that you install the tiles straight.
- Start in the center top of your space and work your way out and down.
- Remove stickybase™ liner and press onto wall. stickybase™ liner does feature a permanent adhesive which is intended to have a strong grip on whatever it is being applied to. The adhesive sets and becomes more permanent over time, so if you need to make any adjustments, do so quickly. NOTICE: The adhesive may cause damage to walls or surfaces when removed. Please test this on your specific surface, and know that this product is intended for permanent installation.
- Because the tiles are soft and squishy, check regularly that you are staying level.
Finishing the Edges
- Measure your remaining open space.
- Using a utility knife and metal straight edge, cut tile to intended size.
- To determine size of fabric, add 4 inches to the vertical and horizontal dimension of the custom-cut tile.
- Wrap tile like a present, following the instructions above.