Baseball Bat Picture Hanger
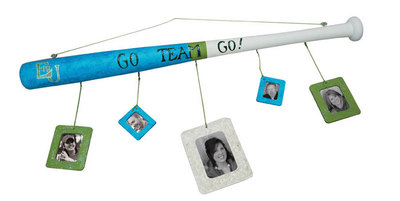
Wow your college friends with this baseball bat recycled into a trendy photo frame hanger.
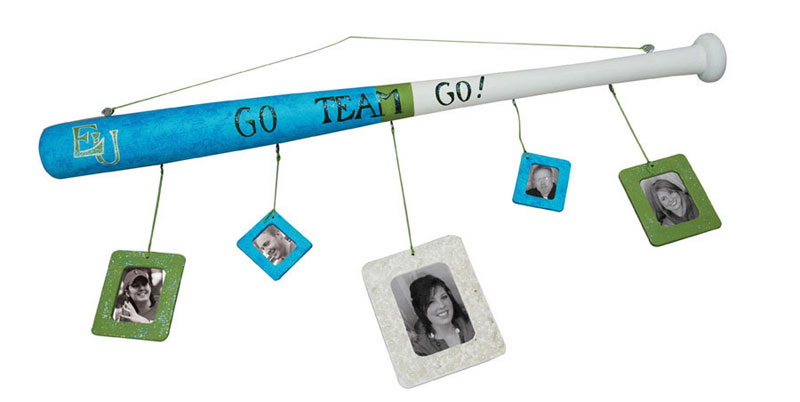
Materials:
DecoArt Products Required
Americana Acrylics
- DAO44 - Desert Turquoise
- DA113 - Plantation Pine
- DA131 - Hauser Light Green
- DA239 - Warm White
- DA255 - Bahama Blue
Craft Twinkles
- DCT1 - Crystal
Liquid Beadz
- BE30C - Crystal Pearl
Multi-Purpose Sealer
- DS17 - Multi-Purpose Sealer
Faux Glazing Medium
- DS18 - Faux Glazing Medium
DuraClear Varnishes
- DS21 - DuraClear Satin Varnish
Americana Brushes
- DBL1582-B - Script Liner 2/0
- DBF2575-B - Flat 3/4"
- DBF3012-B - Shader 12
- DBO7575-B - Large Oval Wash 3/4"
Palette Knife
- DT02 - Palette Knife
Supplies
- Water container
- Palette or plastic plate
- Paper towel
- Pencil
- 250-300 grit sandpaper
- Tracing and transfer paper
- Ruler
- Plastic wrap
- Scissors
- Craft glue
- Seven screw eyes
- Embroidery thread color of choice
- Sharp object such as ice pick or awl
- Recycled baseball bat
- Five picture frames of various sizes
Instructions:
Preparation: Using fine grit sandpaper, sand off burrs and rough edges from small frames and remove dust. Rough up finish on bat to help paint adhere. Apply one, even coat of Multi-Purpose Sealer to frames, using 3/4" flat brush. Allow to dry thoroughly. Sand frames again with fine grit sandpaper and remove dust.
1. Using pencil and ruler, mark 11" down from top of bat. Then mark 2" stripe. (See photo for placement.)
2. Basecoat Bahama Blue: bottom section of bat (using 3/4" flat brush) and two smallest frames (using 12 shader brush).
3. Mix glaze of 3 parts Faux Glazing Medium, 2 parts water, and 1 part Desert Turquoise. Apply to Bahama Blue section of bat with flat brush. Immediately press crumpled plastic wrap into wet glaze and lift. Repeat on two Bahama Blue frames.
4. Basecoat top section of bat and largest frame Warm White with flat brush.
5. Basecoat two remaining medium-sized frames and 2" stripe on bat in Hauser Light Green using 12 shader brush.
6. Print university initial and "Go Team Go!" in 1 3/4" letters favorite font on computer. Lay tracing paper over initial and words and trace around letters. Lay tracing on surface, tape top and one side. Slide graphite paper with dark side down between tracing and surface, and draw over all lines. Apply pattern for initial at end of bat and "Go Team Go!" through center.
7. Using 2/0 liner brush, fill in initials in Hauser Light Green. Using same brush, outline initials in Warm White.
8. Fill in "Go Team Go!" in Plantation Pine using liner brush.
9. Apply as many coats of DuraClear Satin Varnish as desired to all pieces with 3/4" oval wash brush.
10. Apply Craft Twinkles Crystal to all letters with liner brush and to Hauser Light Green frames with 12 shader brush.
11. With palette knife, spread Warm White frame with Liquid Beadz Crystal Pearl.
12. Starting from top of bat, mark with pencil every 4" five times on under side to place screw eyes. Use sharp, pointed object to start hole for screw eye on each mark. Place screw eye in hole and twist until tight. Repeat this process on top of bat; for hanger, place crew eye 3" in from each end.
13. Punch holes in top of each frame with sharp pointed object. Tie embroidery thread through hole in frame and then through screw eye.
14. Tie embroidery thread to top of bat through each screw eye to hang.
Helpful Hint
If you don't want to do lettering on bat, replace with a sport-themed decal or team logo.
Read NextCowboy in Training Rocking Horse

