Batik Tie Dye Technique
Add a batik pattern to a shirt or other fabric with this tie-dye tutorial from I Love to Create. The pattern uses household materials, such as a fork, to create the unique batik design. You can use this one-of-a-kind technique to make a variety of tie-die crafts, such as shirts, scarves, or leggings. These tie-dye projects make great gifts for your kids, your friends, or yourself.
Before beginning this project, read the instructions for the Tulip One-Step Fashion Dye or Tulip Permanent Fabric Dye. Refer back to them for standard steps.
1. Create batik design
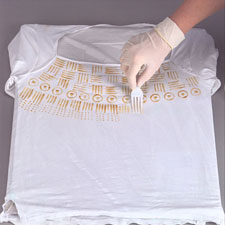
Prewash shirt to remove sizing. Do not use fabric softener or dryer sheets.
Cover work surface with a plastic tablecloth. Insert shirtboard or coated cardboard between shirt layers.
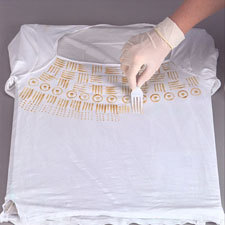
Stamp or draw designs desired. We used the tines of a fork and a spray bottle top to stamp the circles and a pencil eraser for the dots in the circles. The resist should penetrate the fibers so that it blocks the dye. It can be thinned slightly with a few drops of water.
Practice first on paper towels. Let the resist dry thoroughly.
2. Mix dyes and begin to apply dye
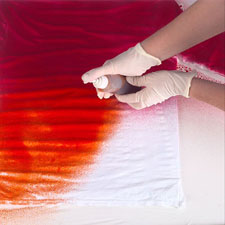
Add warm water to fill the bottles of dye and shake to mix. Dilute each dye to half-strength. We used spray tops on our bottles.
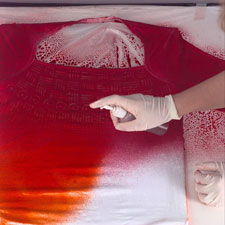
We sprayed the back of the shirt first with Orange and Fuchsia.
3. Apply dye to the design
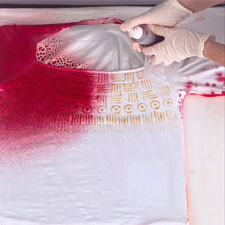
Wipe the excess dye off the plastic-covered work surface and turn the shirt over.
Spray Fuchsia and Orange dye on the front of the shirt.
4. Continue to apply dye
Continue to apply dye until the shirt is completely covered. Do not over saturate fabric.
Cover fabric with plastic. Let set 4 to 6 hours. The resist will gradually melt away. Fill washer to large load setting with hottest water suitable for fabric and a small amount of non-bleach laundry detergent. Wash and dry separately.

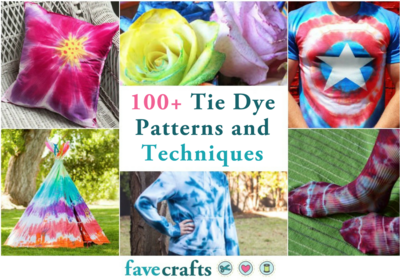
For even more fun tie-dye projects, check out these 100+ Tie Dye Techniques and Patterns.
Read Next100+ Tie Dye Patterns and Techniques
Your Recently Viewed Projects
Thanks for your comment. Don't forget to share!
clewis36 7388422
May 27, 2016
What a great, creative idea! I have lots of possibilities in my mind! #FaveCraftTieDye
jblaine62 5929455
Jul 11, 2014
What is 'resist'? you give no info on how to use it let alone where to get it. Is it wax, like what was originally used to batik? Why don't you have a picture of the finished product? You just don't give enough info/instructions.
Melissa Ryan
Jul 14, 2014
Hi jblaine62--Thanks for your comment. The resist is actually a product put out by Tulip. You can find it in a bottle in various craft stores (Tulip Tie-Dye Resist). As for a final photo, we posted everything that was sent to us by I Love to Create...and this isn't necessarily a project as much as it's a tutorial on how to do the batik tie dye technique. If you're looking for batik tutorials, you can search "batik" on our site to find a variety of project ideas. Hope that helps!--FaveCrafts Editor
nemorocky89 502388 7
Jan 10, 2013
Want to see its final photo. this is very good project. but the pattern you have done is not clear in pic. :( want to see it n try it..
terrynight
Oct 02, 2012
HOW cool is this! But what would be even cooler, is if you could have pics of the actual finished project/product.
Report Inappropriate Comment
Are you sure you would like to report this comment? It will be flagged for our moderators to take action.
Thank you for taking the time to improve the content on our site.