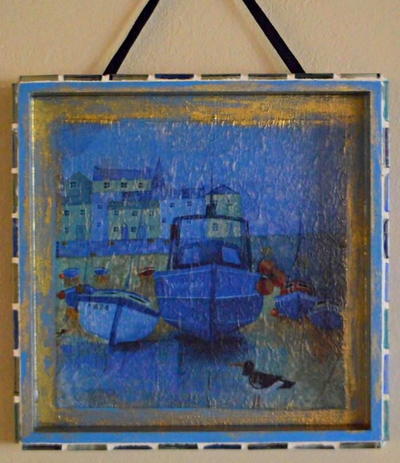
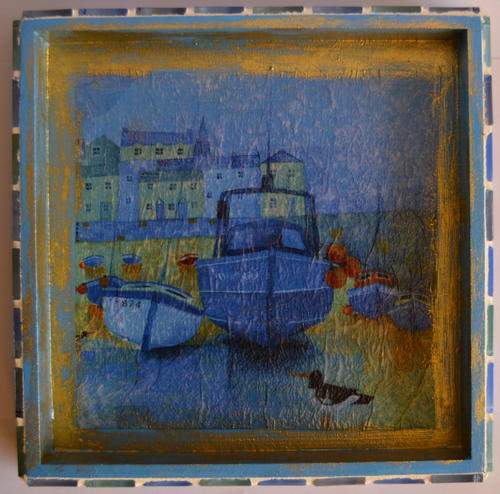
Ships Ahoy DIY Wall Art
This mod podge craft is sure to make waves with your houseguests.

Create a beautiful piece of DIY wall art that will take you to your dream destination across the sea. If you close your eyes, you might just hear the waves rippling in the breeze or feel the gentle rocking of the mighty ship on the deep water.
This gorgeous Ships Ahoy DIY Wall Art combines the art of mosaic with the art of decoupage, leaving you with a unique piece of home decor for your summer cottage or beach-themed living room. You could also put this peaceful piece of artwork in your guest room for your houseguests to enjoy.
Use blue, green, aqua, or gray tones to give your mod podge craft a true oceanic feel. Your friends will be asking which high-end home store you got this stunning piece of artwork from!
Estimated Cost$21-$30
Time to CompleteWeekend project
Primary TechniqueHome Decor

SeasonSummer
Project TypeMake a Project
Materials List
- 200x200x20mm natural wooden canvas
- Thirty-two 20x20mm blue and green glass mosaic tiles
- Napkin with an image of a boat printed on it
- Dark blue shoe lace
- Clear-drying wood glue (such as Qualigrip)
- Super white tile grout
- Royal blue acrylic paint
- Mod Podge
- Hard as Nails water-based varnish
- Rolkem gold dusting powder
- Super Glue
- 25mm-thick paintbrush
- Thin paintbrush
- Hairdryer
- Standard scissors
- Two small plastic containers and a spoon
- Old cloth
- A few sheets of old newspapers to protect the working area
Instructions
-
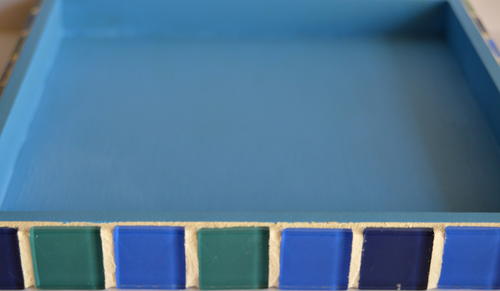
Use the wood glue to add a row of mosaic tiles all around the outer sides of the wooden canvas. Try and space them evenly when gluing them. Allow the glue to dry thoroughly before proceeding to the next step. When the glue is completely dry, you will not be able to move the tiles anymore.
-
Now it is time to grout the mosaic tiles. Drop a few heaping spoonfuls of super white grout into one of the plastic containers. Add a few drops of cold water until the grout is the right consistency (it should not be runny).
-
Use your finger to spread the grout on the side of the canvas. Gently press the grout in between all the tiles, carefully ensuring not to leave any air pockets.
-
When adding grout between the tiles at the corners of two adjoining sides, use a few drops of wood glue instead of water to mix the grout. Without the glue, the grout will just drop right off the canvas once it's dry.
-
Wait for 30 minutes. Then dampen the old cloth and gently wipe off any grout from the outer bottom of the canvas, the edges of the canvas, and from the tiles. Rinse the cloth if necessary and keep wiping off grout from areas where there should be no grout.
-
Allow the grout to dry overnight before proceeding with the next step.
-
Paint the edges, inner sides, and inner bottom of the canvas with the royal blue acrylic paint.
Note: Use the thin paintbrush when painting the edges of the canvas to ensure that you do not smudge the grout with blue paint. -
Allow to dry and repeat.
-
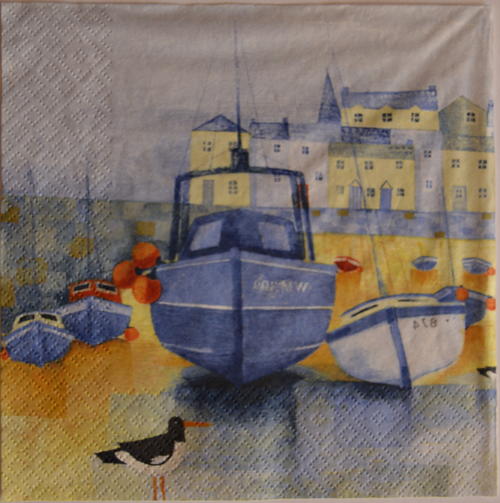
Cut out one quarter of the napkin and remove the bottom layers from this quarter.
-
Add a thin layer of Mod Podge to the inner bottom of the canvas. Position the quarter of the napkin on the inner bottom of the canvas, but do not press down, as you do not want the napkin to tear.
-
Use the thick paintbrush and paint a substantial amount of Mod Podge over the top of the quarter napkin, so that it will stick to the canvas. As the napkin can stretch or tear easily, it is best to start painting from the middle to the sides, working in small triangles. Very gently rub over the quarter napkin with your finger to remove any air pockets.
-
Use the hairdryer to dry the napkin.
-
Paint a thin layer of Mod Podge over the whole inner bottom of the canvas. The Mod Podge will protect the napkin image and give the product a smoother finish.
-
Dry the canvas with a hairdryer.
-
Repeat Steps 13-14. You need to apply at least eight coats of Mod Podge, but remember that with every layer, the direction in which the Mod Podge is applied must be changed from horizontal to vertical to horizontal, etc. Also remember that after every layer of Mod Podge, the canvas must be dried thoroughly with the hairdryer.
Note: If your Mod Podge does not dry clear, use these tips to remove it. -
In the second plastic container, mix a bit of Mod Podge with Rolkem gold dusting powder. Use the thin paintbrush and add an uneven gold wash all around the napkin, as well as to the inner sides and the edges of the canvas. Dry the gold wash with the hairdryer.
-
Add a layer of water-based varnish to the edges, inner sides, and inner bottom of the canvas. Dry thoroughly with the hairdryer.
-
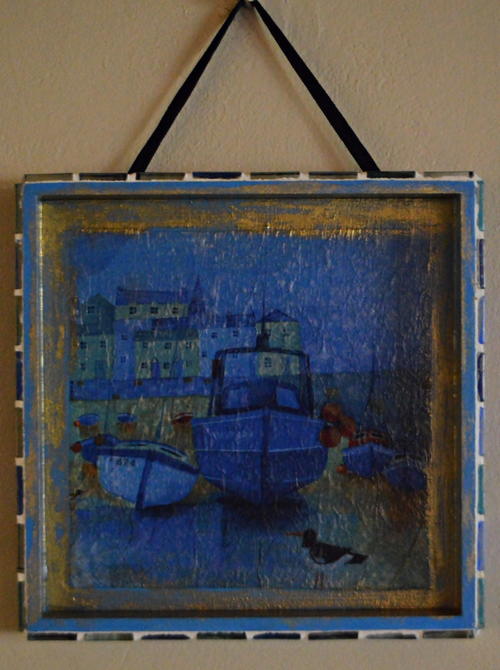
Cut a piece from the shoe lace that can be used to hang the canvas. Secure it to the back of the canvas with the Super Glue and allow to dry thoroughly before hanging.
Why You'll Love This Recycled Craft
Are you ready to set sail on a crafting adventure with our Ships Ahoy DIY Wall Art project? Here are the top 3 reasons why you need to make this stunning piece of home decor:
1. Unique and Personalized: With the art of mosaic and decoupage combined, you can create a one-of-a-kind wall art piece that reflects your love for the sea. Choose your favorite colors and patterns to truly make this project your own.
2. Beachy Vibes: Transform any room in your home into a seaside escape with this ocean-inspired DIY wall art. The blue, green, aqua, or gray tones will bring a sense of tranquility and relaxation to your space, perfect for a summer cottage or beach-themed living room.
3. Impressive Home Decor: Your friends and guests will be amazed at your crafting skills when they see this beautiful Ships Ahoy DIY Wall Art hanging on your wall. They'll be asking where you bought such a high-end piece of artwork, not realizing you made it yourself!
So grab your supplies and get ready to create a piece of DIY wall art that will transport you to your dream destination across the sea. Happy crafting!
Please comment and let us know:
What is your favorite piece of wall art in your home?
Read NextColorful Cross Wall