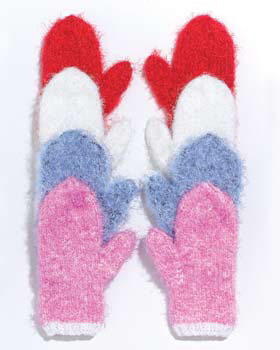
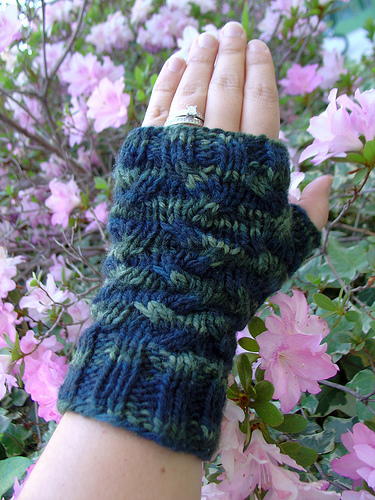
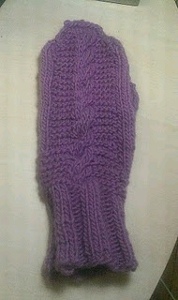
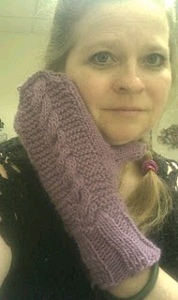
Pretty Cable Mittens
Knit up a pair of pretty cable mittens to keep the chilly air away from your hands this winter! These free knitting patterns show you how to make your own.

Materials:
- Chunky wool roving(14 wraps per inch)
- 4.0 needles
Instructions:
Cuff
Cast on 30
Row 1 to 18: (K-3, P-3) five times [30 st total] each row.
If I do these again for a woman, I will use an alternating shell pattern crochet stitch for the cuffs and just start with the Body, below. I would finish the body and thumb and then add a much prettier cuff than K-3, P-3 which is pretty boorrrhing, thank you very much. But I’m a crohet person at heart. It goes faster and looks prettier and I love all those shell patterns.
Body–Palm to tip
Front Pattern
Rows 19 to 22: K-4 (K-5, P-4, K6, P5) K remaining stitches on odd rows and
Knit all stitches even rows, where the parenz indicates a (garter 5, cable 6, garter 5) decorative pattern on the front or “Front Pattern”. For one mitten, cable forward, and for the other cable backward. Of course if you forget, few will notice!
[the K6 will be a cable every 6 rows, cross on every 3rd purl row-instrs below do not include doing the stitch cross for the cable every 6 rows for brevity]
[divide stitches half in back and half in front on 3 needles, with the Front Pattern all on one needle to make things easier.]
Do an invisible increase by first knitting on the horizontal bar behind and below the next stitch (you’re actually knitting into the backside of the next stitch below), then knit the stitch you’re on same as usual). Google the internet for detailed drawings and videos of “knitting increase invisible stitch” if this confuses you. I found lots of good videos on Youtube for an invisible increase in knitting after I just made a bunch of holes and ripped out rows a few dozen times!
(Don’t forget Front Pattern)
Row 23-26: thumb gusset; Inc 1 beg of each row.
[4 extra-34]
Row 27-28 sa
row 29 incr 1 [35]
row 30-31 sa
row 32 incr 1 [36]
row 33-34 sa
row 35 incr 1 [37]
row 36-37 sa
row 38 incr 1 [38]
row 39-40 sa
row 41 incr 1 [39]
row 42-43 sa
row 44 incr 1 [40]
row 45 hold 8 stitches at gusset with safety pin or bobby pin for thumb opening. On next row you will cast on 8 over this hole. You will note that thumb opening begins at about the 4th cable cross on front of mitten. Make a note for other mitten.
continue pattern to row 68 or to length of pinky top,
taper pinky side every row by decr 1 to length of index finger top (approx. 6 more rows).
Taper both sides by decr 1 both sides, front and back, for 4 more rows.
I decreased by using the old slip stitch over, knit next stitch, cast off the slipped stitch over the next stitch method which I believe is KPSSO to the true knitting pros. Looks nice.
Keep on decreasing until top of fingers is reached and you have 8 stitches on front and back needles. Place front stitches on stitch holder or unbent paper clip and do same for back stitches on a second stitch hoder.
Line up remaining stitches front to back on your two stitch holders and then pick up stitches by the following method, picking up on one needle, pick up first front stitch, then first back stitch, then second front stitch, then send back stitch, until all stitches are picked up onto one needle.
K2tog, cast off one (pull stitch to the right over the one to the left like a daisy chain). Repeat until all stitches cast off and you have a pretty daisy chain at top.
Thumb
Pick up 16 stitches and divide into half on one needle and the other half on two needles. Be sure to pick up an extra stitch or two at edges so you will not have gaps or holes later. Divide stitches half onto one needle and the rest equally onto two needles. Start decreasing up to two stitches along either side of thumb until you have 16 stitches total.
Work those 16 stitches in the round for 13 rows and then taper off one stitch per row at either end (4 sts total per row) for 2 rows until you have 8 stitches total. Place 4 stitches on a front stitch holder (can just be an unbent paper clip), and 4 rem stitches on a back stitch holder. Pick up stitches onto one needle by placing one front st on the needle, then one back st, then a second front, stitch and a second back st and so on until all 8 stitches are on one needle, alternating front and back stitches. Knit first 2 stitches tog create lp 1. Knit second 2 stitches tog creating lp 2, pull first loop over second to cast one loop off. Continue knitting two stitches together and pulling one lp over the other to cast off until end.
Other Hand
(Assuming you have 2. If you have 3 hands, you’ll just have to figure it out on your own).
Do same thing, except of course, mark where you will put your thumb gusset after the first 4 rows on the body on the 4 knit stitches preceding the Front Cable/Garter Pattern. Increase as noted above. (Note that your thumb gusset for the first mitten or right handed mitten was 4 stitches right after the front pattern on the mitten backside, so you will have to knit across the palmside of the mitten until 4 stitches from where front pattern begins to start your thumb gusset. Increase ever row at this stitch for 4 rows (4 new stitches inserted), and then incr every 3rd row until you have 10 new stitches and a thumb opening of 8 stitches.
Weave in all ends. Look for any holes you don’t like and take left over yarn and fill in your holes.
Notes:
- Total weight of each mitten was 1.6 oz wool or 44.8 gr/mitten. Use what you want, as long as it fits your hand. For this pattern a swatch equaled 10 st across was 2.25" and 12 rows was 2.0" tall. So that’s 4.4 spi (stitches per inch horiz) and 6.0 spi vertical. You can use these ratios to recalculate using your own needles and yarn, but basically that means the cuff has 30 stitches around. It is increased with a thumb gusset to 40 stitches in 3.0". This is then tapered off starting when the mitten body covers the pinky, 2 st per row, every row until the mitten body reaches the length of the index finger and both sides are then tapered at the edges 2 st at either edge or 4 stitches per row until the mitten covers the length of the fingers and 16 stitches total are left with 8 on the front needle and 8 on the back needle. The 16 stitches are then cast off using my method or your preferred method. I happen to like putting all the stitches together and doing a knit/cast off.