Tea Light Flowers Napkin Rings
Instead of tossing empty tea lights, those shiny metal holders for the mini-candles, why not make them into something beautiful? Create tea light flowers for cute napkin rings with this eco-friendly craft project from Tiffany Windsor of Inspired at Home.
You can also listen to this project as you craft, read by Tiffany Windsor. ![]()

Last week, while I was pouring tea at the Studio (we serve tea to our customers) the tealight which keeps the teapot hot had burned out so I grabbed a new one and took out the old. But now that I’ve been bitten by the eco bug, I sat for a moment and looked at the old tealight holder and, of course, thought what can I do with this? It didn’t take long before a design came to mind. A few snips here, a squashing there, and a pretty flower had blossomed. So here’s how I did it:
Materials:
- tealight
- scissors
- blue low-mask painter’s tape
- craft knife (or single edge razor blade)
- Aleene’s® Super Thick Tacky Glue™
- Aleene’s® Platinum Bond Glass & Bead Adhesive™
- scrapbook paper
- extra large flat back marble
- brown acrylic paint
- ½ flat paint brush
- miscellaneous beads (optional)
- charms (optional
- Rustoleum Flat White Paint (optional)
- Rub ‘n Buff Gold (optional)
Instructions:
-
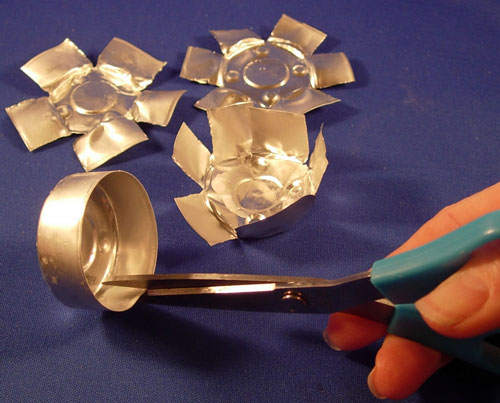
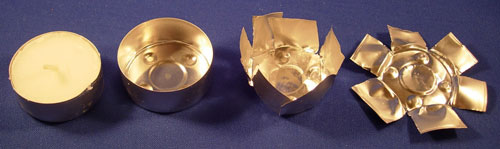
First you need a tealight. You can buy these by the bagful at a really reasonable price. Next, you need to use your tealight. We use ours in tea warmers and aromatherapy diffusers so we get a collection of used tealight holders pretty quickly. (You can pull the candle part out without burning the tealight but why would you want to do that??!!)
-
Next, grab your scissors and cut straight down around the sides of the holder. These holders are really thin so they’re really easy to cut.
-
Next, give them a good smoosh with your palm to flatten them out. Then round off the corners of the petals and you have the base for your flower. Gently push the edges of the petals down and back to give them a more realistic curled edge. You can use your flowers in many different ways. I decided to try them for napkin rings because we had a dinner party coming up!
-
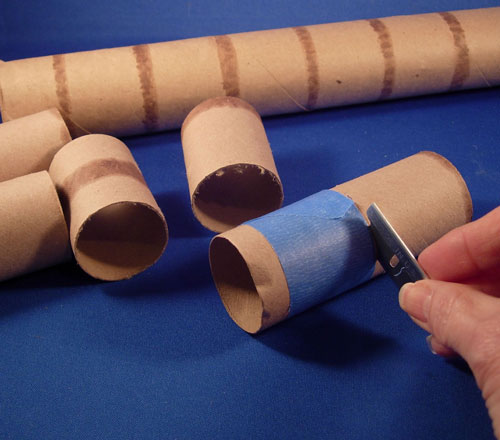
To make eco napkin rings, just place a piece of blue low-mask painter’s tape on your paper towel roll at desired length and use single edge razor blade (or craft knife) to cut roll. You can get a whole set out of one paper towel roll. I then measured and glued scrapbook paper to cover my napkin rings.
-
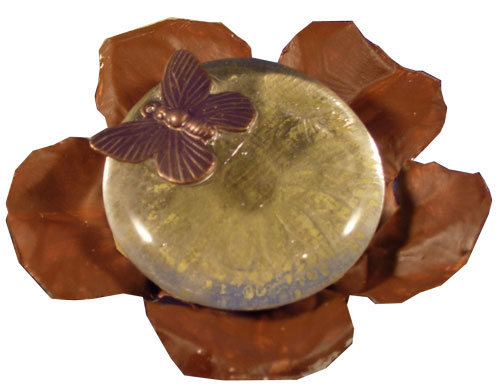
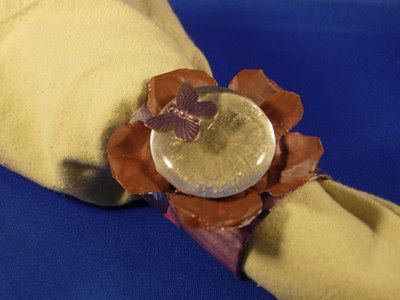
Next up, you need to decide how you want to decorate your tealight flowers. We have the large flat-backed marbles at the Studio that we use for mosaic projects so I decided that the marble would make a perfect center for my tealight flower. I glued scrapbook paper to the back of the marble with my Aleene’s Super Thick Tacky Glue and set it aside to dry. (Not to worry, it dries clear so you’ll be able to see the paper pattern when it dries.) On this one, I used a daisy floral embossed paper that you could clearly see through the marble.
-
Then I painted my tealight flower with brown acrylic paint and let it dry. Glue the marble to the center.

-
Using my Aleene’s Platinum Bond Glass & Bead Adhesive, I glued a butterfly charm to the top of the marble and set it aside to dry. Then, I glued butterfly themed scrapbook paper to my paper towel roll napkin ring, glued my tealight flower to the top and now I have a really cute set of nature themed napkin rings.
-
You can use your flowers for so many more projects – how about framing them in a mini shadow box or adding them to the front of a journal or turn them into canvas art or embellish a box lid or glue them onto wooden skewers for your own style plant picks. I can’t wait to add mine to my mixed media natural collage project underway.
-
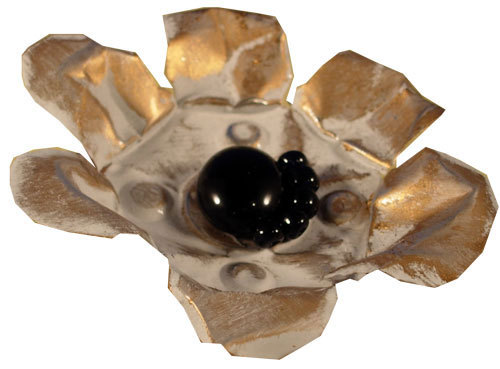
Here’s another look that I made by spray painting the tealight holder with Rust-Oleum Flat White paint and tipping the edges with gold Rub ‘n Buff. For the center, I used a small flat backed black marble and some beads from my jewelry stash.
- I’m quite addicted to making these so I’m sure you’ll see them in other upcoming projects that I’ll be sharing with you! Get Creative! Get Inspired!

Thanks for your comment. Don't forget to share!
happy
Mar 15, 2010
This is such an awesome project! Why couldn't you use another tea light to make the actual ring for the napkin holder instead of the cardboard tube? Wouldn't that be much sturdier?
joni21343
Jan 03, 2010
thanks for the ideas...like you, I use a lot of tea lights and can't stand to throw the containers away. I've been saving them not knowing what to do with them. Thanks again...really appreciate your creativity!
Thenicholas3
Jan 03, 2010
What a great idea, I made some flowers like this last year but covered each petal and the center with seed beads, then attached a pin back. they look great on my jeans jacket!
Report Inappropriate Comment
Are you sure you would like to report this comment? It will be flagged for our moderators to take action.
Thank you for taking the time to improve the content on our site.

![Pill Bottle Crafts: Reuse Pill Bottles [15 Ideas]](http://irepo.primecp.com/2017/06/334076/PILL-BOTTLE-CRAFTS-Header_Category-CategoryPageDefault_ID-2274135.jpg?v=2274135)