This project was submitted by one of our readers, just like you.
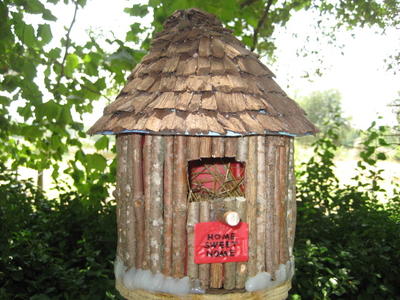
Cheep Coffee Can Birdhouse
How to make a birdhouse out of recycled materials you have in your home.

Cheep Coffee Can Birdhouse
In the Designer's Words: "I was inspired to make a birdhouse because of the hungry birds. The Mama Bird had no place to lay her eggs, except in my flower basket. It's just so wonderful to see many kinds of beautiful birds of different colors. All small birds only are welcome. Sorry, big birds. The coffee can is just small. It’s ready for occupancy, 24/7, free board, lodging, and bath."
While tending to a garden and growing your own veggies or flowers is rewarding, there is just something a little bit more endearing about caring for the animals of your yard. Building a feathered family a home is a great way to give back and commune with nature. This Cheep Coffee Can Birdhouse is cheep to make and perfect for smaller birds to nest in. Plus, if you are looking for a way to teach your kids or grandkids all about nature, this how to make a birdhouse tutorial is perfect.
Estimated Cost$11-$20
Time to CompleteIn an evening
Primary TechniqueGreen Crafting

Project TypeMake a Project
Materials List
- 2 empty Folgers’ coffee container 27.8 oz (big)
- 1 piece plastic placemat
- Many 7-inch dried, straight sticks
- Few 2 ½- inch dried, straight sticks (to be attached above the opening and below the perch)
- Few 3- inch dried, straight sticks (to be attached below the opening)
- Many brown mulch
- Glue gun and many glue sticks
- Silicon sealer
- JB weld
- Ruler
Instructions
-
Cleaning the Coffee Container
Wash the container with soap and rinse thoroughly with warm water. Fill up the container with water. Put 4 tablespoons of baking soda into the container to remove the smell of the coffee. Let it stand overnight. Wash again with soap and rinse thoroughly with warm water. Check if there is still the smell of coffee. If there is, follow the same procedure again as previously mentioned. -
Choosing and Cutting the Sticks
Choose dried, straight sticks from the falling limbs of a tree. Cut them 7 inches long with a manual saw. If the sticks are big, you can cut them into half. In this project, I used all the small sticks, so I don’t need to cut them into half anymore. -
Making an Opening
The area showing “FOLGERS” embedded on the container is where you are going to make an opening for the birdhouse. Save the whole square plastic as you run the knife along the indented lines. Write “Home Sweet Home” on the square plastic and then set aside. -
Hole Drilling
Drill 3 small holes on the sides of container and 5 holes on the bottom using 1/16 drill bit. Drill 3 holes on the center of the cap and 1 hole on the center of the opening using 5/16 drill bit. These holes will provide good air circulation to keep moisture from building up. -
Inserting a Perch and Sticks on the Cap
Insert one 7-inch stick into the hole as a perch. It will be glued later after all the dried sticks are glued on the sides around the container. Insert one 7-inch stick on each hole on the cap. -
Attaching the Dried Sticks
Tie the 3 sticks on the cap with chicken wire to hold them. With a warm glue gun on hand, glue the 3 sticks on the cap and fill up the gaps, too. Attach one 7-inch stick at a time on the side of the container. Attach other sticks around the container until you reach the opening. Attach the 2 ½ -inch sticks above the opening until you fill up the whole area. Attach one 2 ½- inch stick also below the perch. Attach the 3-inch sticks below the opening until you fill up the whole area. Attach one quarter of an inch stick on top of the perch to cover the space. Apply glue on gaps or between sticks that need to be filled up. Apply also glue around the cap to strengthen the hold of the dried sticks to the cap. -
Making of a Roof
To use a compass, set the pointer at 5 ½ measurement to draw 11 x 11 inch round-shaped roof on a plastic placemat. Find the radius of the circle with the use of a ruler. Draw a line and cut through the line up to the center only. Bring both ends together to close the cut, punch a hole, and tie it with a yarn to hold the plastic roof. -
Applying Glue on the Roof
Apply Super Glue on the inside and outside areas of both cut sides of the plastic roof. With warm glue gun on hand, apply glue again on the same areas to strengthen the hold of the shape of the roof. Apply more glue on top of the 3 dried sticks on the cap and then quickly attach the roof on top. Hold for a while to let the glue stick to the roof. Put the plastic roof upside down on another empty coffee container for support. Put the container upside down on top of the plastic roof. With warm glue gun again, apply glue around the plastic roof attaching itself to the container. -
Choosing and Applying the Mulch
Spread out some mulch on top of the newspaper on the table. Choose almost the same size of every mulch that can be glued on the plastic roof, if possible. Start attaching the mulch around the lower end of the plastic roof. Glue each much as closely as possible to cover the plastic roof around until you reach the top level. Glue the signboard, “Home Sweet Home,” below the perch. -
Making a Birdhouse Stand
Cut a pipe measuring 7 feet and stick it on the ground. Make a round-shape wood and drill a hole in the center using 1 ¼ wood drill bit. Insert the center of the wood into the pipe and glue it with JB weld. Arrange the birdhouse on top of the wood and apply silicon sealer around it. Insert some hay inside.
Why You'll Love This Recycled Craft
1. Affordable: The Cheep Coffee Can Birdhouse is an inexpensive craft project that can be made with materials you likely already have at home. By upcycling an old coffee can, you can create a cozy home for small birds without breaking the bank.
2. Eco-friendly: By repurposing a coffee can into a birdhouse, you are not only providing a safe haven for local birds, but you are also reducing waste and contributing to a more sustainable environment. It's a great way to recycle materials and give back to nature in a creative way.
3. Educational: This craft project is a wonderful way to teach children about the importance of caring for our feathered friends and the beauty of nature. By involving kids in the process of making the birdhouse, they can learn about bird habitats, nesting habits, and the joy of birdwatching. It's a fun and educational activity that the whole family can enjoy together.
Up Next:

![Pill Bottle Crafts: Reuse Pill Bottles [15 Ideas]](http://irepo.primecp.com/2017/06/334076/PILL-BOTTLE-CRAFTS-Header_Category-CategoryPageDefault_ID-2274135.jpg?v=2274135)