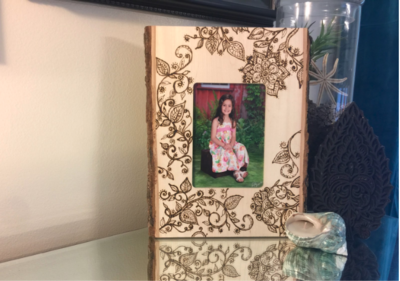
Boho DIY Picture Frame
Add a bohemian touch to your home with this wood burning project!

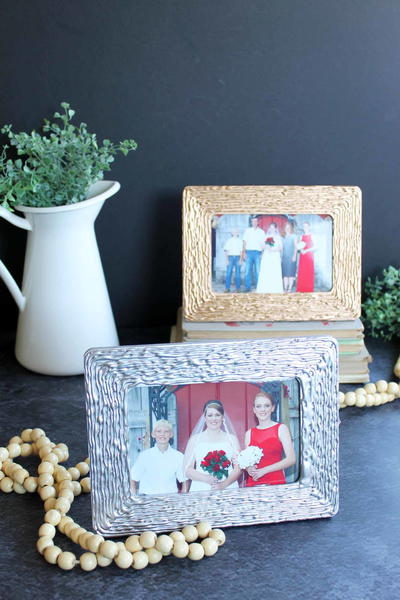
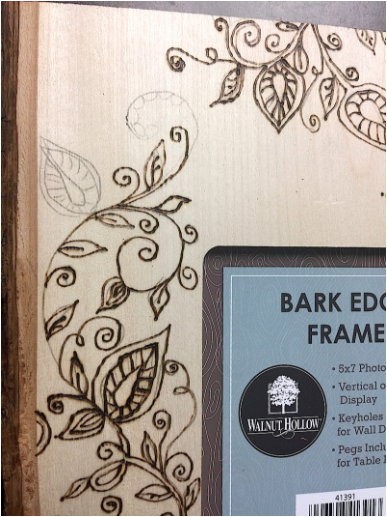
Create unique home decor when you craft this Boho DIY Picture Frame! Using a wood burning tool and a bark edged picture frame, you can craft this beautiful frame for your favorite family picture. Although wood burning might seem hard, don't feel intimidated! This tutorial is so easy to follow that you'll seem like an expert. Once you've finished making this picture frame, you can place it on your dresser, hang it in your living room, or gift it to a friend. And it'll certainly stand out against all of your home decor.
Time to CompleteIn an evening
MaterialsWood
Primary TechniqueWood Crafts

Project TypeMake a Project
Materials List
- Wood burning tools like the Walnut Hollow Versa Tool and Creative Wood Burner
- Wood slices, slabs, shapes, boxes, containers
- Carbon Tracing paper
- Pencil
- Tape (to hold the tracing paper in place)
- Command strips (if you are going to hang your frame)
- Additional wood burning tips, alphabets hotstamps, and numbers hotstamps
- Pliers (to change tips when hot)
- Container for hot tips
Instructions:
Prepping for Wood Burning
-
To become acquainted with how the different points feel on the wood and what you can do with them, practice on some scraps. Wood craft sticks work great for practice. Below are some samples of the different ways you can use each tip. There are many more wood burning patterns you can create with the tips.
-
When working on wood burning, go slow. You can always layer to create the depth. The shading point creates smooth, even shading in subtle gradations or dark and bold shading. Use different pressure, speed and movement for contrasting looks. Leaf shapes are easy to stamp using the shape of the point. Use the cone point to burn fine lines, dots, and curves.

Making Boho DIY Picture Frame
Note: If you see smoke during your project, you are likely burning at a temperature that's too high. If your tip gets too hot, turn it off for a minute or two, and let it cool down. Turn it on to resume your project.
-
Clear your work area, and make sure you have plenty of space. Wear an apron and long sleeves when using a wood burning tool for extra precaution.
-
Make sure your wood surface is smooth and free from debris. The bark edge frame used should come smooth, clean, and ready to go.
-
If you do not like to draw, download a bohemian pattern from the internet. Trace it onto the face of the frame using carbon tracing paper and a pencil.
-
Continue to add designs until you are satisfied. Add more details if necessary.
-
Start by lightly pressing your wood burning tool into the wood on the back side to see if the tool is ready and to test how hard the wood is. No one will see the back of the frame, so it is okay to make a small test burn. Start with the flow tip.
-
Start drawing on the pattern lightly and change tips as needed. Use pliers to change the tips, for they remain hot for a very long time. Use a melt-proof container to hold hot tips.
-
After you've gone over your entire design, take a look at where you might want to go over the lines again. You might want to add more details or thicken the lines.


If you'd like to learn more about wood burning, check out this tutorial on how to use different tips to create patterns on wooden spoons. And if you'd like to get a head start on your holiday gift giving, try making wood burned gift tags to go on this Ultimate Veggie Soup Mix!
What patterns will you be burning onto your picture frame?
Let us know in the comments below!
Read NextEasy Decoupage Frames