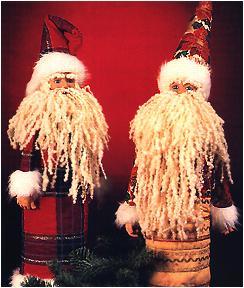
Santa Claus Bottle Cover
Disguise a wine bottle under a festive Santa Claus cover for a hostess gift or Christmas decoration. This fun Christmas sewing project from Sulky of America can use any bottle for a study base.

Materials:
- Zig-zag Sewing Machine
- Sulky Decorative Thread
- Sulky Heat-Away Stabilizer
- Fabric - Amt. depends on bottle
- 1/4 yd. Poly-fil Low Loft Batting
- Iron and Pressing Pad & Cloth
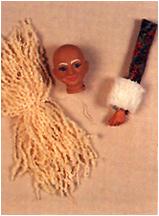
- Santa Head & Hands
- A Ball of Bumpy Natural Yarn
- 1/8 yd. Fake Fur 60" wide to trim Hat, Gown and Sleeves
- String, Safety Pin or Bodkin
- Vanishing or Chalk Marker
- Hot Glue Gun and Glue Sticks or E-6000 glue
- 1 Qt. or Liter Beverage Bottle
Instructions:
- Measure the circumference of the bottle; add 1" for seam allowance and ease. Measure the height to the top of the cap; add 2" so you can make a casing at the top and a hem at the bottom. Trim fabric to size. Also cut small rectangles of fabric for the sleeves approximately 3" x 6" depending on the height of the bottle. Sleeves, with hands attached, should be approximately half the height of the bottle.
- For sample #2 place the Sulky Heat-Away Stabilizer to the wrong side of the gown fabric. Using a chalk or vanishing marker, draw parallel spaced lines to use as stitching guides. Stitch rows of decorative stitching using a twin needle. Try centering one of the large Christmas decorative design patterns available on many top model electronic machines. For a brilliantly glittery look, use Sulky Sliver Metallic, or if you prefer a more filled-in, shiny look, use the heavier Sulky 30 wt. Rayon.
- To softly quilt a Christmas Print, set up the machine for Free-Motion Embroidery: Lower feed dogs or cover them. Lower top tension slightly. Remove the regular presser foot and replace it with a darning foot or darning spring. Reduce the top presser foot pressure, if your machine can be adjusted. Thread top with Sulky Sliver or Sulky Original Metallic; use an Embroidery Needle size 14/90.
- Thread bobbin with a matching color of 40 wt. Sulky Rayon or regular sewing thread to match the background fabric color. Set the machine for a straight stitch. Layer your Fabric (in this example): bottom Layer Ð muslin, middle layer - low loft batting, top layer Ð Poinsettia Print (right side up). Place the fabric in a large machine embroidery hoop with the muslin layer flat against the bed of the machine. This will ease the stress of holding the fabric smooth with just your hands. If a hoop is not available, simply pin layers together at corners and move the fabric slowly while running the machine at an even, moderate speed. Follow the outline of the print.
- Sample #1: If you elect to use a plaid, to embellish, simply keep machine set up for regular sewing and select a decorative stitch like the icicle stitch, feather stitch or multi-straight stitch used above. The lines that make up the plaid serve as perfect guide lines for stitching.
- Once the decorative stitches are completed, remove the Heat-Away Stabilizer by simply pressing with a dry iron at a Cotton Setting for 10 seconds (see package instructions). When stabilizer turns brown, just brush it away. This way you did not exert any stress against your decorative stitches while removing the stabilizer, and delicate straight stitches were not pulled out.
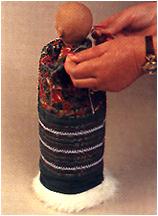
- If you used two different fabrics, sew them together. Add fake fur to bottom of gown. Cut a strip 4" by width needed for your bottle. Fold strip in half lengthwise, place raw edge to raw edge of gown and stitch together. Sew sleeves and turn to right side (finished sleeve should be approximately 1 1/2" wide). Place hand inside bottom of sleeve with thumb up and hot glue it on. Hot glue strip of fake fur (1 1/2" wide) around wrist. Repeat for other hand.
- Make a casing at other end of gown. Thread string through casing. Place over bottle. Tie and knot string to Santa's Head along the neck ridge. Bundle a generous length of bumpy natural yarn (or whatever yarn you prefer) and tie a knot in center with string. Tie securely around Santa's neck. Take a few strands of yarn and glue them under Santa's nose. If desired, glue one small cut piece over each eyebrow.
- The hat is a 10 1/2" equilateral triangle cut from quilted poinsettia fabric. Finish your Santa by sewing the right sides of the hat together. Turn out. Glue to head. Glue a band of fake fur approximately 1 1/2" wide around raw edge of hat. If desired, add a few strands of yarn along forehead next to hat brim. Note: In selecting your bottle of beverage for the party, dinner or gift, the 1 QT. plastic soft drink bottles are always an appropriate selection. ENJOY!
Sources:
Santas Head & Hands:
DBD Enterprises
Designs By Diane
110 W. Hwy. 174
Republic, MO 65738
Phone : 417-732-9030
Website : www.diandolls.com
Email : dian@diandolls.com
Santas Beard & Hair Yarn:
#50047 Bumpy 1 oz. Natural
Fiber Mosaics, Inc.
6855 W. Clearwater #K
Kennewick, WA 99336
Phone : 509-735-1463
TOLL FREE Phone orders only : 1-888-735-1462
Fax : 509-735-1472
Website : www.fibermosaics.com
Email : fibermosa@aol.com
This collection of 11 Ways to Learn How to Wrap Wine Bottles includes more Christmas wine bottle crafts as well as bottle cozies that would be perfect for a Thanksgiving hostess gift.
Read NextFabric Advent Calendar
Your Recently Viewed Projects

Thanks for your comment. Don't forget to share!
mulberrygalprinces s
Oct 10, 2018
These are the cutest things. I go into a kid more at Christmas I love everything about it. The feeling, the decorations, seeing friends, surprising friends and family with gifts. These will go in my other to greet friends and family. Put some batting around them so they look like they are standing in snow.
melaniekoekemoer 1 607310
Dec 09, 2016
What a great Christmas decoration idea. I have pinned this. A definitive project for the new year.
Weberme
Oct 13, 2016
These cute Santa cover bottles are so cute to use as a centerpiece on the table or side table to decorate for Christmas or take to the office and put on your desk and see how many people stop by and say how great these Santas look.Or you could make one for your child's class desk. They are so much more attractive than the store bought ones.A great girl's day project.So I know you have plenty empty bottles on hand. So what are you waiting for grab the rest of the items and let's make some.
Patty Biehler
Aug 13, 2011
You can do the same thing as well with a ghost one or bunnies. The imagination is the key to crafting. .
MtNana
Aug 12, 2011
I love these and can't wait to make a couple soon..will be great .. thanks..Christmas is my season...
catnaps 7028372
Aug 12, 2011
Creeped out by Santa? No, I don't find this creepy at all. Rather cute. I don't think I'd make it, but I still find it charming. Not sure about putting it on a bottle of wine. I always associate Santa with kids. Santa and wine don't really go together. Maybe a bottle of something the whole family could enjoy, or something specifically for kids - a fancy soda, or a sparkling pear or apple drink. Or fill it with candy. Could simply put it on an empty bottle as a decoration in itself.
Crafty Suz
Aug 12, 2011
This is cute. You could fill an empty plastic bottle with sand to use this as a holiday doorstopper.
Crafter 2681358
Jul 12, 2010
I love this craft. easy to store until next year unlike my other Xmas deco.
Report Inappropriate Comment
Are you sure you would like to report this comment? It will be flagged for our moderators to take action.
Thank you for taking the time to improve the content on our site.