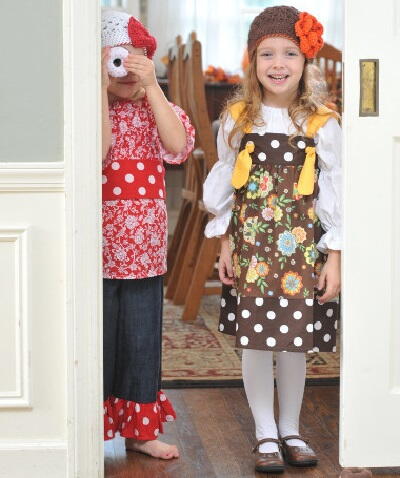
Thanksgiving Dress
Having the perfect Thanksgiving dress isn't always easy to find, but now you can make one for the little girl in your life. Sew a beautiful brown polka dot and flower patterned dress for the special holiday. This free sewing pattern is quite simple to bring to life, and your daughter will love how cute it looks on her. If you need a great dress that falls somewhere between fancy and casual, this is just the right dress to create. Put a smile on her face this holiday with a lovely hand-sewn dress.

Materials:
You will need 3 Coordinating Fabrics:
For the bodice, cut two of the following:
| Length | Width | |
| 6-12m | 38 | 3 |
| 18-24m | 40 | 3 |
| 2t-3t | 42 | 3.5 |
| 4-5 | 44 | 3.5 |
For the Dress, cut one (1) of the following:
| Length | Width | Gather To | |
| 6-12m | 12 | 40 | 17.5" |
| 18-24m | 15 | 41 | 19" |
| 2t-3t | 17.5 | 42 | 20.5" |
| 4-5 | 19.5 | 54 | 23.5" |
For the Straps, cut (4):
| 6-12m, 18-24m | 2" x 16" |
| 2t-3t, 4-5 | 2" x 18" |
Instructions:
Straps
- Take the 4 small strips to make your straps.
- Lay one strip on top of another with right sides facing each other.
- Pin and cut the ends how you wish to have your straps look like.
- You can either cut them round or diagonally or leave them as they are.
- I cut them round for this project.
- Sew three sides with a seam allowance of about ¼ inch and leave the bottom end open. Turn right side out, press.
Bodice
- Take your two long strips and lay them with right sides together and mark the center with a marker or pin. Now find the width that the skirt part has to be gathered to on your SIZING CHART. Fore example; if you are making a size 2t, you need an opening of 20.5”. From the center count 10 1/4” to the right pin it, and 10 ¼ in. to the left, pin it.
- You will now have three pins, sew around the bodice strip leaving the opening space of 20.5” (for the size 2t dress).
- Turn right side out, press.
Buttonholes
- Spacing for the buttonholes: 6-24m – 5.5”, 2t-3t – 6”, 4-5 – 6.5”
- With the center marked, Our example of size 2t, count 3” to the right, go 1” down, pin, From the center count 3” to the left, go down 1”, pin. Your buttonhole should have an opening of 1 ½”. Cut open with seam ripper.
For the Dress
- Starting with short side fold in ¼”, press, fold again ¼” press, straight stitch, do the same for the bottom of dress, finish other side in same manner.( If you would like to add a coordinating ruffle or border do this now.)
- To gather the top of the dress, set machine for basting stitch and stitch on right side of fabric, about ¼” from the edge. Sew another line ¼” under the first row, (This keeps your gathers nice and straight!)
- Gather to width size according to the size chart.
Attach the bodice to the dress
- Find the center of your ruffled dress, pin.
- Find the center of the opening part of the bodice, pin.
- Now, you are going to attach the dress to what will be the “inner” Piece of the bodice.
- Lay the dress right side up, lay the bodice (upside down) on top of the gathered dress pin to one layer of the bodice.
- Straight stitch across the entire length of the opening. Press. The inside should look finished.
- Now, press the front opening of the bodice down, and top stitch the bodice closed.
Attach the straps
- Turn your dress around so you are looking at the inside. Measure in 1” on the bodice from the edge of where the dress ends. Have your child close by and pin first to adjust ( My daughter hates this part ) You can adjust this according to your child’s size.
- Fold in the unfinished end of your strap. Top stitch onto top edge of the inside of your bodice where you have marked.
- Repeat for other side.
- Tie the ends of the bodice in a knot. Feed straps through the buttonholes. Tie knot.
- You're Finished! This looks great with a peasant top under and a pair of jeans or tights.
If you're having the family over this year or just looking for simple homemade Thanksgiving crafts to decorate your home and dining table with, these 12 Homemade Thanksgiving Crafts for Your Turkey Day will help you create the perfect setting.
Read NextPatriotic Cloth Napkins
Your Recently Viewed Projects


Thanks for your comment. Don't forget to share!
Marilyn B
Nov 04, 2017
Such a cute pattern! I have made a similar one twice and modified the top,bodice by adding straps and the top,out of fabric that are longer and can be adjusted in length and size by where you make the knot or bow! I added a flower made by overlapping two yo yos, one on the bottom slightly bigger and centering it with a pretty button!
tileader 5997711
Nov 17, 2013
I have made this dress twice now and it comes out beautifully and is not too difficult However as many of the comment have noted the directions are missing some steps Mainly that the bodice does end up with extra material There are solutions that I see measure the child properly cut the bodice smaller to fit and sew up the back of the bodice leave the bodice to length of instructions do not sew up the bodice instead tie it or press into a pretty fold and leave open This gives you wiggle room if you are not comfortable Measuring like me and growing room for later make the bodice even longer maybe double and that will give you enough to tie it into a bow in the back Other things I noticed the dress length is VERY long and does not include the extra piece at the bottom so…Read More you need to change your measurements accordingly they leave the bodice open at the bottom for the width of the dress I did it this way the first time but was annoyed by the extra finishing step I had to do at the end as well as the itchy finish it leaves behind If you sew all the way around and just leave a small hole to pull the material through it is a much simpler way to finish your seam When you have attached the dress you can pres the bodice edge over the top of the gathered material and that makes a smoother less itchy finish for your girls Enjoy
jcarlisle590 45507 71
Apr 23, 2013
I don't understand the cutting directions. Is something printed wrongwith them
ericksonirene 5960 075
Oct 27, 2012
I'm going to try making this as it's very cute. However the fabric dimensions seem wrong (bodice is 44" but the main body is gathered to 23.5"?) 44" ungathered would be HUGE for a size 4-5. The instructions also don't show how much material to use to make a border. I assume I have to adjust the main body to allow for a border. Finally, there is nothing on how to close the seams. I assume one seam just down the back?
ctcreateforLife 46 80700
Jul 01, 2012
I love the look of the cute dress but i love the hat annnd the adorable flower/do you have the pattern in all free crochet,if could you direct me to it ? Thanks for all your patterns! Its soooo cool to get patterns at your fingertips&start a new project right away woolaaa !!! Thanks ctcreateforlife Please direct me to the hat pattern...
pryces 4243452
Oct 26, 2011
I agree with Crafter 20416 i would like the pattern to the hat to go with it.
Crafter 20416
Oct 25, 2011
I would love the pattern for the hat with the big flower on the side..
Gramma3
Sep 09, 2010
OK - how does the bodice of this dress close in the back???? Are you just supposed to tie the ends?
jlburnett
Sep 02, 2010
On the section entitled "Attach the straps, Item No. 4", it says "tie the ends of the BODICE in a knot". Did you mean to say "tie the ends of the STRAPS in a knot"? I'm confused.
chacha
Mar 04, 2010
i didnt qiuite understand the instructions for the bodice it seemed i ended up with to much fabric at that spot.need help in this placement, thanks
chacha
Feb 28, 2010
i found that there was to much fabric .on the top for the bodice where did i go wroug . can i just cut the exess off.!!!!!PLEASE HELP.THANKS
Report Inappropriate Comment
Are you sure you would like to report this comment? It will be flagged for our moderators to take action.
Thank you for taking the time to improve the content on our site.