This project was submitted by one of our readers, just like you.
Flower Fairies

Flower Fairies
From the Designer: "Growing up in England, it wasn't unusual for children to believe in fairies. We looked for fairy rings on walks through the woods and placed gnomes in our flower gardens to protect them. You may have heard the story about the sisters who photographed fairies in Cottingley woods. They took such convincing photographs, that even Sir Arthur Conan Doyle started to believe in their existence. My earliest childhood crafting memories involved making flower fairies from my dad's pipe cleaners and flowers from mum's garden... The supplies have changed a lot over the years, but my love of creating flower fairies continues."
Primary TechniqueFlorals/Wreaths

Project TypeMake a Project
Materials List
- Xyron® - Creative Station and double sided laminate cartridge
- Marvy® Uchida - DecoColor® Premium Fine Tip Silver; DecoColor® Opaque Paint Fine Tip Ultramarine and Pink Bistro Chalk markers
- Plaid® - Folk Art™ Glitterific paint, Unicorn
- Deflecto® - Acrylic frame, 8" x 10" (to feature the magazine cover in the photo)
- Silk floral bush
- Grey moss for hair
- Smoothfoam™ 1" Ball & 1" Raindrop/egg shape
- Flat paint brush - small fabric (stiff white nylon)
- Wire cutters
- Clear, holographic gift wrap film (cellophane)
- Scissors
- Paper Trimmer
- Lo-temp glue gun & clear glue sticks
- Cotton swab
- Ball head quilt pins (optional)
Instructions
-
Unfold the clear gift wrap and cut one piece about 4" x 8" from one sheet. The sheets tend to cling together so separate carefully then laminate the cut piece. The material is very thin and delicate so work slowly as you laminate.
-
Wings: Draw a simple leaf pattern, about 2" x 1" onto a piece of white paper then place the laminated sheet on top. Trace 4 leaf designs onto the sheet with the silver marker. Add a straight line down the center, and 2 or 3 small lines at angles from the center line toward the edge for veins. Set aside for a few minutes to dry. Note: Laminating this delicate film makes it possible to use for fairy, butterfly, dragonfly wings, raindrops, snowflakes and more! You'll love the way it catches the light.
-
Cut around each leaf shape then paint the edges with Glitterific as follows: Dip the brush into the paint then gently "scrape", or tap the paint onto the edge of the leaf by pulling the brush down across the edge. Let dry then enjoy how it shimmers and sparkles.
-
Head: Push the 1" ball onto the end of a stylus, paint brush handle or toothpick to use as a handle. Scribble pink marker onto a scrap piece of laminate, then dip the cotton swab into the paint. Pounce up and down onto a paper towel to remove excess color then press onto the front of the ball to create 2 pink dots for cheeks. Use lightly at first. It's easier to add more color than it is to remove it if the dots are too dark. Use the tip of the blue marker to make tiny dots for eyes.
-
Spread lo-temp glue over the top and back of the head then dip quickly into the bag of grey moss. Press the moss firmly onto the head. Your fairy will now have a very bad case of bed head, so trim with scissors.
-
Remove the flower head from its stem and separate the layers. Set the stem aside to use for the arms.
-
Body: Spread lo-temp glue around the top half of the raindrop shape then, with the center of one of the large flower layers aligned with the top of the raindrop shape, press in place. Add additional flower layers as needed.
-
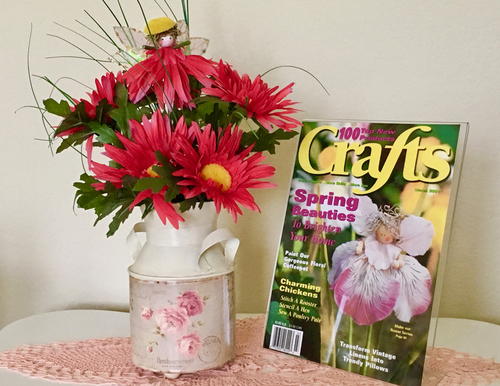
To make the arms, cut 3" from the flower stem. Bend at the center then glue at the top of the body. Glue the smallest flower layer over the top of the arms to cover and create a bodice, then glue the head in place on top. For added security, push a long quilt pin down thru the top of the head into the body. Glue a small flower on top of the hair if desired, or, as shown in the project photo, glue the yellow flower center to the top of the head for a small hat.
-
Glue 2 of the wings to the back of the body, then use a shorter quilt pin to glue the additional wings in place. By using a pin, you can adjust these wings as needed.
-
Glue the remaining piece of the flower stem into the base of the body to finish, then hide her amongst the flowers in the floral bush.
NotesThe Prime Networking Event held in conjunction with the annual Arts & Crafts trade show, is a wonderful opportunity for bloggers & designers to learn about new products and to receive samples to work with. The contest is the icing on the cake, but even without the incentive to create, everyone who is invited to attend leaves as a winner!

Read NextSimple Summer Centerpiece

Thanks for your comment. Don't forget to share!
Report Inappropriate Comment
Are you sure you would like to report this comment? It will be flagged for our moderators to take action.
Thank you for taking the time to improve the content on our site.