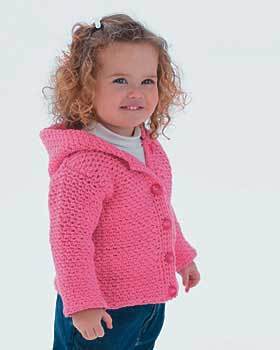
Adorable Toddler Crochet Pattern
This adorable toddler crochet pattern from Bernat Yarns is made with a hood and a button closure. Crochet this great pattern for her birthday, it's perfect for little girls.

SIZES
Chest measurement
6 mos 17 ins [43 cm ]
12 mos 19 ins [48 cm ]
18 mos 21 ins [53.5 cm ]
2 yrs 21½ ins [54.5 cm ]
Finished chest
6 mos 21 ins [53.5 cm ]
12 mos 23 ins [58.5 cm ]
18 mos 25 ins [63.5 cm ]
2 yrs 27 ins [68.5 cm ]
MATERIALS
- Bernat Cottontots (100 g/3.5 oz)
- Sizes 6 mos–3 balls; 12 mos–3 balls; 18 mos–4 balls; 2 yrs–5 balls
Size 5.5 mm (U.S. I or 9) crochet hook or size needed to obtain gauge. 5 buttons.
GAUGE
15 sts and 14 rows = 4 ins [10 cm] in pat.
INSTRUCTIONS
The instructions are written for smallest size. If changes are necessary for larger sizes the instructions will be written thus ( ).
BACK
Ch 40 (44-48-52).
Foundation row: (RS). 1 sc in 2nd ch from hook. *Ch 1. Miss next ch. 1 sc in next ch. Rep from * to end of ch. Ch 1. Turn. 39 (43-47-51) sts. 1st row: 1 sc in first sc. 1 sc in next ch 1 sp. *Ch 1. Miss next sc. 1 sc in next ch 1 sp. Rep from * to last sc. 1 sc in last sc. Ch 1. Turn. 2nd row: 1 sc in first sc. *Ch 1. Miss next sc. 1 sc in next ch 1 sp. Rep from * to last 2 sc. Ch 1. Miss next sc. 1 sc in last sc. Ch 1. Turn. Last 2 rows form pat.
Cont in pat until work from beg measures 6½ (7-7¾-8½) ins [16.5 (18-19.5-21.5) cm], ending with RS facing and omitting turning ch at end of last row.
Shape armholes: Next row: Sl st in each of first 4 sts. Ch 1. Pat to last 4 sts. Ch 1. Turn. Leave rem sts unworked. 31 (35-39-43) sts. Cont even in pat until armhole measures 4½ (5-5¼-5½) ins [11.5 (12.5-13-14) cm], ending with RS facing and omitting turning ch at end of last row. Fasten off.
LEFT FRONT: **Ch 20 (22-24-26).
Foundation row: (RS). 1 sc in 2nd ch from hook. *Ch 1. Miss next ch. 1 sc in next ch. Rep from * to end of ch. Ch 1. Turn. 19 (21-23-25) sts. Proceed in pat as given for Back until work from beg measures 6½ (7-7¾-8½) ins [16.5 (18-19.5-21.5) cm], ending with RS facing and omitting turning ch at end of last row.**
Shape armhole: Next row: Sl st in each of first 4 sts. Ch 1. Pat to end of row. 15 (17-19-21) sts. Cont even in pat until armhole measures 2½ (3-3¼-3½) ins [6 (7.5-8-9) cm], ending with RS facing for next row.
Neck shaping: 1st row: Pat to last 3 (3-4-4) sts. Ch 1. Turn. Leave rem sts unworked. 2nd row: Draw up a loop in each of first 2 sts. Yoh and draw through all 3 loops on hook -sc2tog made. Pat to end of row. Ch 1. Turn. 3rd row: Pat to last 2 sts. Sc2tog over last 2 sts. Ch 1. Turn.
Rep 2nd row once more. 9 (11-12-14) sts.
Cont even in pat until work from beg measures same length as Back to shoulders, ending with RS facing for next row and omitting turning ch at end of last row. Fasten off.
RIGHT FRONT: Work from ** to ** as given for Left Front but do not omit turning ch at end of last row.
Shape armhole: Next row: Pat to last 4 sts. Ch 1. Turn. Leave rem sts unworked. 15 (17-19-21) sts.
Cont even in pat until armhole measures 2½ (3-3¼-3½) ins [6 (7.5-8-9) cm], ending with RS facing and omitting turning ch at end of last row.
Neck shaping: 1st row: Sl st in each of first 3 (3-4-4) sts. Ch 1. Pat to end of row.
2nd row: Pat to last 2 sts. Sc2tog over last 2 sts. Ch 1. Turn. 3rd row: Sc2tog over first 2 sts. Pat to end of row. Ch 1. Turn.
Rep 2nd row once more. 9 (11-12-14) sts.
Cont even in pat until work from beg measures same length as Back to shoulders, ending with RS facing and omitting turning ch at end of last row. Fasten off.
SLEEVES: Ch 28 (30-30-30).
Foundation row: (RS). 1 sc in 2nd ch from hook. *Ch 1. Miss next ch. 1 sc in next ch. Rep from * to end of ch. Ch 1. Turn. 27 (29-29-29) sts.
Proceed in pat as given for Back for 3 rows.
Next row: (RS. Increase row). 2 sc in first st. Pat to last st. 2 sc in last st. Ch 1. Turn. Work a further 3 rows even in pat. Rep last 4 rows 2 (3-4-5) times more, taking inc sts into pat. 33 (37-39-41) sts.
Cont even in pat until work from beg measures 6 (7½-8-9) ins [15 (19-20.5-23) cm]. Place a marker at each end of last row. Work a further 4 rows even in pat omitting turning ch at end of last row. Fasten off.
HOOD: Ch 76 (78-80-82).
Foundation row: (RS). 1 sc in 2nd ch from hook. *Ch 1. Miss next ch. 1 sc in next ch. Rep from * to end of ch. Ch 1. Turn. 75 (77-79-81) sts. Proceed in pat as given for Back for 3 rows.
Next row: (RS). Sc2tog over first 2 sts. Pat to last 2 sts. Sc2tog over last 2 sts. Ch 1. Turn.
Next row: Work even in pat.
Rep last 2 rows to 59 (61-63-65) sts.
Cont even in pat until work from beg measures 6¼ (6¾-7-7¼) ins [16 (17-18-18.5) cm], ending with RS facing and omitting turning ch at end of last row.
Shape back seam: Next 6 rows: Sl st in each of first 3 sts. Pat to last 3 sts. Turn. Leave rem sts unworked.
23 (25-27-29) sts rem. Fasten off.
FINISHING: Pin garment pieces to measurements and cover with a damp cloth and allow cloth to dry.
Buttonhole Band: 1st row: With RS of Right Front facing for Her or Left Front facing for Him, work 30 (34-38-46) sc evenly along between neck edge and lower edge. Ch 1. Turn.
2nd row: 1 sc in each sc across. Ch 1. Turn.
3rd row: 1 sc in each of first 2 sc. *Ch 2. Miss next 2 sc. 1 sc in each of next 4 (5-6-7) sc. Rep from * 3 times more. Ch 2. Miss next 2 sc. 1 sc in each of last 2 sc. Ch 1. Turn.
4th row: 1 sc in each of first 2 sc. *2 sc in next ch 2 sp. 1 sc in each of next 4 (5-6-7) sc. Rep from * 3 times more. 2 sc in next ch 2 sp. 1 sc in each of last 2 sc. Ch 1. Turn.
5th row: 1 sc in each sc across. Fasten off.
Button Band: Work as given for Buttonhole Band on Left Front for Her or Right Front for Him, omitting all reference to buttonholes.
Sew shoulder seams. Fold Hood in half along back seam edge and sew center back seam. Pin shaped edge of Hood to neck opening, beg at center of button or buttonhole bands and matching back seam of Hood to center back neck edge. Sew in Sleeves placing rows above markers along armhole edges of Fronts and Back to form square armholes. Sew side and sleeve seams. Sew buttons to correspond to buttonholes.
Your Recently Viewed Projects
Thanks for your comment. Don't forget to share!
elenaks 8194848
Sep 18, 2016
So far one the worst pattern I have ever tried....doesnt match any part when start to sew everything together.....had to redo it on my own.....waste of time
Member 6682922
May 23, 2015
for the sleeve where it says Next row (RS. Increase row). 2 sc in first st. Pat to last st. 2 sc in last st. Ch 1. Turn. Work a further 3 rows even in pat. Rep last 4 rows 2 (3 does that mean i have to do 2sc for all 4 rows 3 times ? please help im stuck
sabrams2009 276959 8
Dec 23, 2014
Row 2 makes the number of stitches per row less and pulls the row making it uneven. Is this right or are there sc's missing?
teenpower87
Jul 29, 2013
Please help clarify this pattern more. "Shape back seam: Next 6 rows: Sl st in each of first 3 sts. Pat to last 3 sts. Turn. Leave rem sts unworked. 23 (25-27-29) sts rem. Fasten off." How on Earth am I supposed to get from 65 sts to only 29? If my math is right, even taking away 6 each row for 6 rows, I'd have 47... is there a typo here? It also looks really bizarre... help?
rissaroo1234 80610 22
Jun 13, 2013
Hey can someone please clarify this line for me? Because I'm really confused and I'm not sure what it wants me to do ;; "Fold Hood in half along back seam edge and sew center back seam. Pin shaped edge of Hood to neck opening, beg at center of button or buttonhole bands and matching back seam of Hood to center back neck edge." I wish this pattern came with a bunch more photos! Patterns with photos are always so much easier to fallow! =)
Minny
Mar 14, 2013
I wish there were more patterns for little boys. Most of the patterns are for little girls. I have 2 gr grandsons ..one is 5 & the other is almost a year old. I have trouble finding patterns for boys.
pc PEP 2784865
Apr 23, 2013
Minny, could you use blue, brown or brown ombre and switch the button hole to the other side for boys? Just a thought. Yes, it is hard to find little boy type projects so I do just change things around. Seems to work. Good luck. Priscilla
cchottel
Jan 22, 2011
I have made many different patterns through the years, but this is my absolute favorite! I have made it twice in the past couple of weeks. Takes me about 6 evenings. Added novelty-style buttons. My daughter-in-law said that she is constantly getting compliments when my granddaughter wears them. I made the 12 mos. size.
cjw1020 6936403
Nov 10, 2010
I just learned how to crochet and this is my first project. Can anyone tell me what the abbreviation "sp" means? And how do I do it?
erindumont59 71571 14
Jun 07, 2012
"sp" means space. It would be helpful for you to go to any of many tutorial sites which demonstrate basic stitches and which explain pattern abbreviations and symbols. You'll be making this and other patterns in no time!
dwouster 8104665
Jan 13, 2013
I also still after many years o crocheting fnd m mind forgetting. So I go to YouTub ad hevideos from many different people help me step by step, even with things I didn't know.
CassandFay
Feb 21, 2010
This is so cute. I'm going to make this for my niece. Thanks for the pattern.
Report Inappropriate Comment
Are you sure you would like to report this comment? It will be flagged for our moderators to take action.
Thank you for taking the time to improve the content on our site.