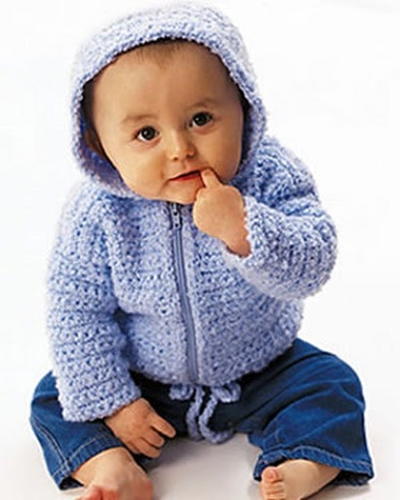
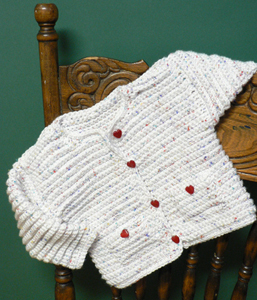
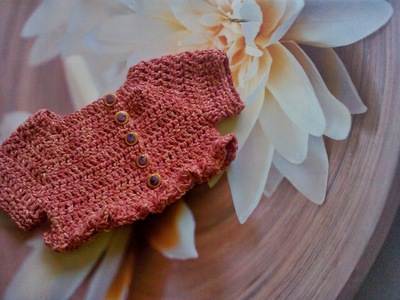
Tweed Baby Jacket
Keep your little guy snug and warm in this Tweed Baby Jacket. The easy crochet pattern is free, so buy a couple skeins of yarn and devote an afternoon to this cute jacket and you'll have a great baby gift.
Materials:
- Caron International's Simply Soft Tweed (98% Acrylic, 2% Rayon; 3 oz/85 g, 159 yds, 145 m) #2601 White, 3 (3, 4) balls
- Crochet hook US H/8 (5 mm), or size to obtain gauge
- Crochet hook US G/6 (4 mm) for edging
- Split-ring stitch markers
- Tapestry needle (tn)
- 6 5/8” Buttons
Sizes:
Small (Medium, Large) To fit: 6-9 (12, 18-24) months
Finished Measurements:
Chest/Bust 23 (25, 27)", buttoned
Length 11 (12, 13)"
Gauge:
In Stitch pattern (sc-tbl), using larger hook, 15 sts = 4"/10 cm
Special Terms:
Dec: [Yo, pull up a loop in next st] twice, yo and draw through all loops on hook, (1 st decreased).
Stitches Used:
Chain (ch) Single crochet through the back loop (sc-tbl)
Instructions:
NOTE:
1. Jacket is worked in one piece to underarms, then Fronts and Back are worked separately to shoulder.
2. Stitch pattern (sc-tbl), looks the same on both sides; place a marker at beg of Row 2 to designate RS.
HELPFUL HINT: Make Pocket first to check gauge; piece should measure 3" wide by 2 1/2" long.
POCKETS (make 2): Using larger hook, chain 12.
Row 1: Beginning in second ch from hook, sc in second ch and in each ch across; turn—11 sc.
Rows 2 – 10: Ch 1, working in back loop only, sc in each st across; turn. Fasten off.
BODY
Using larger hook, chain 87 (95, 103).
Row 1: Beginning in second ch from hook, sc in second ch and in each ch across; turn—86 (94, 102) sc.
Row 2: Ch 1, working in back loop only, sc in each st across, turn. Work even, repeating Row 2, until piece measures 5 1/2 (6, 6 1/2)" from the beginning, end with a WS row.
RIGHT FRONT
Dividing Row –(RS) Ch 1, sc-tbl across 21 (23, 25) sts; turn.
Next Row: Ch 1, sc-tbl in each st across; turn. Working on 21 (23, 25) sts of right Front only, work even until piece measures 3 1/2 (4, 4 1/2)" from Dividing Row, end with a RS row (at armhole edge).
Shape Neck: (WS) Cont in sc-tbl as est, ch 1, work 13 (14, 15) sts, dec; turn—14 (15, 16) sts remain. At neck edge, dec 1 st every row 4 times more, working armhole edge even—10 (11, 12) sts for shoulder. Work even on remaining sts until piece measures 2" from beginning of neck shaping. Fasten off—armhole measures 5 1/2 (6, 6 1/2)" from dividing row.
BACK
(RS) Skip 1 st for underarm, join yarn in next st with a slip st; ch 1, beginning in next st, work in sc-tbl across 40 (44, 48) sts; turn—23 (25, 27) sts remain unworked; 2 for underarm and 21 (23, 25) sts for left Front. Cont in sc-tbl as est, work even until Back measures same as right Front to shoulder. Fasten off.
LEFT FRONT
(RS) Skip 1 st for underarm, join yarn in next st with
a slip st; ch 1, beginning in next st, work in sc-tbl across—21 (23,
25) sts for left Front. Work as for right Front, reversing shaping. Sew
shoulder seams.
SLEEVES (worked from the top down)
Using larger hook, beginning at underarm, pick up and sc 38 (42, 46) sts evenly around armhole;
do NOT join. Rows 1 - 5: Ch 1, work even in sc-tbl across, turn.
Shape Sleeve: Row 6 (Decrease Row): Ch 1, dec over next 2 sts, work in sc-tbl to last 2 sts, dec over last 2 sts; turn.
Rows 7 – 9: Repeat Row 1. Cont as est in sc-tbl, dec 1 st each side this row, then every 4 rows until sleeve measures 6 (7, 8)", or 1" less than desired length, from the beg.
Shape Cuff: Row 1: Change to smaller hook; work in sc-tbl, dec evenly across to 22 (24, 26) sc. Rows 2 – 4: Repeat Row 1. Fasten off.
FINISHING
Sew underarm and sleeve seams.
Edging: Row 1: With RS facing, using smaller hook, beginning at lower left Front, work 1 row sc around entire edge of jacket as follows:
Work along entire lower edge, dec 1 st approx every 10 sts across; work 3 sc in lower right Front corner, sc evenly along center Front edge, work 3 sc in corner; work around neck shaping, dec 3 sts evenly along Back neck; work 3 sc in corner, sc evenly along left Front, work 3 sc in corner; join with a slip st to first sc. Place markers for 4 buttonholes, evenly spaced on right Front for girls or left Front for boys, first approx 1/2" from lower edge, last 1/2" from beg of neck shaping, rem 2 evenly spaced between.
Row 2 (Buttonhole Row): Work in sc around jacket, working 3 sc in each corner, and AT
SAME TIME, work 4 buttonholes opposite markers as follows: * Sc to 1 st before marker, ch 2, skip 1 st; repeat from * for rem 3 buttonholes, sc to end of round; join with a slip st to first sc. Fasten off.
Pockets: Sew pockets centered on each Front, approx 1" up from lower edge. Sew buttons opposite buttonholes; sew remaining 2 buttons on pockets (see photo).
Weave in all ends.
1. Washing Instructions ~ Hand Washing And Drying: Wash gently in warm water using a mild detergent. Gently rinse well in cold water. Lay flat on a towel and roll in towel to remove excess water.
DO NOT WRING, STRETCH OR HANG TO DRY.
2. Handling Instructions ~ When using the yarn be sure to tie a knot at the beginning of each skein and at both yarn ends when joining. A small amount of shedding can be expected when using this yarn under normal conditions.


Thanks for your comment. Don't forget to share!
letyourlightshine 5698787
Jan 06, 2014
Are there any updated instructions for the neck as it seems people were having problems with that portion. I really would like to make this for my nephew but if I wouldn't be able to complete it to look nice I don't even want to start.
BeckySue
Mar 03, 2016
I checked the Caron site, and the pattern is still saying the same and it's been archived. I've contacted them about the problems mentioned here and will keep everyone posted if there's an update! Sometimes an experienced crocheter knows how to fix it, so I can ask in my crochet group if anyone has made it.
puggie1948 1136095
Nov 25, 2013
HELP!!!!!!!!!!!!!!!! everything was fine until i got to the neck shape
sheryllehmann 4157 537
Jan 30, 2013
Pattern is OK until you get to the neck shaping then pattern gets very frustrating because any way that you work it the numbers just don't add up. I really needed help to complete this jacket. Please send me instructions to complete this jacket. Thank you New Grandma
sheryllehmann 4157 537
Jan 30, 2013
I am having the same problem as Hartyboys had. The stitches just don"t work. Can you please help me? The part that does not work is " Shape neck:(WS) Cont in sc-tbl as est,ch 1, work 13(14,15) sts,dec; turn -14(15,16)sts remain. At neck edge even-10(11,12) sts for shoulder. Work even on remaining sts until piece measures 2" from beginning of neck shaping. How in the heck do you do this. I've tried many times and cannot get it to work out the way the instructions say to. Please help, Grandma left hanging here.:<(
dorrie33 2262002
Dec 29, 2011
I would love to print out this pattern but it doen't let me. I think it is lovely and really would like to make it. Thank you.
JennyBee1
Jan 03, 2012
@dorrie33 2262002, Thank you for your message. Most consumers can easily print our patterns by using the Print button directly from our site. The Print button is located on top of each pattern. Or, go to the page and highlight the text, then right-click on it. You'll get a window that gives you the option to "copy." Do that, and then paste the text into a word document. You should be able print that document that way. --editors of FaveCrafts
Hartyboys
Dec 04, 2011
Hi I love this pattern. As soon as I saw it I new that I would make it for a new baby in our church. I have come to to this part (Shape Neck: (WS) Cont in sc-tbl as est, ch 1, work 13 (14, 15) sts, dec; turn14 (15, 16) sts remain.) and am a little confused as the numbers don't add up. Maybe I'm reading this incorrectly. I would love some help. Thank you Sandra
Report Inappropriate Comment
Are you sure you would like to report this comment? It will be flagged for our moderators to take action.
Thank you for taking the time to improve the content on our site.