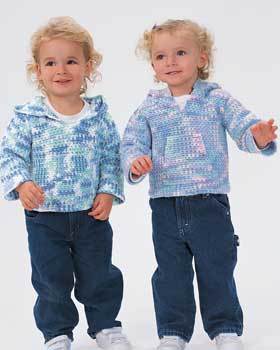
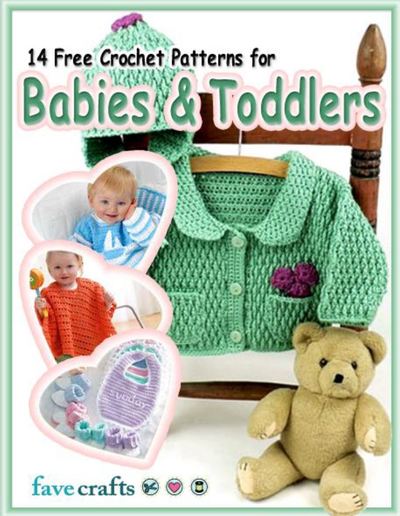
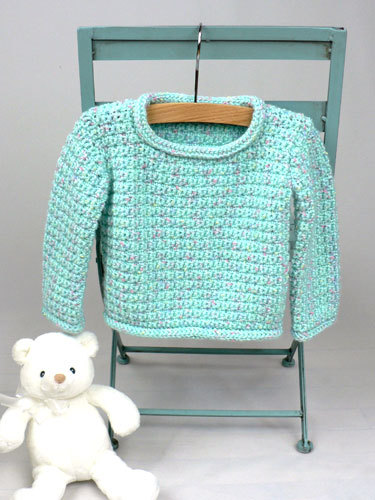
Baby Pullover Sweater
Keep baby warm and cozy with this simple Baby Pullover Sweater. Great for all kinds of weather, this sweater is easy to make and great to have on hand for those unseasonably cool days. Make this sweater in a variety of colors so your little one always has a fun pullover to match with any outfit! Great for boys and girls alike, this universal crocheted sweater pattern is one you'll find yourself coming back to again and again!

Materials:
6 months (12 months, 18 months, 24 months)
- 8 (8, 10, 10) balls Caron International's Simply Soft Baby (100% acrylic; 2 oz/56.7 g, 95 yds/87 m ball) yarn in Cool Mint
- US G-6 (4 mm) crochet hook, or size to obtain gauge
- US H-8 (5 mm) crochet hook
- Yarn needle
Gauge: In stitch pattern, using G-6 (4 mm) hook, 17 sts and 16 rows = 4"/10 cm.
Finished Measurements:
6 months (12 months, 18 months, 24 months)

- Chest 20 (21, 22, 23)"/51 (53.5, 56, 58.5) cm
- Length 10 1/2 (11, 11 1/2, 12 1/2)"/26.5 (28, 29, 32) cm
Special Terms:
- sc2tog: Single crochet 2 together – Insert hook in next stitch, yarn over and pull up a loop, (2 loops on hook), insert hook in next stitch, yarn over and pull up a loop, yarn over and draw through all 3 loops on hook.
- fl-sc: Front loop single crochet – Sc in front loop only of indicated stitch.
- bl-sc: Back loop single crochet – Sc in back loop only of indicated stitch.
Instructions:
To maintain Stitch Pattern during garment shaping, always work in the front loop of fl-sc sts and in the back loop of bl-sc sts.
Stitch Pattern (worked over an odd number of stitches)
- Row 1: Sc in second ch from hook and in each remaining ch across, turn.
- Row 2: Ch 1, fl-sc in first st, *bl-sc in next st, fl-sc in next st; repeat from * across, turn.
- Repeat Row 2 for Stitch Pattern.
Back
Rolled Hem
- With larger hook, chain 44 (46, 48, 50).
- Row 1: Slip st in second ch from hook and in each remaining ch across, turn—43 (45, 47, 49) sts.
- Rows 2–7: Ch 1, working in back loops only, slip st in each st across, turn.
- Fold piece lengthwise, bringing Row 1 up to align with sts of Row 7.
- Row 8: Ch 1, working through both thicknesses, *insert hook in unused loop of next st of Row 1 and in the front loop of next st of Row 7, yarn over and draw through all loops on hook (making a slip st); repeat from * across, turn.
- Change to smaller hook, tighten loop on hook slightly.
Body
- Row 9: Ch 1, bl-sc in each slip st across, turn.
- Row 10 (RS): Ch 1, work Row 2 of Stitch Pattern.
- Continue even in Stitch Pattern until piece measures 5 3/4 (6, 6 1/4, 7)"/14.5 (15, 16, 18) cm from beginning (including rolled hem).
Shape Armholes
- Row 1: Ch 1, slip st in first 2 sts, ch 1, work in Stitch Pattern across to last 2 sts; leave last 2 sts unworked, turn—39 (41, 43, 45) sts (excluding slip sts).
- Row 2: Ch 1, sc2tog, work in Stitch Pattern across to last 2 sc, sc2tog, turn—37 (39, 41, 43) sts.
- Continue even in Stitch Pattern until armhole measures 4 1/4 (4 1/2, 4 3/4, 5)"/11 (11.5, 12, 12.5) cm from beginning of armhole shaping.
Shape First Shoulder
- Row 1: Ch 1, work in Stitch Pattern over first 8 (8, 9, 9) sts; leave remaining sts unworked, turn—8 (8, 9, 9) sts.
- Row 2: Ch 1, sc2tog, work in Stitch Pattern across, turn—7 (7, 8, 8) sts.
- Fasten off.
Shape Second Shoulder
- Sk 21 (23, 23, 25) unworked sts following first shoulder; join yarn with slip st in next st.
- Row 1: Ch 1, work in Stitch Pattern in same st as join and in each remaining st across, turn—8 (8, 9, 9) sts.
- Row 2: Ch 1, work in Stitch Pattern to last 2 sts, sc2tog—7 (7, 8, 8) sts.
- Fasten off.
Front
- Work as for Back until piece measures 8 1/2 (9, 9 1/2, 10)"/21.5 (23, 24, 25.5) cm from beginning (including rolled hem)—37 (39, 41, 43) sts.
Shape First Neck Edge and Shoulder
- Row 1: Ch 1, work in Stitch Pattern over first 13 (13, 14, 14) sts; leave remaining sts unworked, turn—13 (13, 14, 14) sts.
- Row 2: Ch 1, slip st in first 5 sts, ch 1, work in Stitch Pattern across, turn—8 (8, 9, 9) sts (excluding slip sts).
- Row 3: Ch 1, work in Stitch Pattern across to last 2 sc, sc2tog, turn—7 (7, 8, 8) sts.
- Continue even in Stitch Pattern until armhole measures same as Back armhole. Fasten off.
Shape Second Neck Edge and Shoulder
- Sk 11 (13, 13, 15) unworked sts following first neck edge; join yarn with slip st in next st.
- Row 1: Ch 1, work in Stitch Pattern in same st as join and in each remaining st across, turn—13 (13, 14, 14) sts.
- Row 2: Ch 1, work in Stitch Pattern over first 8 (8, 9, 9) sts; leave remaining sts unworked, turn—8 (8, 9, 9) sts.
- Row 3: Ch 1, sc2tog, work in Stitch Pattern across, turn—7 (7, 8, 8) sts.
- Continue even in Stitch Pattern until armhole measures same as Back armhole. Fasten off.
Sleeve (Make 2)
- With larger hook, chain 28 (30, 32, 34).
- Rows 1–10: Work as for Rows 1–10 of Back—27 (29, 31, 33) sts.
- Row 11 (increase row): Ch 1, 2 sc in first st, work in Stitch Pattern across to last sc, 2 sc in last sc, turn—29 (31, 33, 35) sts.
- Rows 12–15 (16, 16, 17): Work in Stitch Pattern.
- Row 16 (17, 17, 18): Repeat Row 11—31 (33, 35, 37) sts.
- Repeat last 5 (6, 6, 7) rows 3 more times—37 (39, 41, 43) sts.
- Continue even in Stitch Pattern until piece measures 6 1/2 (7 1/2, 8, 8 1/2)"/16.5 (19, 20.5, 21.5) cm from beginning (including rolled hem).
Shape Sleeve Cap
- Row 1 (decrease row): Ch 1, sc2tog, work in Stitch Pattern across to last 2 sts, sc2tog, turn—35 (37, 39, 41) sts.
- Rows 2–8 (9, 10, 11): Repeat Row 1—21 (21, 21, 21) sts.
- Fasten off.
Finishing
- Sew shoulder seams.
Rolled Collar
- Row 1: With RS facing and larger hook, join yarn with slip st in either shoulder seam; work slip st evenly around neckline; do not join, turn.
- Rows 2–5: Ch 1, working in back loops only, slip st in each st across, turn.
- Fold collar down lengthwise, bringing Row 5 down to align with sts of Row 1.
- Row 6: Ch 1, working through both thicknesses, *insert hook in unused loop of next st of Row 1 and in the front loop of next st of Row 5, yarn over and draw through all loops on hook (making a slip st); repeat from * across.
- Fasten off. With yarn needle, carefully seam beginning and ending edges of the collar together.
- Set in sleeves. Sew sleeve and side seams. Weave in all ends.
Read NextBaby Pullover Sweater
Your Recently Viewed Projects
Thanks for your comment. Don't forget to share!
Clarissa
Oct 20, 2019
Hi, Thanks for posting this pattern -) I would love to create my own version of your diagram of finished dimensions. Did you use a special software to create it?
Editor Dana
Oct 21, 2019
Hi there, I'd recommend reaching out to Kim Guzman directly! You can reach her by visiting her website, crochetkim.com. Have so much fun and good luck!
egbrown48 2358918
Nov 13, 2016
Two questions. Row 10 says Ch 1, workRow2 of pattern. The start of row 2 says ch1. Do I do another ch1 for a total of 2 ch 1?? Also, row 1 of pattern stitch doesn't say to ch 1, so do I not do a ch 1 at the beginning of Row 1? After I do Row1 of pattern, I then have only 41 stitches not 43. Is this correct won't I keep having less stitches after Row 1 because you are starting second stitch in not adding any stitches. I guess that is more then 2questions, but any help would be appreciated. Thanks
Editor Dana
Nov 15, 2016
Hi there! For the first question, I believe you only ch 1 one time before starting row 10. You won't ch 1 at the start of row 1 because that 44th original chain will count as the ch 1 (equaling 43 stitches for row 1). You should end up with 43 stitches instead of 41. I might recommend reaching out to Caron Yarns directly for further clarification on this pattern! I hope this helps! -Editors of FaveCrafts
lpalmer59 7490208
Mar 06, 2016
I am just like you, when I buy my yarn, I like to get it when it is on sale. I also try to buy with a project in mind so I get all the skeins that I need. I do however tend to over buy to make sure that I have enough for the project. Now I have a collection of a skeins and not sure what to do with them. What do you do with your left over yarn? I am open for suggestions.
BeckySue
Mar 03, 2016
The Caron baby yarn is very soft, too. Whenever it goes on sale I stock up because I know I'll be using it to make something. I just have to have an idea of what I'm going to make, like a plushie or blanket so I know many skeins to buy. There's nothing worse than running out of yarn before you finish the project only to find it's been discontinued or out of stock!
gigles62 0328694
Nov 20, 2014
How would you make this same sweater for an adult?
FaveCrafts Editor JL
Nov 21, 2014
Hi there, Luckily, we have so many adult sweater patterns on our site for you to enjoy! Simply search for crochet sweaters in the search bar in the top right corner. If you want to make this larger, I would at least triple the amount of stitches throughout. - Julia from FaveCrafts
atiqagul 6156332
Feb 05, 2014
The pattern is so simple to follow. i have made one sweater for my niece, and it looks really nice.
princesscloset 226 6019
Aug 28, 2011
The sweater has a wonderful thickness and the neck opening if perfect. No struggling with your child.
Report Inappropriate Comment
Are you sure you would like to report this comment? It will be flagged for our moderators to take action.
Thank you for taking the time to improve the content on our site.