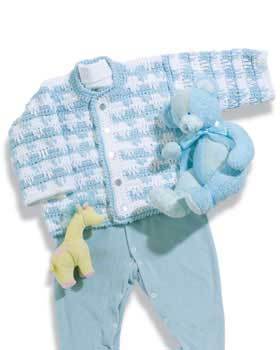
Baby Cardigan
Keep your little boy blue warm in a baby cardigan from Bernat Yarns. Cute little cotton balls decorate this cardigan. Crochet in any size you wish. This makes for a great baby shower gift.

SIZES
Chest measurement:
6 mos 17 ins [43 cm ]
12 mos 19 ins [48 cm ]
18 mos 21 ins [53.5 cm ]
Finished chest:
6 mos 19 ins [48 cm ]
12 mos 22 ins [56 cm ]
18 mos 25 ins [63.5 cm ]
MATERIALS:
- Bernat Cottontots (Solids: 100 g/3.5 oz/Ombres: 85 g/3 oz)
Sizes
Main Color (MC) (90005 Wonder White) 6 mos–2 balls; 12 mos–3 balls; 18 mos–3 balls
Contrast A (90128 Little Boy Blue) 6 mos–2 balls; 12 mos–3 balls; 18 mos–3 balls
Size 4.5 mm (U.S. 7) crochet hook or size needed to obtain gauge. 5 buttons.
GAUGE: 16 sc and 16 rows = 4 ins [10 cm].
INSTRUCTIONS: The instructions are written for smallest size. If changes are necessary for larger sizes the instructions will be written thus ( ).
Note: To change colors, work to last 2 loops on hook of first st. Yoh with next color and complete st.
BACK: With MC, ch 42 (48-51).
Foundation row: (RS). 1 sc in 2nd ch from hook. 1 sc in each ch across. 41 (47-50) sts. Turn.
1st to 4th rows: Ch 1. 1 sc in each sc to end of row. Turn. Join A at end of last row.
5th row: With A, ch 1. 1 sc in first sc. *1 sc in each of next 3 sc. 1 long sc 2 rows below. 1 long sc 3 rows below. 1 long sc 2 rows below. Rep from * to last 4 (4-1) sc. 1 sc in each of last 4 (4-1) sc. Turn.
6th to 8th rows: Ch 1. 1 sc in each st to end of row. Turn. Join MC at end of last row.
9th row: With MC, ch 1. 1 sc in first sc. *1 long sc 2 rows below. 1 long sc 3 rows below. 1 sc 2 rows below.** 1 sc in each of next 3 sc. Rep from * to last 4 (4-1) sc. Rep from * to ** 1 (1-0) time(s) more. 1 sc in last sc. Turn.
10th to 12th rows: Ch 1. 1 sc in each st to end of row. Turn. Join A at end of last row. Rep 5th to 12th rows for pat until work from beg measures 7 (7½-8) ins [18 (19-20.5) cm], ending with RS facing for next row.
Shape armholes: Next row: Sl st in each of first 4 sts. Ch 1. Pat to last 4 sts. Ch 1. Turn. Leave rem sts unworked. 33 (39-42) sts.
Cont even in pat until armhole measures 4½ (5-5½) ins [11.5 (12.5-14) cm], ending with RS facing for next row. Fasten off.
LEFT FRONT: ***With MC, ch 21 (24-27).
Foundation row: (RS). 1 sc in 2nd ch from hook. 1 sc in each ch across. 20 (23-26) sts. Turn.
Work 4 rows in sc as given for Back. Join A at end of last row.
**** 5th row: With A, ch 1. 1 sc in first sc. *1 sc in each of next 3 sc. 1 long sc 2 rows below. 1 long sc 3 rows below. 1 long sc 2 rows below. Rep from * to last 1 (4-1) sc. 1 sc in each of last 1 (4-1) sc. Turn.
6th to 8th rows: Ch 1. 1 sc in each st to end of row. Turn. Join MC at end of last row.
9th row: With MC, ch 1. 1 sc in first sc. *1 long sc 2 rows below. 1 sc 3 rows below. 1 long sc 2 rows below.** 1 sc in each of next 3 sc. Rep from * to last 1 (4-1) sc. Rep from * to ** 0 (1-0) time(s) more. 1 sc in last sc. Turn.
10th to 12th rows: Ch 1. 1 sc in each st to end of row. Turn. Join A at end of last row.
Rep 5th to 12th rows for pat until work from beg measures 7 (7½-8) ins [18 (19-20.5) cm], ending with RS facing for next row.***
Shape armhole: Next row: Sl st in each of first 4 sts. Ch 1. Pat to end of row. 16 (19-22) sts. Cont even in pat until armhole measures 2 (2½-3) ins [5 (6-7.5) cm], ending with RS facing for next row.
Neck shaping: 1st row: Pat to last 3 (3-4) sts. Ch 1. Turn. Leave rem sts unworked. 13 (16-18) sts.
2nd row: Draw up a loop in each of first 2 sts. Yoh and draw through all 3 loops on hook -sc2tog made. Pat to end of row. Ch 1. Turn.
3rd row: Pat to last 2 sts. Sc2tog over last 2 sts. Ch 1. Turn. Rep 2nd row once more. 10 (13-15) sts.
Cont even in pat until work from beg measures same length as Back to shoulders, ending with RS facing for next row and omitting turning ch at end of last row. Fasten off.
RIGHT FRONT
Sizes 6 and 18 mos only: Work from *** to *** as given for Left Front.
Size 12 mos only: Work from *** to **** as given for Left Front.
5th row: With A, ch 1. 1 sc in first 4 sc. *1 long sc 2 rows below. 1 long sc 3 rows below. 1 long sc 2 rows below. 1 sc in each of next 3 sc. Rep from * to last sc. 1 sc in last sc. Ch 1. Turn.
6th to 8th rows: Ch 1. 1 sc in each st to end of row. Turn. Join MC at end of last row.
9th row: With MC, ch 1. 1 sc in first sc. *1 sc 2 rows below. 1 long sc 3 rows below. 1 long sc 2 rows below. 1 sc in each of next 3 sc. Rep from * to last sc. 1 sc in last sc. Turn.
10th to 12th rows: Ch 1. 1 sc in each st to end of row. Turn. Join A at end of last row.
Rep 5th to 12th rows for pat until work from beg measures 7 (7½-8) ins [18 (19-20.5) cm], ending with WS facing for next row.
All sizes: Shape armhole: Next row: (RS). Pat to last 4 sts. Ch 1. Turn. Leave rem sts unworked. 16 (19-22) sts.
Cont even in pat until armhole measures 2 (2½-3) ins [5 (6-7.5) cm], ending with RS facing for next row.
Neck shaping: 1st row: Sl st in each of first 3 (3-4) sts. Ch 1. Pat to end of row. Ch 1. Turn.
2nd row: Pat to last 2 sts. Sc2tog over last 2 sts. Ch 1. Turn.
3rd row: Sc2tog over first 2 sts. Pat to end of row. Ch 1. Turn.
Rep 2nd row once more. 10 (13-15) sts.
Cont even in pat until work from beg measures same length as Back to shoulders, ending with RS facing for next row and omitting turning ch at end of last row. Fasten off.
SLEEVES: With MC, ch 33.
Foundation row: (WS). 1 sc in 2nd ch from hook. 1 sc in each ch across. 32 sts. Ch 1. Turn. Proceed in pat as given for Back for Size 18 mos for 3 rows.
Next row: (RS). 2 sc in first st. Pat to last st. 2 sc in last st. Ch 1. Turn. Work a further 3 rows even in pat. Rep last 4 rows 2 (3-4) times more, taking inc sts into pat. 38 (40-42) sts.
Cont even in pat until work from beg measures 6 (7½-8) ins [15 (19-20.5) cm]. Place a marker at each end of last row. Work a further 4 rows even in pat. Fasten off.
FINISHING: Pin garment pieces to measurements and cover with a damp cloth and allow cloth to dry.
Neckband: Sew shoulder seams. With RS of work facing, join A with sl st to top right corner at neck edge. Work 14 (14-15) sc up right front neck edge. 1 sc in each st across back neck edge. Work 14 (14-15) sc down left front neck edge. Ch 1. Turn.
Work 2 rows more of sc. Fasten off.
Buttonhole Band: 1st row: With RS of work facing, join MC with sl st to bottom corner of Right Front for Her or top corner of Left Front for Him and work 34 (38-42) sc evenly between neck edge and lower edge. Ch 1. Turn.
2nd row: (WS). 1 sc in each sc across. Ch 1. Turn.
3rd row: 1 sc in each of first 2 sc. *Ch 2 for Buttonhole. Miss next 2 sc. 1 sc in each of next 5 (6-7) sc. Rep from * 3 times more. Ch 2. Miss next 2 sc. 1 sc in each of last 2 sc. Ch 1. Turn.
4th row: 1 sc in each sc across working 2 sc in ch-2 sp.
5th row: 1 sc in each sc across. Fasten off.
Button Band: Work as given for Buttonhole Band on Left Front for Her or Right Front for Him, omitting all reference to buttonholes.
Sew in Sleeves placing rows above markers along armhole edges of Fronts and Back to form square armholes. Sew side and sleeve seams.
Body Edging: 1st rnd: With RS of Body facing, join A with sl st at bottom corner of Left Front. Ch 1. 3 sc in same sp. Work 83 (95-104) sc across bottom edge to next corner. Work 1 sc in each sc up Left Front, around neck edge and down Right Front, having 3 sc in corners. Join with sl st to first sc. Do not turn
Read NextBaby Pullover Sweater
Your Recently Viewed Projects


Thanks for your comment. Don't forget to share!
lpalmer59 7490208
Mar 06, 2016
I agree this sweater is just adorable for a boy, but dont you think it would be just as adorable done in pink for a little girl? All you would need to do is change out the blue for pink, and you have a wonderful little sweater pattern that could be worked up for either. I cant wait to work this up for my grandma box.
mamadukes7391 6390 977
Mar 12, 2015
Can this baby boy pattern be downloaded?
FaveCrafts Editor JL
Mar 13, 2015
Hi there - You shouldn't need to download this pattern - everything is on the page above. If you'd like to print, simply click on the "Print" button underneath the project title. Thanks! - Julia from FaveCrafts
Report Inappropriate Comment
Are you sure you would like to report this comment? It will be flagged for our moderators to take action.
Thank you for taking the time to improve the content on our site.