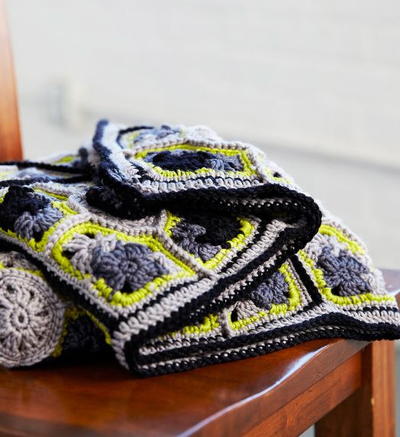
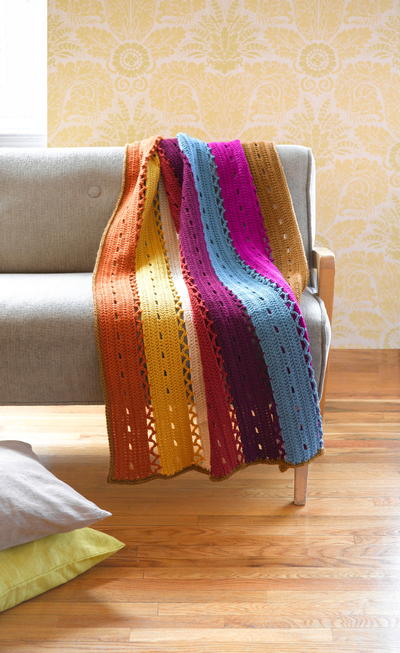
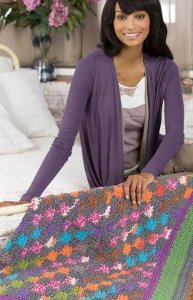
Crocheted Amish Quilt-Inspired Throw
Solid and striped yarns add visual movement to this Crocheted Amish Quilt-Inspired Throw from Red Heart Yarn. Crocheted with a background of grey heather yarn, the more saturated colors really pop from the background for maximum color impact. A modern twist on the Amish black foundation, the grey is a hot color in decorating and gives the throw a thoroughly modern look. Check out this pattern and more in our We've Got You Covered: 25 Crochet and Knit Throws free eBook from Red Heart Yarns.

Throw is 44” x 54”.
MATERIALS:
- Red Heart® “Super Saver®” (Art. E300) solid 7 oz (198 g), 364 yd (333 m); multicolor and print 5 oz (141 g), 244 yd (223 m), flecks 5 oz (141 g) 260 yds (238 m) skeins:
- 3 skeins 400 Grey Heather A 1 skein each 512 Turqua B 528 Medium Purple C, 624 Tea Leaf D and 256 Carrot E Red Heart® “Stripes™” (Art E760) 3.5 oz (100 g), 170 yd (156 m) balls: 3 balls 942 Cancun Stripe F
- Crochet Hook: 6mm [US J-10]
- Yarn needle
GAUGE: Small Square = 1½”. CHECK YOUR GAUGE. Use any size hook to obtain the gauge.
Notes
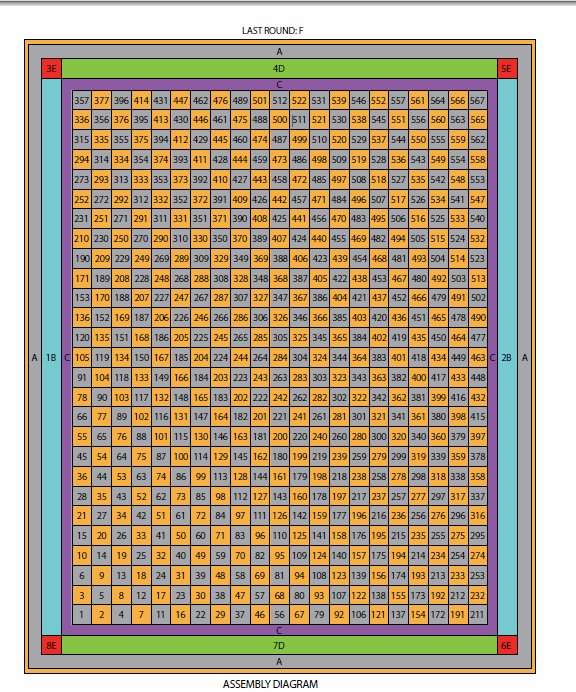
Throw is worked in Diagonal Rows from Square 1 in the left corner, increasing Squares in each Diagonal Row until one side has 21 Squares, making 2nd corner. Then Diagonal Rows are worked with 21 Squares for 6 more rows to add length and make 3rd corner. Then Squares are decreased in each Diagonal Row until one Square remains for last corner. New Squares are joined on to previous Squares at lower edge of Square and then join along one side edge of corresponding Square of previous Diagonal Row. Each Diagonal Row is worked in one color across all Squares and colors are alternated every Diagonal Row. The Assembly Diagram on page 62 has numbers to guide you on the order squares are crocheted.
Special Abbreviations
Large Shell = 5 dc in same st.
Small Shell = 3 dc in same st.
INSTRUCTIONS:
DIAGONAL ROW 1
(See Assembly Diagram for numbering of squares)
SQUARE 1
With A, ch 7.
Row 1 (Right Side): Working in back loops only, sc in 2nd ch from hook, [ch 1, skip next ch, sc in next ch] twice, leave last ch unworked.
Row 2: Ch 1, turn, sc in first sc, [ch 1, skip next ch-1 space, sc in next sc] twice.
Rows 3-5: Repeat 2.
Fasten off.
DIAGONAL ROW 2
SQUARE 2
With F, join yarn in unworked ch on Row 1 of Square 1, ch 7.
Row 1 (Right Side): Working in back loops only, sc in 3rd ch from hook, [ch 1, skip next ch, sc in next ch] twice, slip st in Row 1 of Square 1.
Row 2: Ch 1, turn, sc in first sc, [ch 1, skip next ch-1 space, sc in next sc] twice.
Row 3: Ch 1, turn, sc in first sc, [ch 1, skip next ch-1 space, sc in next sc] twice, slip st in Row 3 of
Square 1.
Row 4: Repeat 2.
Row 5: Ch 1, turn, sc in first sc, [ch 1, skip next ch-1 space, sc in next sc] twice, slip st in Row 5 of
Square 1.
SQUARE 3
Row 1 (Right Side): Continue with F across sts of Row 5 of Square 1, working in back loops only, sc in first sc, [ch 1, skip next ch-1 space, sc in next sc] twice. Do not work across sts of Square 2.
Row 2: Ch 1, turn, sc in first sc, [ch 1, skip next ch-1 space, sc in next sc] twice.
Rows 3-5: Ch 1, turn, sc in first sc, [ch 1, skip next ch-1 space, sc in next sc] twice.
Fasten off.
DIAGONAL ROW 3
SQUARE 4
With A, join yarn in unworked ch on Row 1 of first Square of previous Diagonal Row, ch 7.
Repeat Square 2.
SQUARE 5
Row 1 (Right Side): Continuing with A and working in back loops only across sts of next Square of previous Diagonal Row, sc in first sc, [ch 1, skip next ch-1 space, sc in next sc] twice, slip st in Row 1 of next Square on previous Diagonal Row.
Row 2: Ch 1, turn, sc in first sc, [ch 1, skip next ch-1 space, sc in next sc] twice.
Row 3: Ch 1, turn, sc in first sc, [ch 1, skip next ch-1 space, sc in next sc] twice, slip st in Row 3 of previous Square.
Row 4: Repeat 2.
Row 5: Ch 1, turn, sc in first sc, [ch 1, skip next ch-1 space, sc in next sc] twice, slip st in Row 5 of previous Square.
SQUARE 6
Repeat Square 3.
DIAGONAL ROW 4
SQUARE 7
With F, join yarn in unworked ch on Row 1 of first Square of previous Diagonal Row, ch 7.
Repeat Square 2.
SQUARES 8 AND 9
Repeat Square 5.
SQUARE 10
Repeat Square 3.
DIAGONAL ROWS 5-21
Repeat Diagonal Row 4, alternating A and F and working one more Square 5 in each Diagonal Row – 21 A Squares in last Diagonal.
DIAGONAL ROWS 22-27
DIAGONAL ROW 22: Beginning with F, repeat Square 2 in first Square, then repeat Square 5 across to last Square.
Do not work Square 3 in last Square.
Alternating A and F, repeat Diagonal Rows 22 – 21 A Squares in last Diagonal Row.
DIAGONAL ROWS 28-47
Diagonal Row 28: Beginning with F, repeat Square 5 across top of first Square in previous Diagonal Row, repeat Square 5 across to last
Square. Do not work Square 3 in last Square – 20 Squares.
Repeat Diagonal Row 28, alternating A and F and working 1 less Square in each Diagonal Row, until 1 A Square remains.
Border C
Round 1: With right side facing, join C in last sc of Square 564, sc in each sc, ch-1 space and row edges around, working (sc, ch 2, sc) in each
corner st, slip st to first st to join – 136 sc along each side edge and 105 sc along top and bottom edges.
Round 2: Ch 1, sc in each sc around, working (sc, ch 2, sc) in each corner ch-2 space, slip st to first st to join. Round 3: Ch 1, turn, sc in next sc, [ch 1, skip next sc, sc in next sc] around, working [ch 1, skip 1 sc, (sc, ch 2, sc) in corner ch-2 space] in first and 3rd corners and [ch 1, (sc, ch 2, sc) in corner ch-2 space] in 2nd and 4th corners, end skip last sc, slip st to first st to join.
Round 4: Ch 1, turn, sc in next ch-1 space and in each sc and ch-1 space around, working (sc, ch 2, sc) in each corner ch-2 space, slip st in first st to join – 143 sc each side; 111 sc along top and bottom edges.
Fasten off.
Border 1B
Row 1: With right side facing and B, draw up a loop in corner ch-2 space at top left hand corner, sc in same space, [skip 2 sc, work Large Shell in next sc, skip 2 sc, sc in next sc] across to last 2 sc before corner ch-2 space, skip 2 sc, sc in last ch-2 space.
Row 2: Ch 3, turn, 2 dc in first sc, [sc in center dc of next Shell, Large Shell in next sc] across, end sc in center dc of next Shell, 3 dc in last sc.
Row 3: Ch 1, turn, sc in first dc, [Large Shell in next sc, sc in center dc of next Shell] across, end sc in center dc of next shell, sc in top of beginning dc.
Row 4: Repeat 2.
Row 5: Ch 1, turn, sc in first 2 dc, *hdc in next dc, dc in next sc, hdc in next dc, sc in next 3 dc; repeat from * across, end hdc in next dc, dc in next sc, hdc in next dc, sc in last 2 dc.
Fasten off.
Border 2B
Repeat Border 1B along opposite edge.
Corner 3E
Row 1: With right side facing and E, draw up a loop in first row of Border 1B, ch 1, work sc in edge of each sc row and 2 sc in edge of each dc row – 7 sc.
Rows 2-7: Ch 1, turn, sc in each sc across.
Fasten off.
Border 4D
With right side facing and D, draw up a loop in right corner ch-2 space, ch 1, sc in same space, [skip next sc, Small Shell in next sc, skip next sc, sc in next sc] across, end sc in left corner ch-2 space, slip st in Row 1 of Corner 3E.
Row 2: Ch 3, turn, dc in first sc, [sc in center dc of next Shell, Small Shell in next sc] across, end 2 dc in last sc.
Row 3: Ch 1, turn, sc in first dc, [Small Shell in next sc, sc in center dc of next Shell] across, end sc in top of beginning ch, slip st in Row 4 of
Corner 3D.
Row 4: Repeat 2.
Row 5: Ch 1, turn, sc in first dc, [hdc in next dc, dc in next sc, hdc in next dc, sc in next dc] across, end sc in top of beginning ch, slip st in Row 7 of
Corner 3D.
Fasten off.
Corner 5E
Row 1: With right side facing and E, draw up a loop in last row of Border 2B, ch 1, work sc in edge of each sc row and 2 sc in edge of each dc row, slip st in Row 1 of Border 4D – 7 sc.
Work as for Corner 3E, working slip st to Rows 3 and 5 of Border 4D to join.
Fasten off.
Corner 6E
With right side facing and E, work as for Corner 3E across opposite edge of Border 2B.
Border 7D
With right side facing and D, work as for 4D.
Corner 8E
With right side facing and E, work as for 5E.
Border A
Round 1: With right side facing and A, draw up a loop in 2nd st of Border 7D to left of Corner 6E, ch 1, sc in each st around, working (sc, ch 2, sc) in each corner sc, slip st to first st to join.
Round 2: Ch 1, turn, sc in next st, [ch 1, skip next st, st in next sc] around, working (ch 1, slip next st, sc, ch 2, sc in corner ch-2 space, ch 1) in each corner, skip last st, slip st to first st to join.
Round 3: Ch 3, turn, dc in next ch-1 space and in each sc and ch-1 space around, working (2 dc, ch 2, 2 dc) in each corner ch-2 space, slip st in top of beginning ch to join.
Round 4: Ch 1, turn, sc in top of beginning ch 3, repeat Round 2.
Round 5: Ch 1, turn, sc in next ch-1 space and in each sc and ch-1 space around, working (sc, ch 2, sc) in each corner ch-2 space, slip st to first sc to join.
Fasten off.
Last Round: With right side facing and F, draw up a loop in 3rd sc to left of bottom left corner ch-2 space, ch 1, sc in same sc, sc in same space, [skip
2 sc, work Large Shell in next sc, skip 2 sc, sc in next sc] around, working (ch 1, skip 2 sc, 7 dc in corner ch-2 space, ch 1, skip 3 sc, sc in next sc) in
first and 3rd corners and (ch 1, skip 3 sc, 7 dc in corner ch-2 space, ch 1, skip 2 sc, sc in next sc) in 2nd and 4th corners, slip st to first sc to join.
Fasten off.
FINISHING
Weave in ends.
Read NextFast Care Package Throw


Thanks for your comment. Don't forget to share!
NancyDoll
Mar 01, 2017
This looks like the PERFECT afghan pattern for using up all those bits and pieces and leftover skeins from other projects!! It looks like a challenging project, but as an experienced crocheter, that's fine for me. Sometimes I want an easy project that I don't have to think about, and sometimes I want a project that makes me pay attention. This one would make me pay attention, that's for sure!
mulberrygalprinces s
Apr 06, 2016
What a lovely pattern. My grandmother and mother were from Lancaster,Pa. They made quilts by sewing. They were beautiful, but somehow that talent skipped over me. But I do knit and crochet. Now I can make an Amish quilt without sewing. And it may just come out looking just like the type they sewed. Thank you Red Heart!
Report Inappropriate Comment
Are you sure you would like to report this comment? It will be flagged for our moderators to take action.
Thank you for taking the time to improve the content on our site.