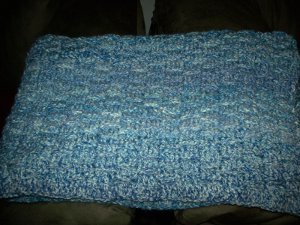
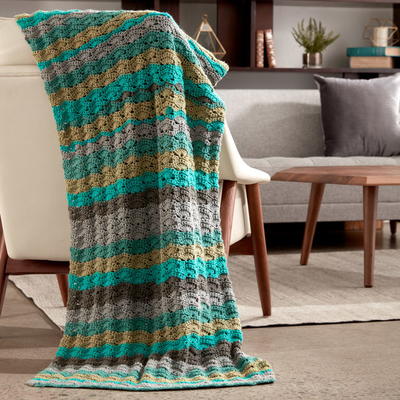
Crochet a Fan Throw
Throw this colorful afghan on your bed or couch and you won't need another blanket for years! Crocheted in changing hues of blue, purple, and green in a foundation of heather gray, the colors in this afghan really make an impression. This is a great crocheted afghan for livening up your home and is a fun and easy project for beginners and advanced crocheters alike. Challenge your skills and learn to make something new with this amazingly colorful Crocheted Fan Throw.

Materials:
- 7 skeins Red Heart Super Saver yarn in Grey Heather (A)
- 2 skeins Red Heart Super Saver yarn in Medium Purple (B)
- 2 skeins Red Heart Super Saver yarn in Tea Leaf (C)
- 2 skeins Red Heart Super Saver yarn in Light Periwinkle (D)
- 2 skeins Red Heart Super Saver yarn in Delft Blue (E)
- 1 skein Red Heart Super Saver yarn in Turqa (F)
- 6mm [US J-10] crochet hook
- Yarn needle
Gauge: Panel = 5.75” long x 2” wide at top; Square = 8.5” x 8.5”. CHECK YOUR GAUGE. Use any size hook to obtain the gauges.
Special Abbreviations:
- dec (decrease) = [draw up a loop in next st] twice, yarn over and draw through all 3 loops on hook.
- shell = 5 dc in specified st.
Instructions:
Throw measures 58” x 76”
Square 1 (Square 2)-Make 24 each
Panel 1
- Row 1 (Right Side): With E (F), ch 2; sc in 2nd ch from hook; turn.
- Row 2: Ch 1, 2 sc in sc; turn – 2 sc.
- Rows 3 and 4: Ch 1, sc in each sc across; turn.
- Row 5: Ch 1, sc in first sc, ch 1, sc in next sc; turn.
- Row 6: Ch 1, sc in first sc, sc in ch-1 space, sc in last sc; turn – 3 sc.
- Rows 7-9: Ch 1, sc in each sc across; turn.
- Row 10: Ch 1, sc in first sc, 2 sc in next sc, sc in last sc; turn – 4 sc.
- Rows 11-12: Ch 1, sc in each sc across; turn.
- Row 13: Ch 1, sc in first 2 sc, ch 1, sc in last 2 sc; turn.
- Row 14: Ch 1, sc in first 2 sc, sc in ch-1 space, sc in last 2 sc; turn – 5 sc.
- Row 15: Ch 1, sc in first sc, skip next sc, shell in next sc, skip next sc, sc in last sc. Fasten off.
Panel 2
- Row 1 (Right Side): With B (D), ch 2, sc in 2nd ch from hook; slip st in Row 1 of Panel 1; turn.
- Row 2: Repeat Row 2 of Panel 1.
- Row 3: Ch 1, sc in each sc; slip st in Row 3 of Panel 1; turn.
- Continue working as for Panel 1 and joining panels by slip stitching every right side row to corresponding row of the panel to the left. At end of last row, slip st to last sc of the panel to the left and fasten off.
Panels 3-7
- Work as for Panel 2, slip stitching to corresponding rows of panel to the left, in the following colors: Panel 3: C (B). Panel 4: D (E). Panel 5: C (C). Panel 6: B (D). Panel 7: E (F).
Bottom Corner
- Row 1: With right side facing and A, draw up a loop in bottom ch (under first sc) of Panel 1; ch 1, 2 sc in same ch as joining, 2 sc in foundation ch of each panel across; turn – 14 sc.
- Row 2: Ch 1, dec, sc to last 2 sc, dec; turn – 12 sc.
- Row 3: Repeat Row 2 – 10 sc.
- Row 4: Ch 1, sc in each sc across; turn.
- Row 5: Repeat Row 2 – 8 sc.
- Row 6: Ch 1, sc in first 3 sc, dec, sc in last 3 sc; turn – 7 sc.
- Row 7: Ch 1, dec, skip next sc, shell in next sc, skip next sc, dec. Fasten off.
Top Corner
- Row 1: With right side facing, join A with a dc in corner sc of Panel 7, dc in same sc, * ch 1, skip 2 dc, sc in next dc, ch 1**, 3 dc between next 2 sc (in joining seam); repeat from * to last sc, end at **; 2 dc in last sc – 43 sts. Fasten off.
- Row 2: With wrong side facing, skip first 6 sts, join yarn in next dc; ch 1, sc in same dc as joining and in next 30 sts (counting ch-1 spaces as a st); turn leaving last 6 sts unworked – 31 sc.
- Row 3: Ch 1, skip first sc, dec, sc to last 3 sc, dec; turn – 27 sc.
- Rows 4 and 5: Repeat Row 3 – 23 sc at end of Row 4 and 19 sc at end of Row 5.
- Rows 6-11: Ch 1, dec, sc to last 2 sc; dec; turn – 7 sc at end of Row 11.
- Row 12: Ch 1, dec, skip next sc, shell in next sc, skip next sc, dec. Fasten off. Weave in ends.
Assembly
- Arrange Squares 1 and 2 following Assembly Diagram, noting the direction of the fans.
- After the first square, all others are joined while working the Square Edging.
Square Edging
- With right side facing, join A in center dc of bottom or top corner shell or in dc at beginning or end of Top Corner Row 1; ch 4, slip st in same dc, * ch 2, work [slip st, ch 2] 12 times evenly spaced to next corner **; (slip st, ch 4, slip st) all in next corner; repeat from * around, end at **. Fasten off. There will be 13 ch-2 spaces between each corner ch-4 space.
To Join Squares
- Join on 1 or 2 sides as necessary in ch-4 spaces and ch-2 spaces while working Square Edging. To join a ch-2 space = ch 1, drop loop from hook, insert hook from right side into corresponding space and into dropped loop, draw loop through, ch 1.
- To join a ch-4 space = ch 2, drop loop from hook, insert hook from right side into corresponding space and into dropped loop, draw loop through, ch 2.
- When all squares are joined, start working Border.
Border
- With right side facing, join A in a ch-2 space to the left of any joining seam.
- Round 1: Ch 2, * slip st in next space, ch 2; repeat from * around working (slip st, ch 4, slip st) in corner ch-4 spaces; ch 2; repeat from * around; slip st in same ch-2 space as beginning of round; TURN.
- Round 2 (Wrong Side): Slip st in last ch-2 space worked.
- Repeat Round 2.
- Round 3 (Right Side): Ch 1, (sc, ch 2, sc) in each ch-2 space around and work (sc, ch 2, sc, ch 3, sc, ch 2, sc) in each corner ch-4 space; join with a slip st in first sc. Do not turn.
- Round 4: Slip st in next space, ch 1, (sc, ch 2, sc) in each ch-2 space around and work (sc, ch 3, sc) in each corner ch-3 space; join. Fasten off.
- Weave in ends.

Read NextSummer Breeze Crochet Throw Pattern
Your Recently Viewed Projects

Thanks for your comment. Don't forget to share!
serendipitysin
Apr 12, 2020
Great pattern! I think I might change The layoutba but and the colors to a multicolored background and the fans to my odds and ends him. Terrific scrapbuster!
Zeemer
Jun 11, 2016
It is very encouraging to see the pattern found just right on the front page, you want to start the project right away. This dark-colored throw may not be my cup of tea due to the dark colors but a lot of crocheters will love this. So fellow crocheters, go ahead and enjoy making this project.
Report Inappropriate Comment
Are you sure you would like to report this comment? It will be flagged for our moderators to take action.
Thank you for taking the time to improve the content on our site.