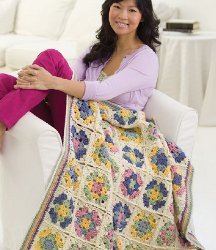
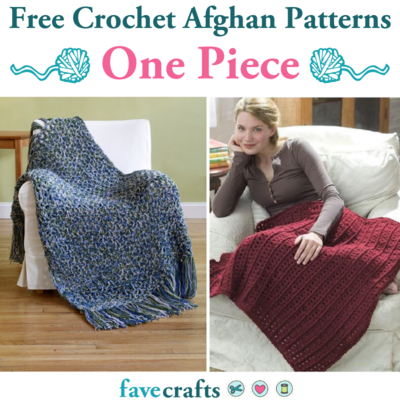
Weekend-Wonder Giant Granny Square Throw

This takes the traditional granny square afghan to a whole new level! The three-color Weekend-Wonder Giant Granny Square Throw from Red Heart Yarn is made from the center out in one piece, so that there are no seams to sew once you finish.
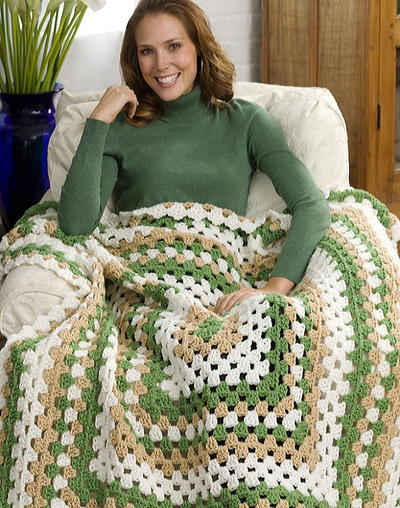
This big and bold crochet lap throw pattern is perfect for keeping you warm on cool evenings without being too heavy. It's so easy that you really could finish it in a weekend. Choose a set of two neutral tones and one bright color to really make your crochet pattern pop. This lovely free crochet afghan pattern offers the warmth you need without the weight of more complicated, dense crochet project ideas.
Crochet HookN/15 or 10 mm hook
Yarn Weight(5) Bulky/Chunky (12-15 stitches for 4 inches)
Crochet GaugeRound 1 = 2½” x 3¾” long.
Finished Size48” x 55”
Materials List
- RED HEART® “Super Saver®” Chunky™ solid color 6 oz (170 g), 207 yd (189 m) skeins: 2 Skeins each 624 Tea Leaf A and 334 Buff B, and 3 Skeins 316 Soft White C
- Crochet Hook: 10mm [US N-15]
- Yarn needle
Instructions
With A, ch 8.
-
Row 1: Slip st in 4th ch from hook (counts as ch-1 space) slip st in next 2 chs, ch 1, skip next ch, slip st in next ch – 2 ch-1 spaces.
-
Round 1 (Right Side): Ch 3 (counts as dc here and throughout), work 2 dc in ch-1 space, ch 2, 3 dc in same space, ch 1, ([3 dc, ch 2] twice, ch 2, 3 dc) in next ch-1 space, ch 1, 3 dc in first ch-1 space, ch 2, slip st to top of beginning ch to join. Fasten off.
Note: This will make 4 ch-2 spaces in each corner. Working (3 dc, ch2, 3 dc) in each corner ch-2 space and (3 dc, ch 1) in each ch-1 space in between corner ch-2 spaces. -
Round 2: Join B in any ch-1 space, ch 3, work 2 dc in same space, ch 1, [(3 dc, ch 2, 3 dc) in next ch-2 space, ch 1] twice, 3 dc in next ch-1 space, ch 1, [(3 dc, ch 2, 3 dc) in next ch-2 space, ch 1] twice, slip st in beginning ch.
-
Round 3 (Wrong Side): Ch 3, turn, 2 dc in same ch-1 space, *ch 1, (3 dc, ch 2, 3 dc) in next corner ch-2 space, [ch 1, 3 dc in next ch-1 space] to next ch-2 space; repeat from * twice more, (3 dc, ch 2, 3 dc) in last corner ch-2 space, [ch 1, 3 dc in next ch-1 space] to beginning ch, ch 1, slip st in top of beginning ch. Fasten off.
-
Round 4: Join C in any corner ch-2 space, ch 3, work 2 dc in same space, ch 2, 3 dc in same space, *[ch 1, 3 dc in next ch-1 space] across to next corner ch-2 space, ch 1, (3 dc, ch 2, 3 dc) in corner ch-2 space; repeat from * twice more, [ch 1, 3 dc in next ch-1 space] across to beginning ch, ch 1, slip st to top of beginning ch.
-
Round 5: Ch 3, turn, 2 dc in same ch-1 space, *[ch 1, 3 dc in next ch-1 space] to next ch-2 space, (3 dc, ch 2, 3 dc) in corner ch-2 space; repeat from * 3 more times, ch 1, slip st in beginning ch.
-
Round 6: Ch 3, turn, 2 dc in same ch-1 space, ch 1, *(3 dc, ch 2, 3 dc) in corner ch-2 space, [ch 1, 3 dc in next ch-1 space] to next ch-2 space; repeat from * twice more, (3 dc, ch 2, 3 dc) in corner ch-2 space, [ch 1, 3 dc in next ch-1 space] to beginning ch, ch 1, slip st in beginning ch. Fasten off.
-
Rounds 7-8: With A, repeat Rounds 4-5.
-
Round 9: With B, repeat Round 4. Fasten off.
-
Round 10: With C, repeat Round 4. Fasten off.
-
Round 11: With A, repeat Round 4. Fasten off.
-
Rounds 12-13: With B, repeat Rounds 4-5. Fasten off.
-
Rounds 14-16: With C, repeat Rounds 4-6. Fasten off.
-
Rounds 17-18: With A, repeat Rounds 4-5. Fasten off.
-
Round 19: With B, repeat Round 4. Fasten off.
-
Round 20: With C, repeat Round 4. Fasten off.
-
Round 21: With A, repeat Round 4. Fasten off.
-
Rounds 22-23: With B, repeat Rounds 4-5. Fasten off.
-
Rounds 24-26: With C, repeat Rounds 4-6. Fasten off.
-
Rounds 27-28: With A, repeat Rounds 4-5. Fasten off.
-
Round 29: With B, repeat Round 4. Fasten off.
-
Round 30: With C, repeat Round 4.
-
Round 31: (Sc, ch 2, sc) in next dc, ch 1, skip next dc, *(sc, ch 2, sc) in ch-2 space, [ch 1, sc in center dc of next dc-group, ch 1, slip st in next ch-1 space] across to next corner, ch 1, sc in center dc of next dc-group, ch 1; repeat from * twice more, (sc, ch 2, sc) in ch-2 space, [ch 1, sc in center dc of next dc-group, ch 1, slip st in next ch-1 space] across to first sc, slip st to first sc to join. Fasten off.
-
Weave in ends.
Helpful Hint
We've received several comments on this project from readers who are having difficulties finishing this project. Check out this helpful comment from one of our readers for some guidance!dwbechthold 980300 7
"After multiple tries I got it On the first chain of you end up with chain one spaces One on each end and one in the middle Working in the ch space on the end chain and do double crochets ch double crochets ch double crochets Ch and in the middle ch one space of the original ch do double crochets ch and in the other end ch space do double crochets ch double crochets ch double crochets then ch and in the same middle chain space that you did double crochets in do double crochets ch and slip stitch into top of first chain You end up with a rectangle piece where the ch spaces are the corners You have sets of double crochets with on each end and in the middle opposite each other From there you go around with double crochets in each ch space and double crochet ch double crochet to form each corner Good luck"
Even More Granny Square Crochet Patterns!
For more easy crochet granny square patterns, check out our comprehensive list of 36 Granny Square Crochet Patterns for Beginners.
You will find crochet granny square patterns like:
What is your favorite thing to crochet?
Your Recently Viewed Projects

Thanks for your comment. Don't forget to share!
Zeemer
Apr 26, 2018
This Weekend -Wonder Giant Granny Square Throw is another beautiful throw project that I want to start soon. It seems very easy to make and fast. Great for personal use or as present to mom in Mother's Day.
Lynn K
Apr 24, 2017
My wonderful friend, Heather, loves retro crochet items so this awesome Granny Square Throw is going to send her right into orbit, lol! Her birthday is just a few months away so I must add it to my Things To Make list right now. Our teenage daughter, Lily, has offered to help which will make it an even more special gift because they have a very special bond. We already have a good idea of what colors she will love so are all set to get started!
katelaxar 5844776
Jan 16, 2017
CORRECTED LINK redheart.com/files/patterns/pdf/LW2403corr.pdf MODERATORS, PLEASE DELETE MY OTHER COMMENTS.
katelaxar 5844776
Jan 16, 2017
FOR SOME REASON, THIS SITE WILL NOT LET ME ENTER THE UNDERSCORE IN THE LINK. IT SHOULD BE AFTER "LW2403" AND BEFORE "corr" IN THE ADDRESS ABOVE.
Editor Dana
Jan 16, 2017
Hi there! We don't allow URLs in the comments except by moderators to help cut down on spam. :) There are some helpful comments below and featured in the pattern as well! This pattern should match the Red Heart one identically so if anyone notices a particular error, I'm happy to go in and fix. I hope that helps! -Dana, Editor of FaveCrafts
katelaxar 5844776
Jan 16, 2017
I CAN'T GET THE LINK TO SHOW UP CORRECTLY BY DOING A COPY/PASTE. THIS SITE KEEPS CHANGING THE LINK. THE CORRECT LINK IS redheart.com/files/patterns/pdf/LW2403corr.pdf PLEASE IGNORE MY OTHER 2 POSTS
mcmullenda1953 613 4042
Mar 10, 2016
I thought something was wrong with this pattern. I tried and tried again, and still, the instructions are wrong. And now looking at the reviews, I can see where you were told many times the instructions were wrong and to please correct them. How can anyone trust your site if the instructions are wrong on this pattern, are the other patterns on your site wrong too??? I think I will trust another site before I trust your site again. Too much money and time wasted on this.
Kaylee
Jun 28, 2016
@mcmullenda1953 613 4042 thanks so much for your comment. I am so sorry you are having trouble with this pattern. We were gifted this pattern from Red Heart Yarns and this project appears exactly as it does on their site here: http://www.redheart.com/free-patterns/weekend-granny-throw I suggest reaching out to them for help on completing the project. Sorry for the inconvenience, -Kaylee, Editor of FaveCrafts
nannysharp7 799828 5
Oct 30, 2013
I can not believe the instructions are messed up. And the fact that you havebeenmade aware of this problem and it hasn't been fixed is ridiculous . I have crocheted for some time but I'm not a pro. Like a fool I bought all the yarn needed , and can not figure out how. To make the starting piece. Shame on you, and shame on me.
Kaylee
Jun 28, 2016
@nannysharp7 799828 5 We were gifted this pattern from Red Heart Yarns and this project appears exactly as it does on their site here: http://www.redheart.com/free-patterns/weekend-granny-throw I suggest reaching out to them for help on completing the project. Sorry for the inconvenience, -Kaylee, Editor of FaveCrafts
rkgermann 8573341
Feb 24, 2013
I am so sorry I bought the yard for this before really studying the pattern. I have crocheted for many, many years, and this pattern is horrible to understand. When the pattern says for round 1, ([3 dc, ch 2] twice, ch 2, 3 dc) I am confused. Are all these stitches done in the same space? I don't understand the number of chain 1 spaces in this row to be worked on. I don't get it. Very frustrating.
Kaylee
Jun 28, 2016
@rkgermann 8573341 We were gifted this pattern from Red Heart Yarns and this project appears exactly as it does on their site here: http://www.redheart.com/free-patterns/weekend-granny-throw I suggest reaching out to them for help on completing the project. Sorry for the inconvenience, -Kaylee, Editor of FaveCrafts
tlmoor56 8012535
Feb 02, 2013
I made this at Christmas for a teenager to match her bedspread using turquoise, dark brown and off white. I used the turquoise as the primary color. Everyone loved it. The colors really popped with the less amount of white. The instructions became clearer when I realized it was not a square but a rectangle.
Kaylee
Jun 28, 2016
@tlmoor56 8012535 is there any chance you could provide some tips and tricks on how to complete this pattern? It looks like a lot of our readers are struggling to complete it. Thanks! -Kaylee, Editor of Favecrafts
librarytiger 83308 78
Jan 07, 2013
Try http://idratherbecrocheting.blogspot.com/2010/07/basic-granny-square-stitch-diagram.html for a diagram of a typical granny square. Nora B.
notirt09 5491262
Nov 22, 2012
I think its better to have it printed in mesh diagram like most Japanese books, its easier to understand and at the end or foot note just stated ch = chain and how it looks like, most of the times I want to do all the pattern given but I don't understand either, I've wrote quiet smetimes asking if anyone could help by tranlating it into diagram and till now no reply even from the editor or anyone, I don't understand abbreviations as when I learn this crochet I learn it frm diagram so any one could do us a favour by translating it nto diagram picture mesh something like what Japanese did to make it simpler to understand - I do have books n mostly it all diagram n its easier to understand - thank you in advance for those who read this comment n trying to help us out
pld
Oct 23, 2012
I'll do a trial run first before committing to making the entire afghan, or buying yarn for it.
bigsal1967 6815900
Jul 30, 2012
Having problems understanding Row 1 instructions of this pattern, can it be explained in and easy to understand way. It is a little confusing I think! thanks
Melissa Ryan
Aug 03, 2012
Do a slip stitch in the 4th chain from the hook. Do another slip stich in the next 2 chain stiches, chain 1, skip the next chain, and do a slip stich in the following chain. Chain 2. Hope that helps!
loisdrolshagen 246 6032
Apr 09, 2012
I ordered the yarn, before trying this pattern. BIG mistake! Someone needs to proof read instructions before posting. "Round 1" does not make any sense and I have been crocheting for a lifetime. After reading comments from 9803007, I finally realized there was a typo, and now hopefully, I have it figure out! what a waste of time these directions have been on something so simple as a granny rectangle.
Melissa Ryan
Aug 03, 2012
@loisdrolshagen 2466032 sorry to hear about your confusion! If something like this happens again and the pattern is from a company (as denoted in the byline--This one is from Red Heart), you could always double check their website for pattern corrections. We try to stay on top of updating our patterns if corrections are released, but occasionally we can miss one. Hopefully you figured out the problem and are enjoying your new afghan! Thanks again!
dwbechthold 980300 7
Apr 08, 2012
After multiple tries I got it On the first chain of you end up with chain one spaces One on each end and one in the middle Working in the ch space on the end chain and do double crochets ch double crochets ch double crochets Ch and in the middle ch one space of the original ch do double crochets ch and in the other end ch space do double crochets ch double crochets ch double crochets then ch and in the same middle chain space that you did double crochets in do double crochets ch and slip stitch into top of first chain You end up with a rectangle piece where the ch spaces are the corners You have sets of double crochets with on each end and in the middle opposite each other From there you go around with double crochets in each ch space and double crochet…Read More ch double crochet to form each corner Good luck
jtiller
Mar 22, 2012
I love the look of this quick afghan, but I am new at this and can't figure out how to make the starter piece. If could see a picture of the first row, I can do it. I have made other granny squares from books and magazines with no problem. Can someone help? A video or jpeg of the start would be great. Thanks.
memry1 2609958
Jan 17, 2012
I really enjoy the Weekend Wonder Giant Granny Square Throw. I need help. How many double crochets are there when Row 1 is completed. Also how many double crochets are there when Row 2 is completed. Hope you can answer this asap.
Dibbers
Jan 06, 2012
Okay, I've been crocheting for a long time & I never started a Granny Square like this! I think maybe someone needs to try this out & see for themselves how this works. With A, ch 8. Row 1: Slip st in 4th ch from hook (counts as ch-1 space) slip st in next 2 chs, ch 1, skip next ch, slip st in next ch 2 ch-1 spaces.
tmsd1930 6457763
Oct 17, 2011
I am a beginner at crocheting. I do not get Row 1 instructions "slip st in next ch 2 ch-1 spaces." Can someone please explain this to me.
Report Inappropriate Comment
Are you sure you would like to report this comment? It will be flagged for our moderators to take action.
Thank you for taking the time to improve the content on our site.