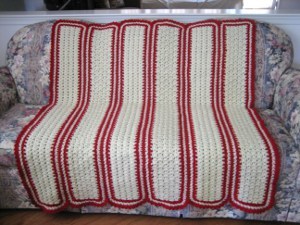
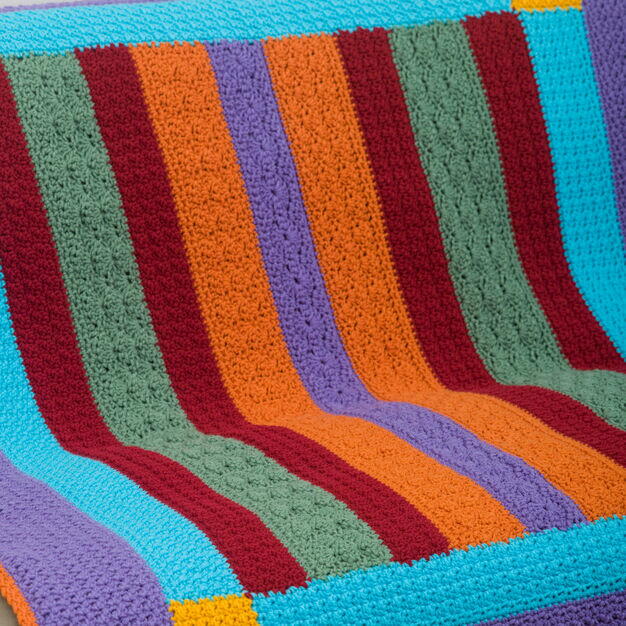
Updated Amish Bars Throw

Reminiscent of an Amish quilt design, this graphic crocheted throw from Red Heart Yarn is worked in brighter colors for a fresh look and feel. Various pattern stitches make the Updated Amish Bars Throw one of the best free crochet patterns for expanding your skills.
For more crochet blankets, download our free eBook, We've Got You Covered: 25 Crochet and Knit Throws!

Crochet HookJ/10 or 6 mm hook
Yarn Weight(4) Medium Weight/Worsted Weight and Aran (16-20 stitches to 4 inches)
Crochet Gauge12 sts = 4”; First 4 rows of Panel 1 = 1¾”. CHECK YOUR GAUGE. Use any size hook to obtain the gauge.
Finished SizeThrow is 46” wide and 55½” long.
Materials List
- Red Heart® “Super Saver®” Art. E300, 7 oz (198 g), 364 yd (333 m) skeins: 2 skeins 358 Lavender A, and 1 skein each 376 Burgundy B, 631 Light Sage C, 512 Turqua D, 256 Carrot E and 321 Gold F
- Crochet hook, 6 mm [US J-10]
- Yarn needle
Instructions:
Center Panel 1 - First Half
-
With A, ch 111.
-
Foundation Row (wrong side): Working in back bars of ch, sc in 2nd ch from hook and in each of next 108 ch, leaving last ch unworked for knotting off, turn – 109 sc.
-
Row 1: Ch 1, sc in first sc, *skip next 2 sc, large shell in next sc, skip next 2 sc, sc in next sc; repeat from * across, turn – 18 large shells.
-
Row 2: Ch 3 (counts as dc here and throughout), *hdc in next dc, sc in next 3 dc, hdc in next dc, dc in next sc; repeat from * across, turn.
-
Row 3: Ch 1, sc in each st across – 109 sc. Fasten off.
Center Panel 1 - Second Half
-
With right side facing, join A in first ch on opposite side of foundation ch.
-
Row 1: Ch 1, sc in first ch, *skip next 2 ch, large shell in next ch, skip next 2 ch, sc in next sc; repeat from * across, turn – 18 large shells. Fasten off.
-
Rows 2-3: Repeat rows 2-3 of first half.
Center Panel 2
-
Work panel 2 on each side of panel 1.
-
With right side facing, join E in first sc of row 4 of panel 1.
-
Row 1: Ch 1, sc in each sc across, turn – 109 sc.
-
Row 2: Ch 1, sc in first sc, *ch 1, skip next sc, sc in next sc; repeat from * across, turn – 54 ch-1 spaces.
-
Row 3: Ch 1, sc in first sc, *small shell in next sc, sc in next sc; repeat from * across, turn – 27 small shells.
-
Row 4: Ch 3, dc in first sc, *sc in center dc of next shell, small shell in next sc, repeat from * across, ending with 2 dc in last sc, turn – 26 small shells plus 2 half-shells.
-
Row 5: Ch 1, sc in first dc, *small shell in next sc, sc in center dc of next shell; repeat from * across, ending with sc in last dc, turn.
-
Row 6: Repeat row 4.
-
Row 7: Ch 1, sc in first dc, *hdc in next dc, dc in next sc, hdc in next dc, sc in next dc; repeat from * across, turn.
-
Row 8: Ch 1, sc in first sc, *ch 1, skip next st, sc in next st; repeat from * across, turn – 54 ch-1 spaces.
-
Row 9: Ch 1, sc in each sc and in each ch-1 space across, turn – 109 sc. Fasten off.
-
Repeat panel 2 on opposite side of center panel 1.
Center Panel 3
-
With right side facing, join B in first sc.
-
Row 1: Ch 1, sc in each sc across, turn – 109 sc.
-
Row 2: Ch 1, sc in first sc, *dc in next sc, sc in next sc; repeat from * across, turn.
-
Row 3: Ch 3, *sc in next dc, dc in next sc; repeat from * across, turn.
-
Row 4: Ch 1, sc in first dc, *dc in next sc, sc in next dc; repeat from * across, turn.
-
Rows 5-6: Repeat rows 3-4.
-
Row 7: Ch 1, sc in each st across. Fasten off.
-
Repeat panel 3 on opposite side center panel 2.
Center Panel 4
-
With right side facing, join C in first sc.
-
Row 1: Ch 1, sc in each sc across, turn – 109 sc.
-
Row 2: Repeat row 1 of center panel 1.
-
Row 3: Ch 3, 2 dc in first sc, *sc in center dc of next shell, large shell in next sc; repeat from * across, ending with 3 dc in last sc, turn – 17 large shells plus 2 half-shells.
-
Row 4: Ch 1, sc in first dc, *large shell in next sc, sc in center dc of next shell; repeat from * across, ending with sc in last dc, turn.
-
Rows 5-6: Repeat rows 3-4.
-
Row 7: Repeat row 2 of center panel 1.
-
Rows 8-9: Repeat 8-9 of center panel 2. Fasten off.
-
Repeat panel 4 on opposite side center panel 3.
Center Panel 5
-
With B, repeat panel 3 on both sides of throw in last row of each center panel 4.
Edge Panel 1
NOTE: Designate top and bottom of center panels. Follow Assembly Diagram for placement of edge and border panels and squares, working in numerical order.
-
With right side facing, join D in first sc of lefthand panel 5.
-
Row 1: Ch 1, sc in each sc across, turn – 109 sc.
-
Row 2: Repeat row 2 of center panel 2.
-
Row 3: Ch 1, sc in first sc, *Ldc over next ch-1 space into corresponding st 2 rows below, sc in next sc; repeat from * across, turn.
-
Row 4: Ch 1, sc in first sc, *ch 1, skip next dc, sc in next sc; repeat from * across, turn.
-
Rows 5-10: Repeat rows 3-4, 3 times.
-
Row 11: Repeat row 9 of center panel 2. Fasten off.
Edge Square 2
-
With right side facing, join F in end of row 1 at top of edge panel 1.
-
Row 1: Ch 1, sc in each row-end sc across, turn – 11 sc.
-
Rows 2-11: Repeat rows 2-11 of edge panel 1.
Edge Panel 3
-
With right side facing, join D in end of last row of center panel 5 at top right-hand corner of throw.
-
Row 1: Ch 1, work *8 sc evenly across top of center panel 5; 11 sc across center panel 4; 8 sc across center panel 3; 11 sc across center panel 2*, 9 sc across center panel 1; repeat from * to * in reverse order across remaining panels on left side, slip st in end of row 1 of edging square 2, turn – 85 sc.
-
Rows 2-11: Repeat rows 2-11 of edging panel 1, joining with slip sts to rows 3, 5, 7, 9, and 11 of edging square 2.
Edge Panel 4
-
With D, repeat edge panel 1 across right-hand side of throw.
Edge Square 5
-
With right side facing join F in end of row 11 at top of edge panel 4, repeat edge panel 3 across top edge of edge panel 4, joining with slip sts to rows 1, 3, 5, 7, 9, and 11 of edge panel 3.
Edge Square 6
-
With F, repeat edge square 2 in bottom righthand corner working across bottom edge of edge panel 4.
Edge Panel 7
-
With D, repeat edge panel 3 across bottom of throw, joining with slip sts to rows 1, 3, 5, 7, 9, and 11 of edge square 6.
Edge Square 8
-
With F, repeat edge square 5 in bottom left-hand corner working across bottom edge of edge panel 1, joining with slip sts to rows 1, 3, 5, 7, 9, and 11 of edge panel 7.
Border Panel 1
-
With right side facing, join A in end of row 11 of edge square 2 in top left-hand corner of throw.
-
Row 1: Ch 1, sc in end of each row of edge square 2, in each sc of edge panel 1 and in end of each row of edge square 8, turn – 131 sc.
-
Row 2: Repeat row 2 of center panel 2 – 65 ch-1 spaces.
-
Row 3: Ch 1, (sc, ch 2, sc) in each sc across, turn – 66 ch-2 spaces.
-
Row 4: Ch 1, sc in first ch-2 space, *ch 1, sc in next ch-2 space; repeat from * across, turn.
-
Rows 5-16: Repeat rows 3-4, 6 times; repeat row 3 once more.
-
Row 17: Ch 1, sc in each sc and in each ch-1 space across. Fasten off.
Border Square 2
-
With right side facing, join C in first row at top of border panel 1.
-
Row 1: Ch 1, sc in each row-end sc across, turn – 17 sc.
-
Rows 2-17: Repeat rows 2-17 of border panel 1. Fasten off.
Border Panel 3
-
With A, repeat border panel 1 across top edge (edge panel 3), joining with slip sts to rows 1, 3, 5, 7, 9, 11, 13, 15 and 17 of border square 2.
Border Panel 4
-
With A, repeat border panel 1 across right-hand edge (edge panel 4).
Border Square 5
-
With right side facing, join C in end of row 17 at top of border panel 4, repeat border square 2 across top edge of border panel 4, joining with slip sts to rows 1, 3, 5, 7, 9, 11, 13, 15 and 17 of border panel 3.
Border Square 6
-
With C, repeat border square 2 in bottom righthand corner working across bottom edge of border panel 4.
Border Panel 7
-
With A, repeat border panel 1 across bottom of throw (edge panel 7), joining with slip sts to rows 1, 3, 5, 7, 9, 11, 13, 15 and 17 of border square 6.
Border Square 8
-
With C, repeat border square 5 in bottom lefthand corner working across bottom edge of edge panel 1, joining with slip sts to rows 1, 3, 5, 7, 9, 11, 13, 15 and 17 of border panel 7.
TRIM
-
With right side facing, join E in the first sc of last row of any border panel.
-
Round 1: Ch 1, sc evenly around, working sc in each sc and in each row-end st of corner squares, working (sc, ch 2, sc) in each corner sc; join.
-
Round 2: *[Ch 2, skip next sc, slip st in next sc] across to next corner, ch 2, (slip st, ch 2, slip st, ch 2) in corner ch-2 space; repeat from * 3 times, [ch 2, skip next sc, slip st in next sc] across to beginning; join with slip st in first slip st.
-
Fasten off.
-
Weave in ends. Block lightly with wrong side facing.
Abbreviations
- large shell
- 5 dc in same st.
- small shell
- 3 dc in same st.
- Long dc (Ldc)
- Yo, working over ch-1 space, insert in hook in next st 2 rows below, yo, draw yarn through st, [yo, draw yarn through 2 loops on hook] twice.
Up Next:
Read NextThe FaveCrafts Afghan
Your Recently Viewed Projects

Thanks for your comment. Don't forget to share!
Crafty Suz
Apr 30, 2017
This is nice. I like that it is based on an Amish quilt design. A good thing about it is that different colors can be used. I am thinking of school or favorite team colors. I would think that this would also be a good project to use stash yarn for. Seasonal colors will be pleasing too.
Zeemer
Mar 22, 2016
The Amish people are known for their simplicity, plain in their dressing and for not adopting the modern convenience in life. But they don't hesitate to show of this Amish throw which is vibrant and colorful. This is in my bucket list of projects.
lpalmer59 7490208
Mar 20, 2016
I really like this throw, and I have been thinking of what color combination I would do one, and I think mine will be gray, pink and cranberry. I think that would be stunning. I also think one in the primary colors would be good for my grandson. He is into blue, red, yellow, green and orange. All of his super heros.
Report Inappropriate Comment
Are you sure you would like to report this comment? It will be flagged for our moderators to take action.
Thank you for taking the time to improve the content on our site.