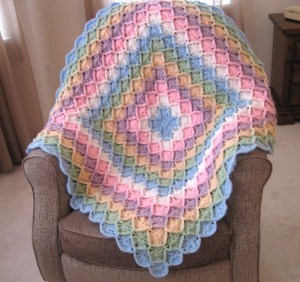
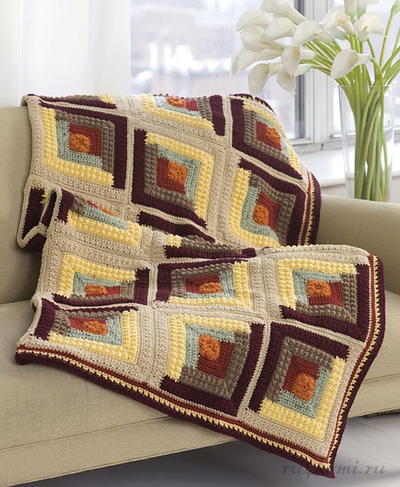
Log Cabin Afghan
This intermediate afghan crochet pattern creates a throw with the appearance of a log cabin quilt. The colors in this crochet afghan are perfect for fall. An attached chart helps with assembly. This is a beautiful afghan to have on display in your living room, or use it to keep warm by the fire on a cold winter night. Crochet fans of all skill levels are sure to love this fun and challenging design that's great to work on when you're stuck inside because of rain or snow.

Materials:
- 1 skein Red Heart® Super Saver yarn in Carrot (A)
- 1 skein Red Heart® Super Saver yarn in Ranch Red (B)
- 1 skein Red Heart® Super Saver yarn in Frosty Green Fleck (C)
- 2 skeins Red Heart® Super Saver yarn in Cafe (D)
- 2 skeins Red Heart® Super Saver yarn in Cornmeal (E)
- 2 skeins Red Heart® Super Saver yarn in Claret (F)
- 3 skeins Red Heart® Super Saver yarn in Buff (G)
- 5mm [US H-8] crochet hook
- Yarn needle
Gauge: Motif = 11½” square.
Instructions:
Afghan measures 72” x 72”
Motif (Make 36)
Section 1
- With A, ch 2.
- Rnd 1 (Right Side): 8 Sc in 2nd ch from hook; join with a slip st in first sc; TURN.
- Rnd 2: Ch 1, sc in next sc; * yo and draw up a loop in next sc, yo and draw through 1 loop on hook, [yo and draw through 2 loops] twice – long-dc made; (sc, long-dc) all in same place where first long-dc was made, sc in next sc; repeat from * twice more; (long-dc, sc, long-dc) all in last sc; join in first sc; turn.
- Rnd 3: Ch 1, sc in first st, 3 hdc in next st for corner, [sc in next 3 sts, 3 hdc in next st] 3 times, sc in last 2 sts; join.
- Fasten off.
Section 2
- Row 1: With right side facing, join B with sc in center hdc of any corner; sc in next 5 sts, 3 sc in next hdc, sc in next 6 sts; turn – 15 sc.
- Rows 2-5: Ch 1, sc in each st to center sc of corner, 3 sc in next sc, sc in each st to end; turn – 23 sc at end of Row 5. Fasten off.
Section 3
- Row 1: With right side facing, join C with sc in end of last row, sc in end of next 4 rows, 5 sc along edge of Section 1 to next corner, 3 sc in corner, 5 sc along edge of Section 1, sc in end of next 5 rows; turn – 23 sc.
- Rows 2-5: Repeat Rows 2-5 of Section 2 – 31 sc at end of Row 5. Fasten off.
Section 4
- Row 1: With right side facing, join D and sc in end of next 5 rows, sc in next 11 sc, 3 sc in next sc, sc in next 11 sc, sc in end of next 5 rows; turn – 35 sc.
- Row 2: Ch 1, sc in first sc, [long-dc in next sc, sc in next sc] 8 times, (long-dc, sc, long-dc) all in corner sc, sc in next sc, [long-dc in next sc, sc in next sc] 8 times; turn – 37 sts.
- Row 3: Repeat Row 2 of Section 2 – 39 sc.
- Row 4: Repeat Row 2 of Section 4 except work sts in brackets 9 times instead of 8 times – 41 sts.
- Row 5: Repeat Row 2 of Section 2 – 43 sts. Fasten off.
Section 5
- Row 1: With right side facing, join E and sc in end of next 5 rows, sc in next 15 sc, 3 sc in next sc, sc in next 15 sc, sc in end of next 5 rows; turn – 43 sc.
- Row 2: Repeat Row 2 of Section 4 except work sts in brackets 10 times instead of 8 times – 45 sts.
- Row 3: Repeat Row 2 of Section 2 – 47 sc.
- Row 4: Repeat Row 2 of Section 4 except work sts in brackets 11 times instead of 8 times – 49 sts.
- Row 5: Repeat Row 2 of Section 2 – 51 sc. Fasten off.
Section 6
- Row 1: With right side facing, join F and sc in end of next 5 rows, sc in next 21 sc, 3 sc in next sc, sc in next 21 sc, sc in end of next 5 rows; turn – 55 sc.
- Row 2: Repeat Row 2 of Section 2 – 57 sc.
- Row 3: Ch 1, sc in first sc, [ch 1, skip 1 sc, sc in next sc] 13 times, ch 1, skip 1 sc, 3 sc in next sc, [ch 1, skip 1 sc, sc in next sc] 14 times; turn – 59 sts.
- Row 4: Ch 1, sc in first sc; (yo, insert hook in sc directly below the ch-1 and draw up a loop to height of row in work, yo and draw through all 3 loops on hook – long-hdc made; sc in next sc] 14 times, 3 sc in next sc, sc in next sc, [long-hdc, sc in next sc] 14 times; turn – 61 sts.
- Row 5: Repeat Row 2 of Section 2 – 63 sc. Fasten off.
Section 7
- Row 1: With right side facing, join G and sc in end of next 5 rows, sc in next 25 sts, 3 sc in next st, sc in next 25 sts, sc in end of next 5 rows; turn – 63 sc.
- Row 2: Repeat Row 2 of Section 2 – 65 sc.
- Row 3: Ch 1, sc in first sc, [ch 1, skip 1 sc, sc in next sc] 15 times, ch 1, skip 1 sc, 3 sc in next sc, [ch 1, skip 1 sc, sc in next sc] 16 times; turn – 67 sts.
- Row 4: Ch 1, sc in first sc, [long-hdc, sc in next sc] 16 times, 3 sc in next sc, sc in next sc, [long-hdc, sc in next sc] 16 times; turn – 69 sts.
- Row 5: Repeat Row 2 of Section 2 – 71 sc. Fasten off.
Motif Border
- With right side facing, join G to any corner; ch 1, * (sc, hdc, sc) all in corner sc, 35 sc evenly spaced to next corner; repeat from * around; join in first sc. Fasten off.
Finishing
- Sew motifs together following diagram.
Outer Border
- Rnd 1: With right side facing, join B in any sc; ch 1, sc around working 3 sc in each corner; join. There should be an odd number of sc between each center corner sc.
- Rnd 2: Ch 1, sc in each sc around and work 3 sc in center corner sc; join. Fasten off.
- Rnd 3: With right side facing, join E in any corner; ch 1, 2 sc in corner sc, [sc in each sc to next center corner sc, 3 sc in corner sc] 3 times, sc in each sc to next corner, work 1 more sc in same sc as first 2 sc; join.
- Rnd 4: Ch 1, ** 3 sc in center corner sc, * ch 1, skip next sc, sc in next sc; repeat from * to next corner; ch 1, skip next sc; repeat from ** around; join. Fasten off.
- Rnd 5: With right side facing, join F in any corner; ch 1, ** 3 sc in center corner sc, * sc in next sc, long-hdc; repeat from * to next corner; sc in next sc; repeat from ** around; join.
- Rnd 6: Ch 1, sc in each st around and work 3 sc in center corner sc; join. Fasten off. Weave in ends.

Up Next:
Read NextRetro Ripple Crochet Afghan Pattern
Your Recently Viewed Projects

Thanks for your comment. Don't forget to share!
Delphine Bryant
Nov 14, 2018
This to me is considered art and I would gladly display this in my home. I can remember from when I was a child sleeping under quilts at my Grand Mothers. I thought they were so beautiful because of all of the wonderful colors. If I only had any one of those now I know I would be the proud owner of something special and unique. This log cabin was nothing like hers but beautiful just the same.
Morehouse17
Oct 31, 2018
This is beautiful and for the true quilter I know they would agree with me in that this does really look like it could be an actual quilt. The colors are for Autumn but a quick change in the colors could have this piece easily be a part of your homes decor. Because I can't sew this will be the best attempt for me to have a quilt without quilting it, lol.
elocin1104 2800379
Jun 03, 2018
I love this log cabin afghan pattern! It is such an intricate pattern, and I think it will look amazing all put together! You can change the color scheme if this is too dark for you. I am thinking lighter colors would be amazing too! So many color combinations, so little time.
jmb880
Aug 02, 2015
The log cabin afghan. How do I get from section 3 to section 4. When all other sections are being incremented by 2 each time. How do I get from 31 sc to 35 in one row. I read patterns all the time and this one has certainly go me wondering how to do it - as I don't see much of an increase except for the 3 sc in the corner which only brings me to 33 sc not 35 sc. thanks for any help you can give me as this is a very nice pattern to make..
Kaylee
Dec 02, 2015
Hi jmb880! I am sorry you are experiencing problems with this pattern. I suggest asking our active Facebook community if they may be able to offer some help! Kaylee, Editor of FaveCrafts
SylviaC
Jul 17, 2013
I love this. I have made a knitted one which was great fun but crochet would be quicker!!
snjm33 1806430
Jul 15, 2013
I cannot get the directions to prit - am I supposed to or is there something else I need to do?
SylviaC
Jul 17, 2013
I always copy and paste into a Word or Word Works document when it is not a download. Right click on the photos and paste into the document. Hi-light the text, Ctrl C then Ctrl V into the document. This way you can play around with the spacing etc before you print. Hope this helps.
mrscdsmith 5587746
May 15, 2011
I am having trouble with the start don't know if I'm reading it wrong but mine will not come out right... I have the ch1, sc in next sc; yo and draw up a loop in next sc. yo and draw through 1 loop and then two loops twice... now begings the problem you have (sc, long-dc) all in same place where first long-dc was made. am i moving on to the next sc in the ring after the first two loops twice, or going into the same stitch that i just finished. This is not clear to me... may be that I am not reading right.. HELP!
elevatorgirl396 51 16703
Nov 28, 2015
Did you get the afghan done, I'm getting ready to make it for my brother and the start is confusing!? Trish
DottieGB2
Jan 03, 2010
I've made quilts with this pattern - I love it! It will be fun to crochet one, too.
Report Inappropriate Comment
Are you sure you would like to report this comment? It will be flagged for our moderators to take action.
Thank you for taking the time to improve the content on our site.