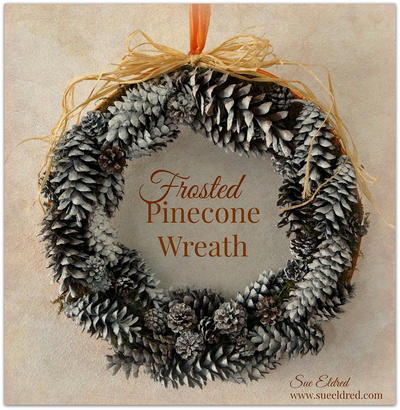
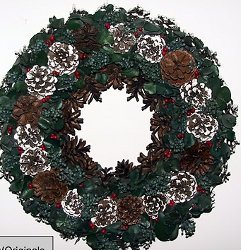
Make a Pine Cone Wreath
Learn how to make a pine cone wreath with these great step-by-step instructions. This wreath is a great decorating idea especially for the fall and winter months.

Materials:
- 1 Oasis Foam Ring - 8 1/2"
- 1 Can Spray Varnish
- Pinecones - 2 Packages Natural Small Pinecones
- White Tipped Pinecones - 1 Package
- Dark Green Preserved Eucalyptus - 1 - 2 Packages
- Dried Floral Berries - Teal Colored - 1 - 2 Packages
- 1/2" Red Holly Berry Head Wire Stems - 1 to 2 Packages
- Floral Picks - 1 to 2 Packages
- Dual Temperature Glue Gun
- Glue Gun and Glue Sticks
- Medium Gauge Wire
- Wire Cutters
Instructions:
(Note - These instructions are for ADULT use only as they require the use of a hot glue gun. Always use caution when working with any kind of hot glue gun.)
- Lay the white tipped pinecones out single file in a circle. Make sure you have enough pinecones to snugly fill the center of the 8 1/2" oasis foam ring.
- Lay the natural small pinecones out single file on their sides within the circle of white tipped pinecones. Make sure you have enough pinecones to snugly fill the inner circle of the 8 1/2" oasis foam ring.
- Lay the natural small pinecones out single file on their sides along the outer circle of the white tipped pinecones. Make sure you have enough pinecones to snugly fill the outer circle of the 8 1/2" oasis foam ring.
- Cut a long piece on the medium gauge wire and fold it in half and then form a 1" loop. Twist the wire around itself to hold the loop and then tightly wrap the wire around the top center back of the oasis foam ring. Twist the ends to secure it. This will form the loop to hold the wreath to the wall.
- Starting with the white tipped pinecones wrap a floral pick around the bottom of one of the pinecones and then insert it into the center of the foam. You may need to trim the wood pick slightly with the wire cutters if it is too long. Then using the low temperature setting of the dual temperature glue gun glue the pinecone to the foam to hold it.
- Wrap a floral pick around the bottom of the second white tipped pinecone and then position it snugly against the 1st pinecone and in the center of the foam ring. You may need to trim the wood pick slightly with the wire cutters if it is too long. Then using the low temperature setting of the dual temperature glue gun glue the pinecone to the foam (if need be) and to the 1st pinecone to hold it.
- Continue in this manner until you have filled the the center of the foam ring with a singular row of white tipped pinecones - snuggly fit.
- For the inner circle wrap a floral pick around the bottom of one of the natural small pinecones and then insert it on its side into the inner center of the foam ring. It should be snuggly positioned against the inner side of the white tipped pinecone. You may need to trim the wood pick slightly with the wire cutters if it is too long. Then using the low temperature setting of the dual temperature glue gun glue the pinecone to the inner center of the foam to hold it.
- Wrap a floral pick around the bottom of the second natural small pinecone and then position it on its side snugly against the 1st pinecone in the inner circle of the foam ring and snuggly against the inner side of the white tipped pinecone. You may need to trim the wood pick slightly with the wire cutters if it is too long. Then using the low temperature setting of the dual temperature glue gun glue the pinecone to the foam (if need be). Then using the low temperature setting of the dual temperature glue gun glue it to the natural small pinecone on its side in the inner circle, and to the side of the white tipped pinecone to hold it.
- Continue in this manner until you have filled the the inner circle of the foam ring with a singular row of natural small pinecones - snuggly fit.
- For the outer circle wrap a floral pick around the bottom of one of the natural small pinecones and then insert it on its side into the outer circle of the foam ring. It should be snuggly positioned against the outer side of the white tipped pinecone. You may need to trim the wood pick slightly with the wire cutters if it is too long. Then using the low temperature setting of the dual temperature glue gun glue the pinecone to the outer circle of the foam to hold it.
- Wrap a floral pick around the bottom of the second natural small pinecone and then position it on its side snugly against the 1st pinecone in the outer circle of the foam ring and snuggly against the outer side of the white tipped pinecone. You may need to trim the wood pick slightly with the wire cutters if it is too long. Then using the low temperature setting of the dual temperature glue gun glue the pinecone to the foam (if need be). Then using the low temperature setting of the dual temperature glue gun glue it to the natural small pinecone on its side in the outer circle, and to the outer side of the white tipped pinecone to hold it.
- Continue in this manner until you have filled the the outer circle of the foam ring with a singular row of natural small pinecones - snuggly fit.
- Cut the eucalyptus into many, many 3" - 4" sections with the wire cutters. Insert the preserved eucalyptus in between all the pinecones and using the low temperature setting of the dual temperature glue gun glue it to the pinecones. Continue in this manner until the wreath has been filled and the eucalyptus placement is pleasing to the eye.
- Cut the dried floral berries into many, many 3" - 4" sections. Insert the dried floral berries in between all the pinecones and and eucalyptus until the placement is pleasing to the eye. Then using the low temperature setting of the dual temperature glue gun glue it to hold it in place.
- Fold many, many of the red holly berry wire stems in half and then insert them in between the pinecones, eucalyptus, and dried floral berries until the placement is pleasing to the eye. If need be, using the low temperature setting of the dual temperature glue gun glue it to hold it in place.
- Spray the whole wreath with varnish.
See this project and more in 16 Decorative Front Door Wreaths for Fall.
Your Recently Viewed Projects

Thanks for your comment. Don't forget to share!
agypsyangel
Nov 25, 2010
this is very cute you could also add glitter to the cones for a sparkly touch
Report Inappropriate Comment
Are you sure you would like to report this comment? It will be flagged for our moderators to take action.
Thank you for taking the time to improve the content on our site.