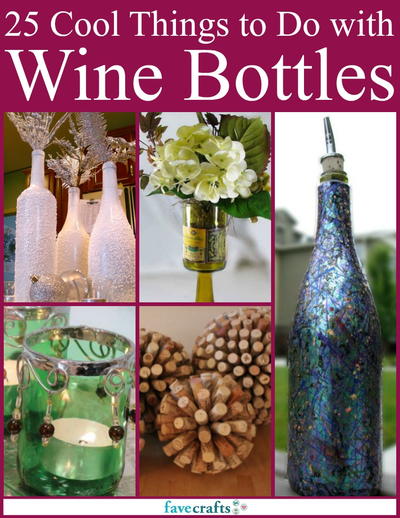
Rhinestone Embellished DIY Wine Bottle Craft
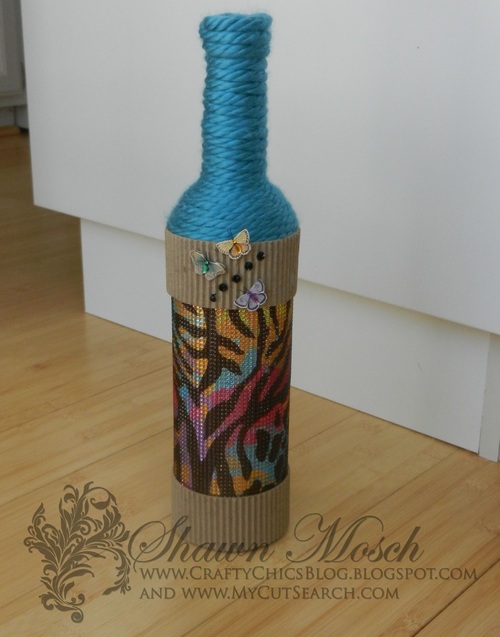
Wine bottle crafts ideas can help you reuse items and save big at the same time. This Rhinestone Embellished DIY Wine Bottle Craft will add a classy touch to anyone's decor. Embellished wine bottles are a great craft to recycle bottles and add some color to any area of your home. This is also a great excuse to use up scarp yarn and rhinestones. The pretty colors and understated look make this a true sight to behold. Best of all, this project is super easy to complete, so it's perfect for beginners. The next time you host a party, save the empty wine bottle and use them to create cool wine bottle projects to display at home.
Primary TechniqueGeneral Crafts

SeasonSpring
Materials List
- Wine bottle
- Rhinestone sticker sheet
- 1 skein Bernat Bulky Yarn
- Corrugated tape
- Butterfly stickers from Little B
Instructions
-
Since a couple of the wine bottles my sister gave me have the lettering and label information printed right on the glass, I knew I was not going to be able to use these bottles for painted projects.
-
See what I mean? I would have to do SO MANY LAYERS of paint to fully cover and hide the words.
-
So on to plan B . . Bernat Mega Bulky yarn, rhinestone sticker sheets from The Buckle Boutique and embellishments from Little B. {wow . . . I guess that really is Plan B . . . lots of companies with the letter B in the name}
-
First I used the rhinestone sticker sheets from The Buckle Boutique to cover the main portion of the bottle. This fun animal print is from the new Tween Quad sheet. The quad sheets have 4 different patterns on one sheet, so you can get more variety out of every sheet. I love that these rhinestone are all on one large sheet with an adhesive back. I just peeled part of the backing off and lined it up on the bottle . . .
-
Then as I rolled the bottle and continued to peel off the backing the bottle basically covered itself in rhinestones. Quick, easy and beautiful! And since this is from the Tween Quad sheet, I still have 3 other patterns left in case I want to make this same project again in a different pattern.
-
First I used the rhinestone sticker sheets from The Buckle Boutique to cover the main portion of the bottle. This fun animal print is from the new Tween Quad sheet. The quad sheets have 4 different patterns on one sheet, so you can get more variety out of every sheet. I love that these rhinestone are all on one large sheet with an adhesive back. I just peeled part of the backing off and lined it up on the bottle . . .
-
Next I added some glue to the top of the bottle, and dripped a little down the back. I did this so I could start the tail down the back and have it tucked under the yarn.
-
Once I wrapped the yarn around the top I let it sit for a little while. I wanted to make sure that the yarn was secure at the top before I started to wrap it around the bottle. In this photo you can see the little tail I left hanging down. As I wrap the yarn around the bottle I will go right over that so that the end of the yarn is not exposed.
-
Then I applied more glue and just wound the yarn around the bottle, making sure not to leave any gaps between the rows.
-
After I was sure that the glue had dried under the yarn, I used the corrugated tape from Little B to cover the last parts of the bottle. Just the the rhinestone sticker sheets, this tape has an adhesive back, so I just needed to cut off the right amount, peel off the backing and stick it on the bottle.
-
When I finished with the corrugated tape I felt like it still needed "something". I used a few scraps of the rhinestone sticker sheets I had left over from another project along with butterfly stickers from Little B
-
I love how these dimensional butterfly stickers look like they are going to fly right off the bottle. And look how great the colors go with the pattern in the rhinestone sticker sheet! It is like all of these products were made to go together.