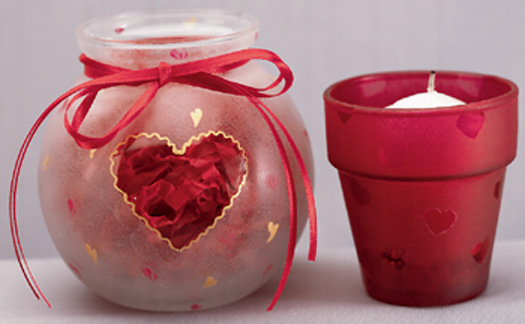
Ultra Frost Heart Votives
Add a translucent, frosted elegance to glass candle holders for a romantic Valentine's Day gift.
Materials:
DecoArt Products Required
Ultra Frost
- UF01 - Frost White
- UF03 - Raspberry Red
- UF04 - Gold
Supplies
- 1 Liner
- Brush basin
- Cosmetic sponges
- Palette
- Paper towels
- Scissors
- One large heart sticker
- 15 small heart stickers
- Small Red Glass Votive
- Small Ivy Bowl
Steps:
1. Remove dust and debris from glass surfaces.
Painting Instructions:
Small Red Ivy Bowl:
1. Before randomly applying small heart stickers on the votive, remove some of the sticky backing by placing the back of each sticker to a piece of fabric. For example, place the sticker on your pants or apron then apply to the bowl. This makes the stickers much easier to remove when finished.
2. Cut cosmetic sponge into 4 to 6 small wedges; use one wedge and save the remaining wedges for future use.
3. Dip one side of the sponge wedge into Raspberry Red. Dab excess off on a clean area of the palette. Use a light dabbing motion to apply the paint to the surface. Reload sponge with paint as needed.
4. Let dry.
5. Remove stickers. Place votive candle inside.
White Ivy Bowl
1. Before applying the large heart sticker centrally on the bowl, remove some of the sticky backing by placing the back of the sticker to a piece of fabric. For example, place the sticker on your pants or apron then apply to the bowl. This makes the sticker much easier to remove when finished.
2. Cut cosmetic sponge into 4 to 6 small wedges; use one wedge and save the remaining wedges for future use.
3. Dip one side of one sponge wedge into the Frost White. Dab excess off on a clean area of the palette. Use a light, dabbing motion to apply the paint to the surface. Reload sponge with paint as needed. Cover the entire area and let dry.
4. Use the liner brush to make Gold and Raspberry hearts randomly around the bowl per photo. Pull two comma strokes, side-by-side, into one point
5. Let dry and remove sticker.
Read Next24 Galentine's Day Crafts