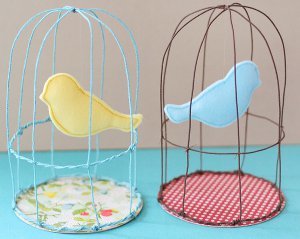
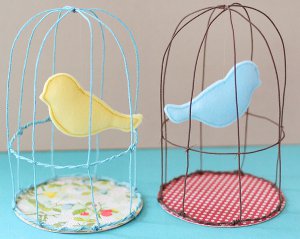
Whimsical Spring Birdcages
 These Whimsical Spring Birdcages from Fiskars are great to use for your springtime decor. You can arrange them on your Easter table or display them on the windowsill for all to see and admire. These also make cute favors for spring celebrations and parties.
You can find this project, as well as many others, in our new eBook, The Ultimate Craft Guide: 25 Free Craft Projects for Every Crafter. Download your own free copy today!
Materials:
- Fuse Creativity System® Starter Set
- Medium Design Set - Bird
- Medium Expansion Pack - Bird
- Cuts+More™ Scissors (9")
- Circle Cutter
Instructions:
- Using the Fuse Creativity System® to create the two birds from the same color of felt. Tip: Add a scrap of printer paper between the felt and cutting plate to avoid leaving behind felt fuzzies.

- Machine or hand-sew felt birds together leaving an inch opening. Stuff bird (I used fluffed cotton balls) and sew opening closed. Tip: Use stuffing tool from Sew Taxi. Thread transparent nylon thread at top of neck and tie to secure for hanging.

- Twist together two or three lengths of brown cloth stem wires and form into a 4.5 inch circle. This is the base ring. Create a duplicate circle using one less wire than previous. This is your stabilizing ring. Use pliers to help twist the wires together to secure.
- Twist the end of another wire onto base ring. Twist the other end to the opposite side of base ring. Repeat this three more times to create cage.

- Using doubled brown thread, knot stabilizing ring to wires at same height around cage. Add another thread knot at the top where the wires meet at center to secure.

- Using circle cutter on craft mat, cut a circle of patterned paper to fit bottom of cage (mine is 4.5 inches).
- Adhere circle to piece of chipboard and trim with scissors.
- Use low-temp hot glue to secure cage to paper base. Tip: I chose to spray paint one of my birdcages prior to adding base.
- Tie bird onto top of cage to complete.
Read Next47 DIY Spring Wreath Ideas