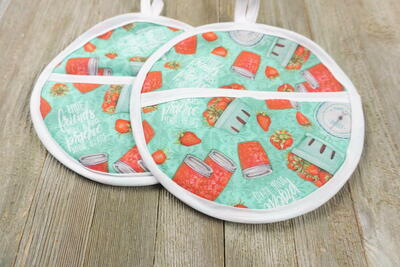
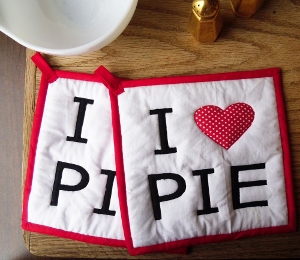
I Heart Pie Potholders
In this craft video from Rebekah Fox, you'll learn how to make a potholder that says "I heart pie" on it! Learn basic quilting techniques as well as how to make potholder loops.
Materials:
- 16" x 16" piece of white cotton, cut into two 8" squares
- 17" x 17" piece of red print cotton, cut into 8-1/2" squares
- 1/2 yard solid red cotton OR 3 yards of 7/8" quilt binding
- Small scraps of black cotton
- Small scraps of small-scale red print
- Two print outs of Applique Template (link included in the video description box)
- 16" x 16" piece of Insul-Bright poly/mylar batting, cut into two 8" squares
- 5 medium safety pins
- Fusible Web (such as Wonder Under)
- Walking Foot (a sewing machine attachment)
- Rotary cutter supplies (optional)
- Template
Video:
Instructions:
Note: Finished potholder will measure 8" square.
- Cut out letters from one of the Applique Template print outs. Fuse some fusible web to the black and small-scale red print cottons. Follow your product's directions on how to do this. Lightly dab with gluestick on backside of letters and hearts and adhere each, colored side up, to the paper backing of the fusible web. Cut out each. Remove templates.
- Now to make placement dots on front piece of potholder so you know where to place appliques. With second print out of Applique Template, cut around black box. Place template on top of a white fabric square and with a pin, pin through both layers at one of the tiny heart placement dots. Slowly lift the paper and mark with chalk or soluble pen where the pin is inserted. Do this to each tiny heart dot.
- Peel off the paper backing from each applique letter and heart and place, sticky side down, on the white fabric square following the placement dots you made earlier. Refer to Applique Template if you need to. Fuse appliques to white fabric using hot, dry iron.
- Now to layer the potholder. Start with one piece of poly/mylar batting, follow with two layers of cotton batting, and then finally, one white fabric square with appliques, right side up. Safety pin baste layers together and thread baste about 1/2" from edges, all the way around. We'll be attaching the backing later.
- Attach walking foot to machine and machine quilt around letters with black thread and hearts with red. Use a small straight stitch: like 1.5 mm.
- Now to baste the backing on. Lay the large red print cotton RS down on work surface and center quilted piece on top. Thread baste 1/4" at all edges. Remove safety pins and previous basting stitches located a 1/2" from edges. Measure piece from side to side to to see if it measures 8" square. Trim away backing and, if there is any unevenness, mark and trim where needed.
- Let's make the hanging loops now. With a fabric strip of solid red cotton that measures 5" x 1-1/2", (you can use a scrap of your quilt binding for this), fold in half lengthwise and press. Open and fold long, raw edges to center crease, press. Finally, fold in half lengthwise again. Stitch along the two folds.
- Onto the quilt binding! I used store-bought quilt binding in my example, but you can make your own. To do this, cut a bias strip that is 2-1/4" wide and sew lengths together so that total length is roughly 3 yards. There are a lot of great videos on this--so take a look. Now to sew the quilt binding to the potholder: with RS up and starting at the bottom of the potholder, stitch the binding leaving about 5 inches excess. Stop about 1/4" from first corner, remove from machine and cut threads. To make a mitered corner, fold the binding at a 45 degree angle up and away from the potholder. Then fold back down so that it is even with the next side. Stitch from corner to 1/4” away from next corner and repeat around. After working all the way around and stitching the two ends together, trim away the excess end open up the seam. Stitch over final section of binding.
- To sew down binding on WS, turn down binding and while making sure the fold of the binding is past the stitching and basting, slip stitch in place using a double threaded needle.
- Now let's put those hanging loops on. You can attach it at either top corner. To do this, fold under one end of the loop and place at front corner. Hold in place with your fingers. Fold under other end and place at same location on backside. Finger pin and stitch in place. I make two lines of stitching for the loops for extra strength.
Enjoy! Now go make a pie. . .
Read NextEasy Potholder With Pocket


Thanks for your comment. Don't forget to share!
Marilyn B
Jun 07, 2017
Thank you for such detailed instructions on making this I love pie potholder! A very dear friend would have loved these, as this friend would make pies with any excuse, picking blueberries, preacher and apples, and on Thanksgiving making dozens of pumpkin pie for anyone who wanted one or two! Thanks for sharing a fun and yet practical project!
Report Inappropriate Comment
Are you sure you would like to report this comment? It will be flagged for our moderators to take action.
Thank you for taking the time to improve the content on our site.