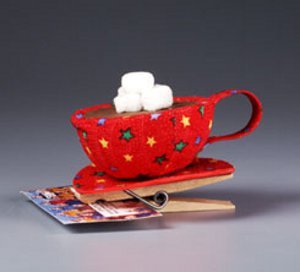
Hot Cocoa Ornament
All you need to create this warm cup o' cocoa is STYROFOAM Brand Foam, fabric and a clothespin. It's such an easy homemade Christmas ornament and the final product looks good enough to eat.

Materials:
- STYROFOAM™ Brand Foam:
- 3" Ball
- Cotton fabrics: 45" print, 1/4 yd.; brown, 2-1/2" square scrap
- Self-adhesive craft foam, color of choice
- Thin cardboard, 1/2" x 3-1/2"
- Wooden spring-type clothespin
- Serrated knife
- Candle stub or paraffin
- Pencil
- Ruler
- Metal tablespoon
- Low-temp glue gun and glue sticks
- Thick, white craft glue
- Compass or circle templates: 2-1/4"; 3"
- Wide flat paintbrush
- Paper towels
- Scissors
STYROFOAM has removed the pattern for this project from their site. We're so sorry for the inconvenience. If and when the pattern returns, we'll be sure to update our project.
Instructions:
Note: Adults only should handle the serrated knife.
- Wax serrated knife with candle stub or paraffin; cut foam ball in half. Cut thin slice from rounded top of one half-ball to create flat cup bottom; save other half-ball for another use.
- Use back of tablespoon to press very shallow depression into center top of cup, leaving 1/4"-wide edge around rim.
- Cut pattern pieces from print fabric as indicated. Spread thin layer of white glue onto back of one fabric piece. Place fabric point at center bottom of cup, then smooth fabric up side and over rim; clip fabric as needed so it lays flat. Repeat with remaining fabric pieces to cover foam, overlapping edges slightly.
- Use compass or template to draw 2-1/4" circle onto wrong side of brown fabric for cocoa; cut out. Glue cocoa to top of cup.
- Use compass to draw 3" circle onto craft foam for saucer; cut out. Peel away backing paper and adhere to wrong side of print fabric; trim excess.
- Cut 1-1/4" x 3-1/2" strip from print fabric. Glue and wrap fabric around cardboard strip. Before glue dries completely, fold one short end over 1/4" and bend rest of strip into curved handle shape. Let dry.
- Use glue gun to glue cup to saucer and handle to cup, placing 1/4" tab near rim.
- For marshmallows, cut remaining foam half-ball into small pieces, approximately 1/2" square. Use fingers to gently mold foam into rounded rectangles. Glue small pile of marshmallows to center top of cup.
- Glue clothespin to bottom of saucer; clip to tree.
®™ Trademark of The Dow Chemical Company ("Dow") or an affiliated company of Dow. For more project ideas, please see styrofoamstyle.com.
Your Recently Viewed Projects
Thanks for your comment. Don't forget to share!
Marilyn B
Nov 18, 2017
Even though the actual pattern is no longer available, you can still get the basic idea of it from the clear instructions! Most crafty folks can figure it out and the use of the fabric is a good way to use up some scraps from your stash. I have made ornaments using a clothespin as the way to attach it. As an alternative, I painted the clothespin green so it blended in with the tree! Thanks for sharing a clever and creative idea!
shawnslater 806997 8
Aug 27, 2012
LOVE, LOVE, LOVE it. Soooooooooooo incredibly cute and easy. I'm thinking teacher gift card holders. Thank you.
Report Inappropriate Comment
Are you sure you would like to report this comment? It will be flagged for our moderators to take action.
Thank you for taking the time to improve the content on our site.