This project was submitted by one of our readers, just like you.
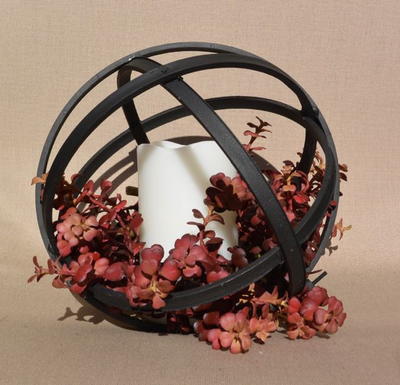
Marvelous Mixed Media Decor
Using several fantastic crafting products to make one piece of DIY home dcor, this simple stunner will be a real conversation starter when you display it in your home.

Marvelous Mixed Media Decor
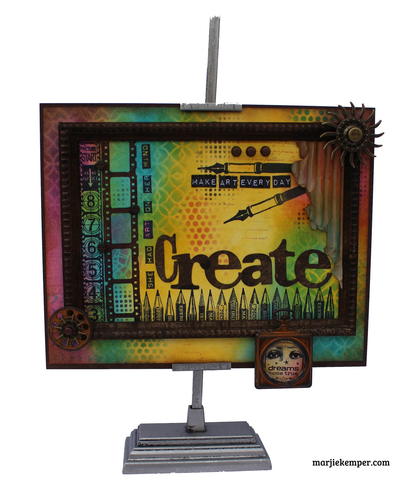
In the Designer's Words: "I created this home décor piece using lots of new products from CHA, as well as two of my all-time favorite Sizzix dies (Tim Holtz Word Play and Mini Filmstrip) from my stash. I started out by blending a background using Ranger Distress Inks and then embellished with stamps and stencils. What appeals to me most is the contrast between the bright background and the metal, wood, and paper elements. I’ll keep this in a prominent place in my studio to remind myself to find time to Make Time to Create Every Day. I hope you feel inspired and that you'll be easy on yourself... use what you have and just enjoy the process."
One of the best things about being a DIY craft lover is that you learn to love all kinds of crafting materials and amass a horde of fabulous, fun, and unique crafting materials. The problem with having this ever-growing stash is that sometimes it can be hard to decide what kind of craft to make. Sometimes paper crafts sound boring and home décor sounds too lofty. When this happens, get creative and combine crafting ideas to make pieces like this Marvelous Mixed Media Décor! Using several fantastic crafting products to make one piece of DIY home décor, this simple stunner will be a real conversation starter when you display it in your home.
Estimated Cost$31+
Time to CompleteWeekend project
Primary TechniqueMixed Media
Project or Page Size8.5 inches x 11 inches
Type of Paper UsedCardstock

Materials List
- Sizzix Dies - Tim Holtz Word Play and Mini Filmstrip
- Ranger Ink Distress Inks
- Prima/Finnabair Mechanicals
- Assorted stamps
- Assorted Stencils
- Mini alphabet stickers
Instructions
-
Blend Distress Ink colors on card stock using Ink Blending tools for background
-
Diecut letters and filmstrip die to fit frame
-
Add stamping and stenciling as desired
-
Choose metal embellishments and adhere to project. Allow time for drying.
-
Tear corrugated cardboard and color with inks. Fit in corner.
-
Fill a metal embellishment with a stamped image and any kind of clear resin. Let dry overnight
-
Attach all remaining embellishments.
Notes

Read NextDecoupaged Letters Decor