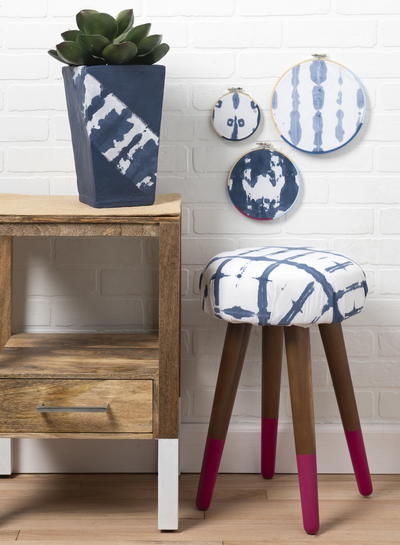
Shibori-Inspired DIY Decor

The name says it all! Discover 3 gorgeous Shibori-Inspired DIY Decor Projects to decorate your home: a stool, planter, and embroidery hoop art. Included in this tutorial is a helpful video teaching you all about the Shibori style tie dye technique and different folding methods to achieve the look. Traditional Shibori materials can be challenging to work with, but with Plaid's method, you can use regular fabric paint mixed with water to create your own twist on this indigo dye method. The results are so beautiful! Add pops of navy to your decor with any of the tutorials in this short roundup.
Main MaterialPaint

Materials List
- Mod Podge ® Matte, 4 oz.
- FolkArt ® Acrylic Colors - Thunder Blue, 2 oz.
- FolkArt ® Acrylic Colors - Light Blue, 2 oz.
- FolkArt ® Acrylic Colors - Blue Ribbon, 2 oz.
- FolkArt ® Acrylic Colors - Magenta, 2 oz.
- 3” Wood squares or other shapes
- 2 yards bright white muslin or cotton fabric
- Rubber bands
- 1” paintbrush
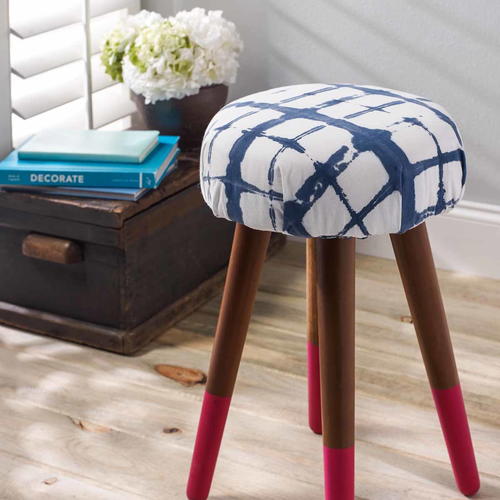
- Round wooden stool
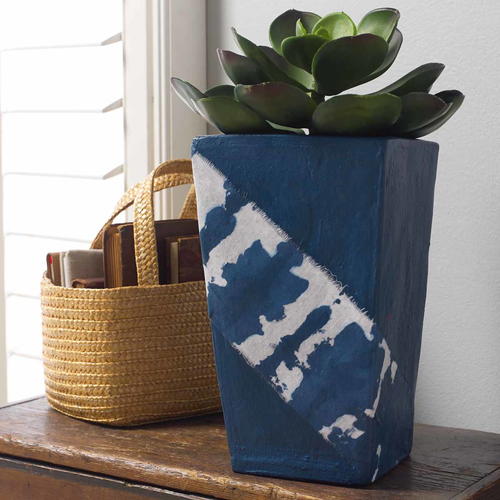
- Rectangular ceramic planter
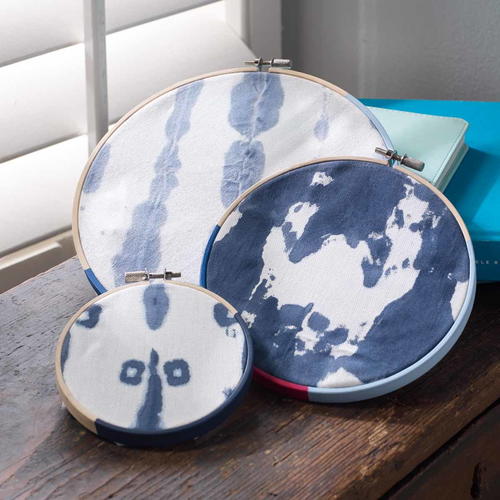
- Three (3) Embroidery hoops of various sizes
- Scissors
- Staple gun
Instructions for Shibori-Inspired DIY Decor:
Shibori Technique
-
Pick a Shibori folding technique and use the small wood shapes and rubber bands to sandwich fabric in between shapes.
-
Mix Thunder Blue with water and saturate exposed areas of fabric.
-
Unfold fabric and hang to dry.
Stool
-
Wrap a piece of fabric around stool cushion and staple underneath.
Planter
-
Paint Planter using a 1” flat brush and Thunder Blue. Allow to dry.
-
Cut a 4” wide strip of faux-shibori fabric.
-
Attach the strip of fabric on plater using a 1” flat brush and matte Mod Podge. Apply a thin layer of Mod Podge where you want to place the strip of fabric.
-
Apply the fabric then brush on an additional coat of Mod Podge to seal the surface of the fabric to the planter.
Embroidery Hoops
-
Cut a section of fabric slightly larger than the embroidery hoop.
-
Stretch the fabric over the inner hoop and place the outer hoop over it.
-
Pull fabric taut and tighten the hoop closure.
Read NextRabbit DIY Rug