
This project was submitted by one of our readers, just like you.
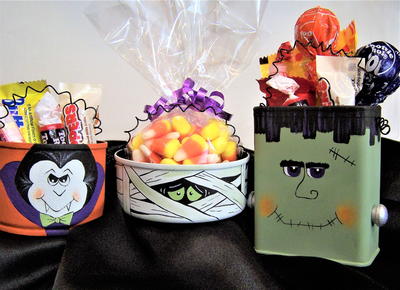
Monster Mash Halloween Favors

Monster Mash Halloween Favors
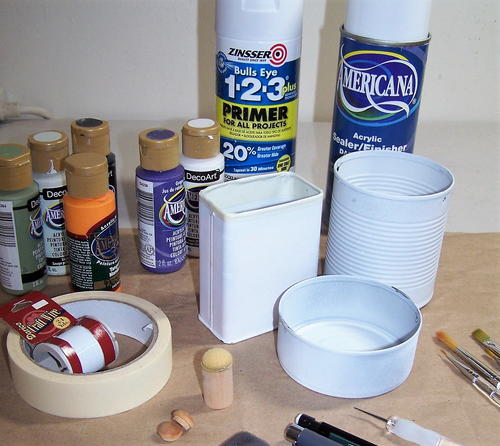
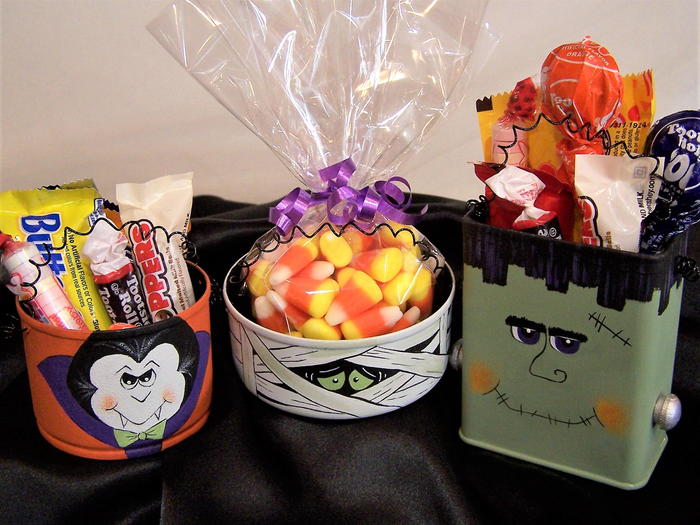
From the Designer: "These monsters will be a hit at your Halloween bash! Root through your recycle bin for small cans with smooth sides such as the tuna, olive, and spice such as the cans used here. You don't have to be a great painter to paint these simple designs using the patterns and step by step instructions provided. You may already have most of the supplies on hand such as acrylic paint, spray primer, and craft wire."
Primary TechniquePainting

SeasonFall
HolidayHalloween
Project TypeMake a Project
Materials List
-
DecoArt Americana Acrylic Paint:
• Aloe
• Lamp Black
• Foliage Green
• Grape Juice
• Lamp Black
• Light Sage
• Persimmon
• Snow White
DecoArt Dazzling Metallics:
• Shimmering Silver
- DecoArt Americana Acrylic Sealer/Finisher Matte (DAS13)
- Rust-Oleum Universal Bonding Primer (white) or similar spray primer for metal
-
Royal Brushes/Tools:
• Royal Gold Shader Series R150 #4, 8
• Pointed Round Series R250-#2, 20/0
• Royal Stylus Tool (#RD5)
• Royal Dabber Set (#RD110)
Foam paint brush or large area brush
- E-6000 glue
- Two wooden button plugs
- Black craft wire and wire cutters/pliers
- Tracing and transfer paper (graphite paper) white and grey
- Electric drill
-
Pencil with white eraser
Instructions
-
Remove labels and glue from cans and wash thoroughly. Run the empty can through the can opener several times to smooth any rough metal edges. Drill two holes in each can near the upper edge for the wires.
-
Spray cans with primer in a well-ventilated area, preferably outside.
-
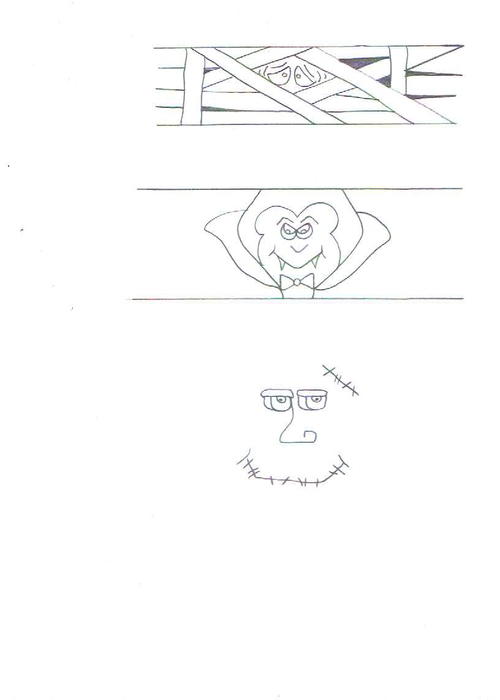
Patterns: Use a copier to reduce or enlarge the patterns as needed to fit your cans. Make a tracing of the patterns. Center the pattern over the front of the can and affix with painter’s tape on one edge. Slip the transfer paper under the pattern and use the stylus to trace over the lines lightly to transfer the bandages to the can. Lift the pattern and transfer paper to be sure all lines were transferred. Remove the pattern and erase any unwanted graphite marks.
Note: Click image of pattern for larger version. -
Use appropriate sized brushes to paint the designs unless otherwise noted. Thin paint with water for fine line-work or to make paint flow better.
-
Use the foam brush and Lamp Black to base the insides on all cans. Repeat until opaque.
-
Mummy Dearest: Use the foam brush and Light Sage to paint a section on the outside of the can. Let dry. Repeat until opaque. Center the pattern over the front of the can and affix with masking tape on one edge. Slip the grey transfer paper under the pattern and use the stylus to trace over the lines lightly to transfer the bandages to the can. Omit the details and eyes for now. Remove the patterns and use the eraser to remove any unwanted graphite marks. Use the pencil to draw in the bandages around the rest of the can using the photo as a guide. Use and Lamp Black to paint the negative space between the bandages. Transfer the eyes using the white graphite paper. Use Aloe to base the eyes. Use the stylus and Lamp Black to dot the pupils. Let dry then add a smaller dot with Snow White. Use Snow White to paint eyebrows and worry lines. Use Lamp Black to paint details on bandages. Use water to thin Aloe and wash it here and there over some bandages.
-
Frankie: Use Aloe to paint the outside of the can. Use the #8 shader and Lamp Black to paint hair. Use the photo as a guide for placement. Begin the stroke at the bottom edge of the hair. Allow the brush to leave a raggedy edge. Let dry. Load the #2 round with a small amount of Grape Juice. Add details to hair. Transfer the pattern. Use Grape Juice to paint irises. Use Snow White to paint white areas of eyes. Use Lamp Black to paint pupils and shaggy eyebrows. Use the stylus and Snow White to add dots of reflected light. Use Lamp Back to paint scar and mouth and to outline eyes. Load dabber with a small amount of Persimmon. Offload excess paint onto a paper towel. Lightly stipple cheeks. Use Shimmering Silver to paint the wooden button plugs. Let dry then glue to sides of can.
-
The Count: Use Light Sage to base an area front of the can large enough for the face. Transfer the pattern. Use Grape Juice to paint the collar. Use Lamp Black to base the hair and pupils. Use the #2 round and a small amount of Snow White to drybrush the hair details. Use Foliage Green + touch of Snow White to base the bow tie. Use Lamp Black to paint face details and to outline the bowtie. Use the stylus and Snow White to add dots of reflected highlights in the eyes. Use the smallest dabber and a small amount of Persimmon to stipple the cheeks. Use Persimmon to base coat the remaining area of the can.
-
Erase any graphite lines not covered by paint. Spray cans lightly with Sealer/Finisher in a well-ventilated area.
-
Cut 3 lengths of wire at least 12” each. Wrap wires around a paintbrush handle leaving 2” at either end to fit through the holes in the cans. Insert ends into holes from the inside of the cans then carefully curl ends. Fill with wrapped treats and enjoy!
Why You'll Love This Recycled Craft
We've got the inside scoop on why you should whip up a batch of these adorable Monster Mash Halloween Favors for your next spooky shindig:
1. Budget-Friendly Fun: One of the coolest things about this craft project is that you can create cute and quirky Halloween favors without breaking the bank. All you need are some small cans from your recycling bin and some basic craft supplies like acrylic paint and craft wire. No need to splurge on expensive materials - just get creative with what you already have at home!
2. Customizable Creations: The best part about making these little monster favors is that you can let your imagination run wild with the design. Whether you want to create a friendly monster with a big grin or a spooky creature with glowing eyes, the possibilities are endless. Plus, the designer provides step-by-step instructions and patterns to help you bring your monster to life, so even if you're not a skilled painter, you can still create a masterpiece.
3. Eco-Friendly Entertainment: By repurposing empty cans from your recycling bin, you're not only saving money but also helping the environment. Instead of tossing those cans into the trash, give them a new life as adorable Halloween decorations. Your guests will love the creativity and effort you put into making these unique favors, and you'll feel good knowing you're reducing waste in a fun and festive way.