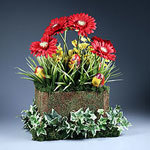
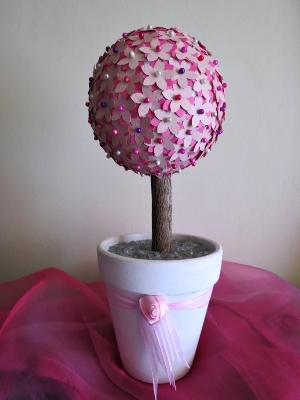
Boldly Blooming Centerpiece
Be bold! Set aside those traditional, whisper-soft pastels this spring and opt for vibrancy in this Boldly Blooming Centerpiece. Freshen up your collection of DIY home decor with a floral planter that will cheer you up even when the sky is cloudy. This is one of the most original and beautiful DIY centerpiece ideas you'll see this season. The red Gerbera daisies and colorful eggs in this faux-finished planter are eye-catching accents that make this floral centerpiece the star of the show.

Materials:
-
STYROFOAM™ Brand Foam:
- Blocks, 8" x 4" x 2", three
- Eggs, 2-1/2", six
- Sheet, 36" x 12" x 1" OR Blocks, two each: 18" x 12" x 1"; 12" x 10" x 1"
- Latex spray paints: Green, red and sheer gold
- Elegant textured spray paint: soft yellow
- Faux stone spray paint: gold metallic, copper
- Florals: variegated grass, six bunches; variegated ivy, four stems; red gerbera daisies, seven; yellow oncidium orchids, ten stems; dark green reindeer moss, large bag
- Floral pins
- Paper, one sheet each: green/red/yellow floral-print tissue; natural card stock, 12" x 10"
- Serrated knife
- Candle stub or paraffin
- Fine-line black permanent marker
- Pencil
- Ruler
- Wooden skewers, 12", six
- Small disposable bowls, two
- Plastic spoon
- Water basin
- Paper towels
- Waxed paper
- Scissors
- Floral shears or wire cutters
- Large cardboard box
- Low-temp glue gun and glue sticks
- Thick, white craft glue
- Optional: disposable gloves; hair dryer
Instructions:
Eggs:
-
Tear tissue paper into several approximately 2" pieces.
-
Mix one part white glue with two parts water in disposable bowl. If desired, put on gloves.
-
Dip one tissue piece into glue/water mixture and then smooth onto surface of foam egg. Continue until egg is completely covered, allowing tissue pieces to wrinkle and overlap. Repeat for all eggs. Place eggs on waxed paper to dry overnight or use dryer.
- Use glue gun to glue one end of each skewer into bottom of one egg for "stem."
Planter Box:
-
Wax serrated knife with candle stub or paraffin. Measure and mark rectangles on foam sheet, or 1"-thick foam blocks, as follows: two 8-1/4" x 5-3/4" (front/back); two 7" x 5-3/4" (sides); one 8-1/4" x 5" (bottom); one 9-1/4" x 12" (base). Cut out.
-
Glue foam sides to ends of foam front and back to create 5-3/4"-tall box shape. Secure joints with floral pins dipped in white glue. Glue and pin foam bottom to inside bottom of box.
-
Follow manufacturer's instructions to prepare paints. Place foam box inside cardboard box in well-ventilated area; work outdoors if weather permits.
-
Spray paint foam box green. Randomly spray box with touches of sheer gold, soft yellow, metallic gold and copper. While wet, dab foam surface with small, dry piece of paper towel to remove top layers of paint in some areas. Let dry.
-
Spray red paint into disposable bowl. Use small, dry piece of paper towel to randomly apply touches of red to painted box. Repeat using copper. Let dry.
-
Glue and pin bottom of box to center of base. Trace base onto card stock; cut out and glue card stock to bottom of base. Use glue gun to glue clumps of moss to exposed foam at base and to top planter edge, completely covering surface.
-
Stack and glue remaining foam blocks inside center of box. Trim excess foam above box rim and use remnants to fill gaps in planter.
-
Trim grass stems. Use glue gun to apply glue to stems before inserting into foam inside box. Repeat with daisies and orchids, referring to photo for placement.
-
Trim egg skewers as needed to fit inside box. Apply glue to ends and insert into arrangement so eggs rest on top of and between grass blades.
- Trim ivy stems, apply glue to ends and insert into foam base as shown. Secure with floral pins. Cover exposed pins with small clumps of moss.
®™ Trademark of The Dow Chemical Company ("Dow") or an affiliated company of Dow. For more project ideas, please see styrofoamstyle.com.
Read Next24 Knockout Tissue Paper Flowers