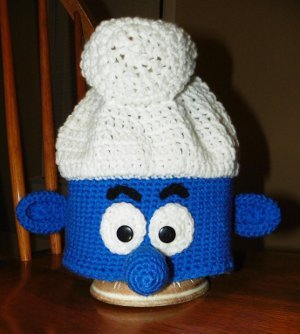
Ear Flap Hat for Kids
Free crochet hat patterns are great come wintertime! This Ear Flap Hat for Kids works up quickly and is a great gift for everyone on your list. This pattern is geared to fit kids ages 4-10.

Materials:
- AU 8 ply yarn (US Light worsted/DK) Less than 50 gm of main color, 25 gm of contrasting color
-
5.00 mm hook (US G)
Instructions:
Hat begins at top of head, ear flaps attached at lower edge of hat.
Chain 4, sl st to first ch to form a ring.
-
ch 1, work 12 hdc into ring, sl st to join in the 1st hdc (you will do this on every round)
-
ch 1, work 2 hdc into each hdc around sl st to join (24 hdc)
-
ch 1, *work 1 hdc into the next 2 hdc, work 2 hdc into the next* repeat from *to* sl st to join (32 hdc)
-
ch 1, *work 1 hdc into the next 3 hdc, work 2 hdc into the next* repeat from *to* sl st to join (40 hdc)
-
ch 1, *work 1 hdc into the next 4 hdc, work 2 hdc into the next* repeat from *to* sl st to join (48 hdc)
-
ch 1, *work 1 hdc into the next 5 hdc, work 2 hdc into the next* repeat from *to* sl st to join (56 hdc)
-
End Increases: ch 1, work 1 hdc in each st around sl st to join (56 hdc)
- Rows: 8 to 21:, repeat row 7, finish off leaving a small tail, this will assist you with your earflap placement and can be sewn in later. Hat can be made longer, just work more rows
Ear Flap Placements:
-
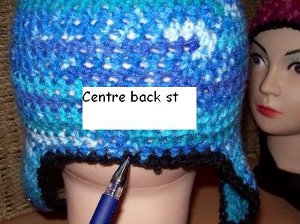
Using the small tail as your centre back st, each ear flap with be placed 7 st’s away from both sides of this st.
-
Left Ear flap (as you would wear it): Join yarn to the 7th hdc after your centre back st (do not count centre back st)
-
Ch 1, work 1hdc in same place as join, work 1 hdc into the next 9 hdc’s (10 hdc) turn
-
Ch 1, work 1 hdc in each hdc across (10 hdc) turn. Repeat.
-
Begin decreases: Ch 1, work 1 hdc into next hdc, skip next hdc, work 1 hdc into next 6 hdc, skip next hdc, work 1 hdc into next hdc, turn (8 hdc)
-
Ch 1, work 1 hdc in each hdc across (8 hdc) turn
-
Ch 1, work 1 hdc into next hdc, skip next hdc, work 1 hdc into next 4 hdc, skip next hdc, work 1 hdc into next hdc, turn (6 hdc)
-
Ch 1, work 1 hdc in each hdc across (6 hdc) turn
-
Ch 1, work 1 hdc into next hdc, skip next hdc, work 1 hdc into next 2 hdc, skip next hdc, work 1 hdc into next hdc, turn (4 hdc)
-
Ch 1, work 1 hdc into next hdc, skip next hdc, skip next hdc, work 1 hdc into next hdc, (2 hdc), finish off
-
Right Ear Flap (as you would wear it): Join yarn to the 17th hdc before your centre back st (do not count back st)
-
Repeat pattern for left ear flap to make the right ear flap.
-
Give your hat an edging and ties.
-
At this point, sew in all loose ends.
Edging:
Using contrasting color
-
Attach yarn to any st at the back of the hat.
-
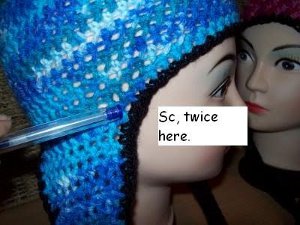
Make 1 sc in each st and space around, placing 2 sc’s in each corner where the flaps join the hat, you will have 2 corners on each flap.
-
Check your work as you go around to maintain evenness.
Ties:
-
We made ours 14 inches long and used a hdc foundation row stitch (see, Chainless Half Double Crochet Foundation video below), then sewed the ties on.
- You can also make the ties with several strands of yarn and braid them.
Your Recently Viewed Projects


Thanks for your comment. Don't forget to share!
CatsRockinCrochet
Jan 10, 2013
The instructions have been copied wrong. Here is the link to the correct pattern. http://cats-rockin-crochet.blogspot.com.au/2010/06/childs-hdc-ear-flap-hat.html Cheers Cat.
dewittj 5453985
Aug 28, 2012
tried to print this pattern and it wont let me print it . am i doing somethiong wrong?
schoolpretty 83334 12
Feb 13, 2012
I found a child's horse ear flap hat and Lighting McQueen pattern on your site a while back. I've found that I don't have all the instructions and I can't find the patterns again. Thank you
momaw1066 1348773
Jan 30, 2012
Do you think she means to follow Row 9 instead of row 7.I am going to try this as row 7 didnt work Thank you
dorismills 5584275
Jan 24, 2012
Sherry, It looks to me as if youshould continue increasing in row 7 adding 8 stitches and on to 56 stitches in row 8. So row 7 is 48 and row 8 comes to 56. You are increasing 8 stitches in each row and then crocccccccccheting even for row 9 Hope hat this has helped you.
sherryalsup 914312 3
Dec 15, 2011
Could someone please help me with rows 8-21? It seems you are going from 56 hdc to row 7 of 48. What are we not understanding here? Thank you
Report Inappropriate Comment
Are you sure you would like to report this comment? It will be flagged for our moderators to take action.
Thank you for taking the time to improve the content on our site.