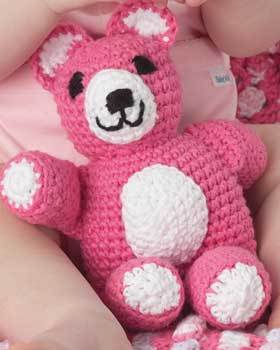
Teddy Bear Crochet Pattern
Crochet a soft and cuddly teddy bear for the little one with this free toy crochet pattern. The bear's eyes and nose are embroidered so there is nothing to pull off.
Find this and other fun amigurumi patterns at "19 Free Amigurumi Crochet Patterns"!

Materials:
- Yarn: Bernat® Cottontots (Solids 100 g/ 3.5 oz/ Ombres 85 g/3 oz)
Main Color (MC): (Pink) 1 ball
Contrast A: (White) 1 ball
- Crochet Hook: Size 4 mm (U.S. G or 6) crochet hook or size needed to obtain gauge.
- Small amount of black yarn for embroidery.
- Stuffing.
Measurement: Approx 9 ins [23 cm] high.
Gauge: 16 sc and 16 rows = 4 ins [10 cm].
Instructions:
HEAD AND BODY
With MC, ch 3. Sl st in first ch to form a ring.
1st rnd: 6 sc in ring. Do not join in rnd. Place a marker on last st to mark end of rnd. Cont moving this marker at end of each subsequent rnd.
2nd rnd: 2 sc in each sc around. 12 sc.
3rd rnd: *2 sc in next sc. 1 sc in next sc. Rep from * around. 18 sc.
4th rnd: *2 sc in next sc. 1 sc in each of next 2 sc. Rep from * around. 24 sc.
5th rnd: *2 sc in next sc. 1 sc in each of next 3 sc. Rep from * around. 30 sc.
6th to 10th rnds: 1 sc in each sc around.
11th rnd: *Draw up a loop in each of next 2 sc. Yoh and draw through all 3 loops on hook – sc2tog made. 1 sc in each of next 3 sc. Rep from * around. 24 sc.
12th rnd: *Sc2tog over next 2 sts. Rep from * around. 12 sc.
13th rnd: 2 sc in each sc around. 24 sc.
14th rnd: *2 sc in next sc. 1 sc in each of next 3 sc. Rep from * around. 30 sc.
15th rnd: *2 sc in next sc. 1 sc in each of next 4 sc. Rep from * around. 36 sc.
16th to 26th rnds: 1 sc in each sc around. Do not fasten off.
Stuff head and body firmly up to 1 in [2.5 cm] below lower edge. Stuff rem portion lightly.
Join lower edge: Ch 1. Fold rnd 26 in half, having ch 1 at fold. Working through both thicknesses, work 1 sc in each sc across. 18 sc. Do not fasten off.
LEFT LEG
1st rnd: Ch 1. Turn. 1 sc in front loop only of each of next 9 sc. Turn. Leave rem 9 sc unworked. Working in free loops of just worked row, work 1 sc in other side of each of first 9 sc. 18 sc. Do not join in rnd. Place a marker on last st to mark end of rnd. Cont moving this marker at end of each subsequent rnd.
2nd to 9th rnds: 1 sc in each sc around.
10th rnd: 1 sc in each sc around. Sl st in next sc. Fasten off.
11th rnd: Join A with sl st in back loop only of same sc as last sl st. Working in back loop only of each st around, sc2tog over this st and next st. 1 sc in next st. *Sc2tog over next 2 sts. 1 sc in next st. Rep from * around. 12 sc. Stuff leg firmly.
12th rnd: *Sc2tog. Rep from * around. 6 sc.
13th rnd: *Miss next sc. Sl st in next sc. Rep from * around. Fasten off.
RIGHT LEG
1st rnd: With Left Leg at right-hand side and working in front loop only of each st, join MC with sl st to next unworked st. 1 sc in each of rem 9 sc. Turn.Working in free loops, work 1 sc in other side of each of first 9 sc. 18 sc.
Do not join in rnd. Place a marker on last st to mark end of rnd. Cont moving this marker at end of each subsequent rnd.
Work rem of Right Leg as given for Left Leg.
TUMMY PAD
With A, ch 5.
1st rnd: 1 sc in 2nd ch from hook. Do not turn. 1 sc in each of next 2 ch. 3 sc in last ch.Working in rem loop of each sc on opposite side of ch, 1 sc in each of next 2 ch. 2 sc in last ch. Join with sl st to first sc. 10 sc.
2nd rnd: Ch 1. 2 sc in same sp as last sl st. 1 sc in each of next 2 sc. 2 sc in each of next 3 sc. 1 sc in each of next 2 sc. 2 sc in each of last 2 sc. Join with sl st to first sc. 16 sc.
3rd rnd: Ch 1. 1 sc in same sc as last sl st. 1 sc in each of next 5 sc. 2 sc in each of next 2 sc. 1 sc in each of next 6 sc. 2 sc in each of last 2 sc. Join with sl st to first sc. 20 sc.
4th rnd: Ch 1. 1 sc in same sc as last sl st. 1 sc in each of next 5 sc. 2 sc in each of next 4 sc. 1 sc in each of next 6 sc. 2 sc in each of last 4 sc. Join with sl st to first sc. Fasten off, leaving a 10 ins [25 cm] long end for sewing.
ARM (make 2)
With A, ch 3. Sl st in first ch to form a ring.
1st rnd: 6 sc in ring. Do not join in rnd. Place a marker on last st to mark end of rnd. Cont moving this marker at end of each subsequent rnd.
2nd rnd: 2 sc in each sc around. 12 sc. Sl st in next sc. Fasten off.
3rd rnd: Join MC with sl st in same sc as last sl st. 2 sc in same sc. *1 sc in next sc. 2 sc in next sc. Rep from * around to last sc. 1 sc in last sc. Sl st in next sc. 18 sc.
4th rnd: Ch1. Working in back loop only of each st, work 1 sc in same sc as last sl st and 1 sc in each sc around.
5th rnd: (Sc2tog over first 2 sts. 1 sc in each of next 7 sc) twice. 16 sc.
6th rnd: 1 sc in each sc around.
7th rnd: (Sc2tog over first 2 sts. 1 sc in each of next 6 sc) twice. 14 sc.
8th to 11th rnds: 1 sc in each sc around. Stuff arm firmly.
Join top edge: Ch 1. Fold rnd 11 in half, having ch 1 at fold. Working through both thicknesses, work 1 sc in each sc across. 7 sc. Fasten off, leaving a 6 ins [15 cm] long end for sewing.
INNER EAR (make 2)
With A, ch 2.
1st row: (WS). 3 sc in 2nd ch from hook. Turn.
2nd row: Ch 1. 2 sc in each sc. 6 sc. Turn.
3rd row: Ch 1. 2 sc in first sc. 1 sc in each of next 4 sc. 2 sc in last sc. 8 sc. Fasten off.
OUTER EAR (make 2)
With MC, work as for Inner Ear. Do not fasten off.
Join Ears: Place WS of Inner Ear against WS of Outer Ear. Ch 1. With RS of Inner Ear facing, using MC attached to Outer Ear and working through both thicknesses, ch 1, work 1 sc in each of 8 sc across. Work 7 sc across bottom edge through both thicknesses. Sl st in first sc. Fasten off leaving a 6 ins [15 cm] long end for sewing.
MUZZLE
With A, ch 3. Sl st in first ch to form a ring.
1st rnd: 6 sc in ring. Do not join in rnd. Place a marker on last st to mark end of rnd. Cont moving this marker at end of each subsequent rnd.
2nd rnd: 2 sc in each sc around. 12 sc.
3rd rnd: *2 sc in next sc. 1 sc in each of next 3 sc. Rep from * around. 15 sc.
4th rnd: *2 sc in next sc. 1 sc in each of next 4 sc. Rep from * around. 18 sc. Sl st in first sc. Fasten off, leaving a 6 ins [15 cm] long end for sewing.
TAIL
With MC, ch 3. Sl st in first ch to form a ring.
1st rnd: 6 sc in ring. Do not join in rnd. Place a marker on last st to mark end of rnd. Cont moving this marker at end of each subsequent rnd.
2nd rnd: 2 sc in each sc around. 12 sc.
3rd rnd: 1 sc in each sc around.
Stuff tail firmly.
4th rnd: (Sc2tog over next 2 sts) 6 times. Sl st in next sc. Fasten off, leaving a 6 ins [15 cm] long end for sewing.
FINISHING
Stuff Tail and sew to back of Body. Sew Tummy Pad to front of Body. Sew Muzzle to face, stuffing lightly. Sew Arms and Ears in position.With black yarn embroider nose and eyes as shown in picture.
Your Recently Viewed Projects
Thanks for your comment. Don't forget to share!
Lu Tee
Dec 13, 2013
i don't undertand how to do the 11th rnd of the head and body. can you please explain it to me? thank you so much.
zztigger 7162214
Aug 25, 2013
when working with this type of pattern I have found that stuffing as I go helps make it easier.
dcsmommy 0422902
Feb 16, 2013
I have been trying to understand the pattern for the legs. I see there are quite a few comments about not being able to do the legs so I'm not the only one having a problem. When I work the pattern as I see it there is not an opening to stuff the legs. Mine just ends up with a closed leg. PLEASE...can you be more specific about how to do the legs? A lot of my time has been spent trying to solve this on my own so any clarification would be appreciated. Thanks
iv6512 5390790
Feb 02, 2013
Ok I did it whit no help for the rest of ladies they are in the same spot .THE LEG . after the nine sc front loop just did turn and notice the free loops,they look like this --------there is were you begin the back sc and keep on doing in rounds. I hope I did my self to understand.
iv6512 5390790
Feb 02, 2013
I am still confusing ,would you please show how to make the leg.i been reading the instruction many times come out flat leg.please help ....!!!!!
karyssagage 695772 6
May 11, 2012
I am crocheting this cute teddy bear, but am confused at how to do the legs. I'm stuck. Please help
Amifan
Jun 10, 2012
The legs are worked into the last row of stitches of the body. The last row of the body is crocheted closed after stuffing and should have 18 stitches. Each of the legs is 9 stitches wide and you start them by working a sc into the front or back loop only, then turn and work into the remaining loop (read the directions for the legs slowly and they tell you which loop to use for each leg). Hope this helps.
jniblett
Feb 02, 2011
I'm a bit confused about doing the legs. Can someone give me some help with the directions. Wish there was a picture of the little guy standing up right. That might help!
karyssagage 695772 6
May 11, 2012
I saw that you had problems with the legs in this cute teddy bear pattern. Can yu help me figure this out? Am stuck
Arianabeads
Jun 07, 2010
Awesome! I'm just finishing up a filet crochet baby afghan...with teddy bears! This is a perfect addition to the project!
Member 4474139
Mar 30, 2010
This little bear would be great for childdren with cancer to have and hold for comfourt. Dwade
razzledazzle
Feb 19, 2010
cutest bear in town..i'm going to make it for myself. I'm always making for family This one is mine. Can't wait to get started on it.
reasonstreasures
Feb 19, 2010
So cute! Thank You I'm going to make it right away. ReasonsTreasures
Crafter 6947178
Feb 17, 2010
I've already made two of these, very easy, no separate head or legs to sew on, just the arms. I've done a few others, and I like this one the best! It gets five stars from me!
Report Inappropriate Comment
Are you sure you would like to report this comment? It will be flagged for our moderators to take action.
Thank you for taking the time to improve the content on our site.