Lily the Christmas Elf
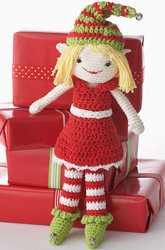
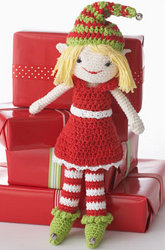
This adorable crochet project is perfect for the holiday season. Lily the Christmas Elf will put a smile on everyone's face with colorful yarn and a cute elf outfit. Give this free crochet pattern a try for a great Christmas project for you or a friend. This sweet little elf makes a wonderful stocking stuffer and is perfect for hiding in the Christmas tree come Christmas morning. Great for kids of all ages, this crocheted elf is here to make your holidays merry and bright.
Materials:
- 1 ball Lily Sugar’n Cream (70 g/2.5 oz; 109 m/120 yds) yarn in Soft Ecru (MC)
- 1 ball Lily Sugar’n Cream (70 g/2.5 oz; 109 m/120 yds) yarn in Hot Green (A)
- 1 ball Lily Sugar’n Cream (70 g/2.5 oz; 109 m/120 yds) yarn in Red (B)
- 1 ball Lily Sugar’n Cream (70 g/2.5 oz; 109 m/120 yds) yarn in White (C)
- 1 ball Lily Sugar’n Cream (70 g/2.5 oz; 109 m/120 yds) yarn in Sunshine (D)
- 3.5 mm (U.S. E or 4) and 4 mm (U.S. G or 6) crochet hooks or size needed to obtain gauge
- Stuffing
- 2 small black beads for eyes
- Small amount of red embroidery floss for mouth
- Small amount of Black embroidery floss for eyelashes
- 3 jingle bells
- Button
Gauge: 16 sc and 20 rows = 4 ins [10 cm] with smaller hook.
Instructions:
Approx 13 ins [33 cm] tall.
Head
- **With smaller hook and MC, ch 2.
- 1st rnd: 8 sc in 2nd ch from hook. Join with sl st to first sc.
- 2nd rnd: Ch 1. 2 sc in each sc around. Join with sl st to first sc. 16 sc.
- 3rd rnd: Ch 1. *2 sc in next sc. 1 sc in next sc. Rep from * around. Join with sl st to first sc. 24 sc.
- 4th rnd: Ch 1. *2 sc in next sc. 1 sc in each of next 2 sc. Rep from * around. Join with sl st to first sc. 32 sc.
- 5th rnd: Ch 1. *2 sc in next sc. 1 sc in each of next 3 sc. Rep from * around. Join with sl st to first sc. 40 sc.
- 6th rnd: Ch 1. 1 sc in each sc around. Join with sl st to first sc. Rep last rnd 10 times more.
- Next rnd: Ch 1. *Draw up a loop in each of next 2 sc. Yoh and draw through all loops on hook – sc2tog made. 1 sc in each of next 3 sc. Rep from * around. Join with sl st to first sc. 32 sts.
- Next rnd: Ch 1. *Sc2tog. 1 sc in each of next 2 sc. Rep from * around. Join with sl st to first sc. 24 sts.
- Stuff Head.
- Next rnd: Ch 1. *Sc2tog. 1 sc in next sc. Rep from * around. Join with sl st to first sc. 16 sts.
- Next rnd: Ch 1. *Sc2tog. Rep from * around. Join with sl st to first st. 8 sts. Fasten off.
Ears (Make 2)
- With MC and smaller hook, ch 2.
- 1st rnd: 8 sc in 2nd ch from hook. Join with sl st to first sc.
- 2nd rnd: Ch 1. 2 sc in each sc around. Join with sl st to first sc. 16 sc.
- Shape Ears: 1st row: Ch 1. Sc2tog. 1 sc in next sc. Sc2tog. Turn. Leave rem sts unworked.
- 2nd row: Ch 1. Sc2tog. 1 sc in last sc. Turn.
- 3rd row: Ch 1. Sc2tog. Fasten off.
- Sew Ears to side of Head.
Body
- With MC and smaller hook, ch 30. Join with sl st to first ch.
- 1st rnd: Ch 1. 1 sc in each ch around. Join with sl st to first sc. 30 sc.
- 2nd rnd: Ch 1. 1 sc in each sc around. Join with sl st to first sc. Rep last rnd until work from beg measures 2 ins [5 cm].
- Next rnd: Ch 1. *Sc2tog. 1 sc in each of next 3 sc. Rep from * around. Join with sl st to first sc. 24 sts.
- Next rnd: Ch 1. 1 sc in each st around. Join with sl st to first sc. Rep last rnd until work from beg measures 4 ins [10 cm].
- Next rnd: Ch 1. *Sc2tog. 1 sc in each of next 2 sc. Rep from * around. Join with sl st to first sc. 18 sts.
- Next rnd: Ch 1. 1 sc in each sc around. Join with sl st to first sc. Rep last rnd twice more. Fasten off.
- Sew bottom edge of Body closed. Stuff Body.
Arms (Make 2)
- With MC and smaller hook, ch 2.
- 1st rnd: 5 sc in 2nd ch from hook. Join with sl st to first sc.
- 2nd rnd: Ch 1. 2 sc in each sc around. Join with sl st to first sc. 10 sc.
- 3rd rnd: Ch 1. 1 sc in each sc around. Join with sl st to first sc.
- 4th rnd: Ch 1. 1 sc in each of next 4 sc. 1 tr in next sc (thumb). 1 sc in each of last 5 sc. Join with sl st to first sc.
- 5th rnd: Ch 1. 1 sc in each st around. Join with sl st to first sc.
- 6th rnd: Ch 1. (Sc2tog. 1 sc in each of next 3 sc) twice. Join with sl st to first sc. 8 sts.
- 7th rnd: Ch 1. 1 sc in each st around. Join with sl st to first sc. Rep last rnd until Arm from beg measures 4 ins [10 cm].
- Fasten off. Stuff Arms lightly.
Legs (Make 2)
- Shoe: With A and smaller hook, ch 2.
- 1st rnd: 4 sc in 2nd ch from hook. Join with sl st to first sc.
- 2nd rnd: Ch 1. (1 sc in next sc. 2 sc in next sc) twice. Join with sl st to first sc. 6 sc.
- 3rd rnd: Ch 1. 1 sc in each sc around. Join with sl st to first sc.
- 4th rnd: Ch 1. (1 sc in each of next 2 sc. 2 sc in next sc) twice. Join with sl st to first sc. 8 sc.
- 5th rnd: As 3rd rnd.
- 6th rnd: Ch 1. (1 sc in each of next 3 sc. 2 sc in next sc) twice. Join with sl st to first sc. 10 sc.
- 7th rnd: Ch 1. (1 sc in each of next 4 sc. 2 sc in next sc) twice. Join with sl st to first sc. 12 sc.
- 8th rnd: Ch 1. (1 sc in each of next 5 sc. 2 sc in next sc) twice. Join with sl st to first sc. 14 sc.
- 9th to 12th rnds: As 3rd rnd.
- Beg working in rows: Next row: Ch 1. 1 sc in each of next 8 sc. Turn. Leave rem sts unworked.
- Next row: Ch 1. 1 sc in each of next 8 sc. Turn. Rep last row once more. Fasten off.
- Fold back of shoe in half to form Heel. Sew back Heel seam.
- Join A with sl st to back of Shoe. Ch 1. Work 14 sc evenly
- around top edge of Shoe. Join B with sl st to first sc. Break A. Stuff Shoe.
- Leg: 1st rnd: With B, working in back loops only, ch 1. 1 sc in each sc around. Join with sl st to first sc.
- 2nd rnd: Ch 1. Working in both loops, 1 sc in each sc around. Join C with sl st to first sc.
- Cont even, working 2 rnds C, 2 rnds B, until Leg from top of Shoe measures 4 ins [10 cm]. Fasten off. Stuff Leg.
Shoe Edging
- With smaller hook, join A with sl st to rem loop of top of Shoe. *Ch 3. 1 sc in 3rd ch from hook. Sl st in same sp as last sl st - picot made. Sl st in next sc. Rep from * around. Join with sl st to first picot. Fasten off.
Finishing
- Sew top of Legs closed using whip st. Attach Jingle Bell to tip of Shoe. Sew Legs to bottom of Body. Sew Arms to sides of Body. With black embroidery floss, embroider eyelashes on Head. Sew Beads to Head. With red embroidery floss, embroider mouth.
Hair Fringe
- Cut a piece of tape 5 ins [12.5 cm] long and secure onto a flat surface with sticky side up. Cut lengths of D 11 ins [28 cm] long and lay them across tape so strip of tape is in center of yarn. Holding tissue paper over top of yarn and using sewing machine, run a line of stitching along length of tape. Remove tape when hair is secure. Remove tissue paper after stitching Pin fringe to top of head. Using backstitch and D, sew hair into place along sewn line, being sure to get all lengths secured in sts. Trim evenly.
Hat
Note: Ch 2 does not count as hdc.
- With larger hook and A, ch 36. Join with sl st to first ch, being careful not to twist ch.
- 1st rnd: Ch 2. 1 hdc in each ch around. Join B with sl st to first hdc.
- 2nd rnd: With B, ch 2. 1 hdc in each hdc around. Join A with sl st to first hdc.
- 3rd rnd: With A, as 2nd rnd. Join B.
- 4th rnd: With B, ch 2. *1 hdc in each of next 4 hdc. (Yoh and draw up a loop in next st. Yoh and draw through 2 loops on hook) twice. Yoh and draw through all loops on hook – hdc2tog made. Rep from * around. Join A with sl st to first hdc. 30 hdc.
- 5th rnd: With A, ch 2. 1 hdc in each st around. Join B with sl st to first hdc.
- 6th rnd: With B, ch 2. *1 hdc in each of next 3 hdc. Hdc2tog. Rep from * around. Join A with sl st to first hdc. 24 sts.
- 7th rnd: As 5th rnd.
- 8th rnd: With B, ch 2. *1 hdc in each of next 2 hdc. Hdc2tog. Rep from * around. Join A with sl st to first hdc. 18 sts.
- 9th rnd: As 5th rnd.
- 10th rnd: With B, ch 2. *1 hdc in next hdc. Hdc2tog. Rep from * around. Join A with sl st to first hdc. 12 sts.
- 11th rnd: As 5th rnd.
- 12th rnd: With B, ch 2, *Hdc2tog. Rep from * around. Join A with sl st to first st. 6 sts.
- 13th rnd: As 5th rnd. Fasten off, leaving a long end. Thread end through rem loops. Pull tightly and fasten securely.
- Sew Jingle Bell to top of Hat. Attach Hat to Head, sewing through all thicknesses.
Dress
Note: Ch 2 does not count as hdc.
- With larger hook and B, ch 40. Join with sl st to first ch, being careful not to twist ch.
- 1st rnd: Ch 2. 1 hdc in each ch around. Join with sl st to first hdc. 40 hdc.
- 2nd rnd: Ch 2. 1 hdc in each hdc around. Join with sl st to first hdc.
- 3rd rnd: Ch 2. *1 hdc in each of next 3 hdc. Hdc2tog. Rep from * around. Join with sl st to first hdc. 32 sts.
- 4th and 5th rnds: Ch 2. 1 hdc in each st around. Join with sl st to first hdc.
- 6th rnd: Ch 2. *1 hdc in each of next 2 hdc. Hdc2tog. Rep from * around. Join with sl st to first hdc. 24 sts.
- 7th and 8th rnds: Ch 2. 1 hdc in each st around. Join with sl st to first hdc.
- Beg working in rows: 1st row: Ch 2. 1 hdc in each of next 24 hdc. Turn.
- 2nd row: Ch 2. 1 hdc in each hdc across. Turn.
- 3rd row: Ch 5. Sl st in first hdc. (button loop made). Ch 2.
- 1 hdc in same st as last sl st. 1 hdc in each hdc across. Fasten off.
Edging
- Join C with sl st to any rem loop of foundation ch at bottom of dress. *Ch 3. 1 sc in 2nd ch from hook. Miss next 2 ch. Sl st in next ch. Rep from * around. Join with sl st to same sp as first sl st. Fasten off.
Straps (Make 2)
- With larger hook and B, ch 9.
- 1st row: 1 sc in 2nd ch from hook. 1 sc in each ch to end of ch. Turn. 8 sc.
- 2nd row: Ch 1. 1 sc in each sc across. Turn.
- Rep last row once more. Fasten off.
Belt
- With larger hook and C, ch 24. Join with sl st to first ch, being careful not to twist ch.
- 1st rnd: Ch 1. 1 sc in each ch around. Join with sl st to first sc. Fasten off.
- Put Dress on doll, mark position for Straps. Sew Straps to Dress. Sew Belt to Dress as shown in picture. Sew button to back of Dress to correspond to button loop.
Your Recently Viewed Projects
ramclaren 9250989
Oct 16, 2015
made this little doll. also made boy doll plus other things from your great site.
cindyliv 4298311
Oct 02, 2015
Thank you for this pattern. I made the basic doll (minus the ears and hair), but it was for a little girl's October birthday, so I created clothes to make her into a woodland fairy. The doll was very easy to make!
rubyfell 4317715
Oct 09, 2011
This little elf is adorable in the pic. I'm fairly new to crocheting again after so many years. Has anyone made her and have they had trouble with the hat? I don't know if I'm suppose to drop one color and start the next color or do I join the green color to green. I'm assuming you don't cut the thread when u join. If anyone could explain this to me I would greatly appreciate it. Thanks so much. R
Report Inappropriate Comment
Are you sure you would like to report this comment? It will be flagged for our moderators to take action.
Thank you for taking the time to improve the content on our site.

