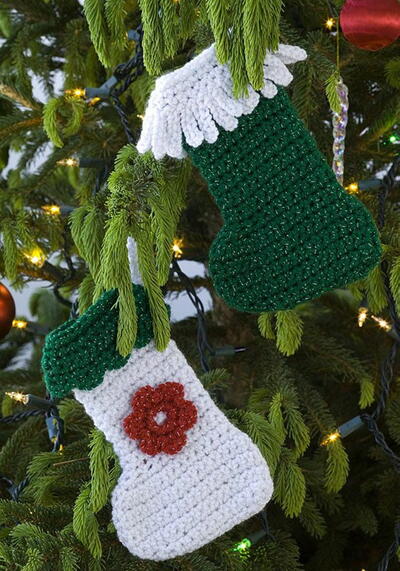
Little Stocking Ornaments
If you're looking for a unique crochet Christmas stocking pattern, you should check out the Little Stocking Ornament. It's a cute way to decorate your tree, plus it's budget friendly...whether you're using it as a gift or for your own decorations. These cute Little Stocking Ornaments would also make adorable package adornments for your friends and family. So gather up all those colorful yarn scraps and get to crocheting these cute mini stockings today.

Get more Christmas crafts delivered straight to your inbox!
Materials:
- 1 ball Red Heart Holiday yarn in Green/Silver (A)
- 1 ball Red Heart Holiday yarn in White/Silver (B)
- 1 ball Red Heart Holiday yarn in Red/Silver (C)
- 4mm [US G-6] crochet hook
- Yarn needle
Gauge: 16 sts = 4"; 16 rows = 4" in sc.
Instructions:
Green Stocking
- Beginning at top edge with A, ch 32.
- Row 1: Sc in 2nd ch from hook and each ch across; turn – 31 sc.
Hanging Loop
- Row 2: Ch 1, skip first 9 sc for hanging loop, sc in last 22 sc for stocking; turn – 22 sc.
Leg
- Rows 3-18: Ch 1, sc in each sc across; turn.
Shape Foot
- Row 19: Ch 1, sc in first 8 sc, [2 sc in next sc] 6 times, sc in last 8 sc; turn – 28 sc.
- Row 20: Ch 1, sc in first 8 sc, [2 sc in next sc, sc in next sc] 6 times, sc in last 8 sc; turn – 34 sc.
- Row 21: Ch 1, 2 sc in first sc, sc across to last sc, 2 sc in last sc; turn – 36 sc.
- Rows 22-26: Ch 1, sc in each sc across; turn.
Shape Toe
- Row 27: Ch 1, sc in first 12 sc; [draw up a loop in next 2 sc, yo and draw through all 3 loops on hook – sc2tog made] 6 times, sc in last 12 sc; turn – 30 sc.
- Row 28: Ch 1, sc2tog over first 2 sc, sc in next 10 sc, [sc2tog] 3 times, sc in next 10 sc, sc2tog over last 2 sc; turn – 25 sc.
- Row 29: Ch 1, sc2tog over first 2 sc, sc to last 2 sc, sc2tog over last 2 sc. Fasten off.
Top Border
- Row 1: Working on opposite side of beginning ch and skipping the 9 ch of hanging loop, with right side facing, join B to first st after hanging loop; ch 1, sc in each ch across; turn – 22 sc.
- Row 2: Ch 1, sc in back loop of each sc across; turn.
- Row 3: Ch 1, sc in both loops of each sc across; turn.
- Row 4: * Ch 6, slip st in 2nd ch from hook and next 4 ch**, slip st in next sc; repeat from * across, end at **. Fasten off.
- Join B in first free loop of Row 2; ch 1, sc in front loop of each sc across. Fasten off.
Finishing
- Sew back and bottom seams of stocking. Sew border seam keeping hanging loop on outside.
White Stocking
Work same as Green Stocking with B.
Top Border
- Row 1: Working on opposite side of beginning ch and skipping the 9 ch of hanging loop, with right side facing, join A to first st after hanging loop; ch 1, sc in each ch across; turn – 22 sc.
- Row 2: Ch 1, sc in back loop of each sc across; turn.
- Rows 3-5: Ch 1, sc in each sc across; turn.
- Row 6: Slip st in next sc, * 3 sc in next sc, slip st in next 2 sc; repeat from * across. Fasten off. Join A in first free loop of Row 2; ch 1, sc in front loop of each sc across. Fasten off.
Finishing
- Sew back and bottom seams of stocking. Sew border seam keeping hanging loop on outside.
Flower
- With C ch 5; join with a slip st in first ch to form a ring.
- Rnd 1: Ch 1, 12 sc in ring.
- Rnd 2: * (Slip st, ch 1, 2 hdc) all in next sc, ch 1, slip st in next sc; repeat from * around; join with a slip st in first slip st. Fasten off. Sew in place.
Read NextSanta Dishcloth Pattern
Your Recently Viewed Projects

Thanks for your comment. Don't forget to share!
Morehouse17
Aug 16, 2018
These would also be very cute if made into a garland to hang around a table top Christmas tree. Ornaments are so fun to make and because they use so little material, you can really get a big bang for your buck when making them.
Hippie Chick
Dec 20, 2017
I made one of these tiny stockings last year. The instructions were easy to follow and understand but the finished product did not turn out so well. I made mine with worsted weight yarn and it is much too thick for this small project. Also, the shape looked weird and not at all like the one shown in the picture.
lcarr
Oct 17, 2017
The pattern is very easy to follow and they are quick to make but they are an awkward shape and size. Mine was 6 inches tall x 4 inches wide (at foot, and just under 3 inches wide (at leg) when done. I find the leg too narrow for anything more than candy canes, or other long narrow items. The foot area is very short.
mkwengert 9317021
Nov 15, 2010
JUST what I needed! I am going to make these up in red and use white eyelash thread at the top/cuff and give them out to my friends in sets to use as silverware holders for Christmas gifts. I was going to sew them with red felt, but this is even better as I already have the needed yarn! WOOHOO!
mskeel
Nov 09, 2010
Doesn't 7.5" x 4.5" seem kinda large to hang on a tree or attach to a present? Maybe using a smaller hook (E maybe) or reducing the stitches per row or the number of rows might help. Also, having just read the article on copyright, making some changes would help there as well. Comments anyone?
realassist4u 46820 19
Nov 01, 2010
This is a great little gift tag as well.... you can use up scraps of yarn too.
Report Inappropriate Comment
Are you sure you would like to report this comment? It will be flagged for our moderators to take action.
Thank you for taking the time to improve the content on our site.