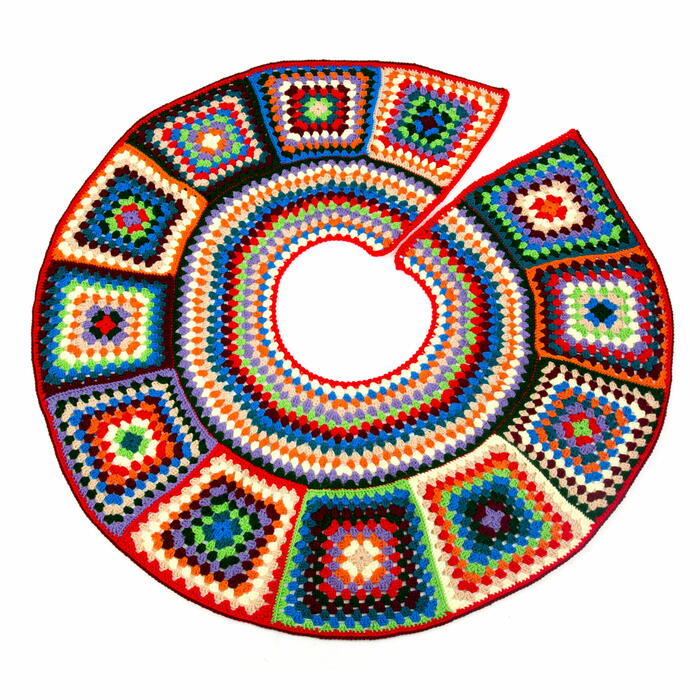
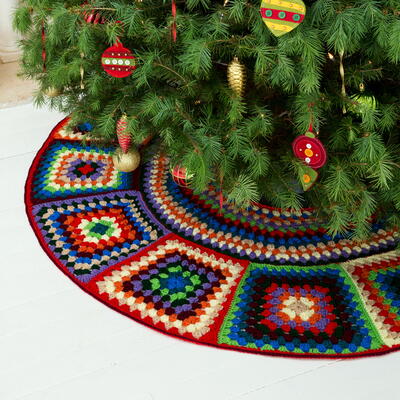
Granny Square Tree Skirt Pattern
Level up your Christmas decorations this year with this one-of-a-kind free crochet tree skirt pattern from Red Heart.

The Granny Square Tree Skirt Pattern is the one-of-a-kind Christmas home accent that will really make your decorations pop this year. With this crochet tree skirt tutorial, you'll create your own timeless Christmas home décor that you'll be able to use year after year.
The Red Heart crochet tree skirt is a challenging project not for the faint of heart, but the results will have all of your friends and relatives looking under your tree! Use your favorite color scheme to design a tree skirt that's durable, vibrant, and unique to YOU. It's amazing how simply adding this granny square tree skirt to your decoration can really tie your décor together. It's sure to make your living room glow with color this holiday season.
If you love crafting for Christmas year-round, sign up for Crafty Christmas Ideas from our friends at AllFreeChristmasCrafts.
Sign Up for More Free Patterns >>>

Crochet HookK/10.5 or 6.5 mm hook
Yarn Weight(4) Medium Weight/Worsted Weight and Aran (16-20 stitches to 4 inches)
Crochet Gauge12 sts = 4"; 6 rows = 4" in double crochet. CHECK YOUR GAUGE. Use any size hook to obtain the gauge.
Finished Size Skirt measures 58" (147 cm) diameter, to fit around standard tree holder.
Materials List
- 1 skein Red Heart® Super Saver® yarn in Buff (A)
- 1 skein Red Heart® Super Saver® yarn in Pale Yellow (B)
- 1 skein Red Heart® Super Saver® yarn in Carrot (C)
- 1 skein Red Heart® Super Saver® yarn in Cherry Red (D)
- 1 skein Red Heart® Super Saver® yarn in Claret (E)
- 1 skein Red Heart® Super Saver® yarn in Lavender (F)
- 1 skein Red Heart® Super Saver® yarn in Blue (G)
- 1 skein Red Heart® Super Saver® yarn in Real Teal (H)
- 1 skein Red Heart® Super Saver® yarn in Spring Green (I)
- 1 skein Red Heart® Super Saver® yarn in Hunter Green (J)
- 6.5mm [US K-10.5] crochet hook
- Yarn needle
- Stitch marker
- Granny Square Tree Skirt Pattern Diagram
INSTRUCTIONS
Notes:
- Skirt is made from thirteen pieces: an inner ring and twelve granny squares arranged around the outer edge of the inner ring.
- The granny squares are not perfectly square; one edge is shorter than the other three edges. The shorter edge is sewn to the outer edge of the inner ring.
Inner Ring
-
With B, ch 140.
-
Row 1 (Right Side): 3 dc in 4th ch from hook (beginning ch counts as first dc), *skip next 2 ch, 3 dc in next ch; repeat from * across to last ch, dc in last ch—Forty-six 3-dc groups, and one dc on each end. Fasten off B.
-
Row 2: With Wrong Side facing, draw up a loop of G in the space between the first 2 dc, ch 4 (counts as dc, ch 1 here and throughout), *3 dc in next space between 3-dc groups, ch 1; repeat from * across, dc in space between last dc and beginning ch—Forty-five 3-dc groups, 46 ch-1 spaces, and one dc on each end. Fasten off G.
-
Row 3: With Right Side facing, draw up a loop of C in first dc, ch 3, 3 dc in first ch-1 space, [ch 1, 3 dc in next ch-1 space] 4 times, ch 1, (3 dc, ch 1, 3 dc) in next ch-1 space (increase made), *[ch 1, 3 dc in next ch-1 space] 6 times, ch 1, (3 dc, ch 1, 3 dc) in next ch-1 space; repeat from * 4 more times, [ch 1, 3 dc in ch-1 space] 4 times, 3 dc in turning ch-space, dc in 3rd ch of beginning ch—Fifty-two 3-dc groups and 51 ch-1 spaces. Fasten off C.
-
Row 4: With Wrong Side facing, draw up a loop of A in the space between the first 2 dc, ch 4, 3 dc in next ch-1 space, [ch 1, 3 dc in next ch-1 space] 8 times, ch 1, (3 dc, ch 1, 3 dc) in next ch-1 space, *[ch 1, 3 dc in next ch-1 space] 15 times, (3 dc, ch 1, 3 dc) in next ch-1 space; repeat from * once more, [ch 1, 3 dc in next ch-1 space] 9 times, dc in space between last dc and beginning ch—Fifty-four 3-dc groups and 55 ch-1 spaces. Fasten off A.
-
Row 5: With Right Side facing, draw up a loop of F in first dc, ch 3, 3 dc in first ch-1 space, [ch 1, 3 dc in next ch-1 space] 4 times, ch 1, (3 dc, ch 1, 3 dc) in next ch-1 space (increase made), [ch 1, 3 dc in next ch-1 space] 8 times, ch 1, (3 dc, ch 1, 3 dc) in next ch-1 space, *[ch 1, 3 dc in next ch-1 space] 7 times, ch 1, (3 dc, ch 1, 3 dc) in next ch-1 space, [ch 1, 3 dc in next ch-1 space] 8 times, ch 1, (3 dc, ch 1, 3 dc) in next ch-1 space; repeat from * once more, [ch 1, 3 dc in ch-1 space] 5 times, 3 dc in turning ch-space, dc in 3rd ch of beginning ch—Sixty-one 3-dc groups and 60 ch-1 spaces. Fasten off F.
-
Row 6: With Wrong Side facing, draw up a loop of I in the space between the first 2 dc, ch 4, 3 dc in next ch-1 space, [ch 1, 3 dc in next ch-1 space] 9 times, ch 1, (3 dc, ch 1, 3 dc) in next ch-1 space, *[ch 1, 3 dc in next ch-1 space] 18 times, (3 dc, ch 1, 3 dc) in next ch-1 space; repeat from * once more, [ch 1, 3 dc in next ch-1 space] 11 times, dc in space between last dc and beginning ch—Sixty-three 3-dc groups and 64 ch-1 spaces. Fasten off I.
-
Row 7: With Right Side facing, draw up a loop of D in first dc, ch 3, 3 dc in first ch-1 space, [ch 1, 3 dc in next ch-1 space] 5 times, ch 1, (3 dc, ch 1, 3 dc) in next ch-1 space (increase made), [ch 1, 3 dc in next ch-1 space] 10 times, ch 1, (3 dc, ch 1, 3 dc) in next ch-1 space, *[ch 1, 3 dc in next ch-1 space] 8 times, ch 1, (3 dc, ch 1, 3 dc) in next ch-1 space, [ch 1, 3 dc in next ch-1 space] 10 times, ch 1, (3 dc, ch 1, 3 dc) in next ch-1 space; repeat from * once more, [ch 1, 3 dc in ch-1 space] 5 times, 3 dc in turning ch-space, dc in 3rd ch of beginning ch—Seventy 3-dc groups and 69 ch-1 spaces. Fasten off D.
-
Row 8: With Wrong Side facing, draw up a loop of E in the space between the first 2 dc, ch 4, 3 dc in next ch-1 space, [ch 1, 3 dc in next ch-1 space] 11 times, ch 1, (3 dc, ch 1, 3 dc) in next ch-1 space, *[ch 1, 3 dc in next ch-1 space] 21 times, (3 dc, ch 1, 3 dc) in next ch-1 space; repeat from * once more, [ch 1, 3 dc in next ch-1 space] 12 times, dc in space between last dc and beginning ch—Seventy-two 3-dc groups and 73 ch-1 spaces. Fasten off E.
-
Row 9: With Right Side facing, draw up a loop of G in first dc, ch 3, 3 dc in first ch-1 space, [ch 1, 3 dc in next ch-1 space] 3 times, ch 1, (3 dc, ch 1, 3 dc) in next ch-1 space (increase made), *[ch 1, 3 dc in next ch-1 space] 7 times, ch 1, (3 dc, ch 1, 3 dc) in next ch-1 space; repeat from * 7 more times, [ch 1, 3 dc in ch-1 space] 3 times, 3 dc in turning ch-space, dc in 3rd ch of beginning ch—Eighty-two 3-dc groups and 81 ch-1 spaces. Fasten off G.
-
Row 10: With Wrong Side facing, draw up a loop of H in the space between the first 2 dc, ch 4, *3 dc in next ch-1 space, ch 1; repeat from * across, dc in space between last dc and beginning ch—Eighty-one 3-dc groups and 82 ch-1 spaces. Fasten off H.
-
Row 11: With Right Side facing, draw up a loop of A in first dc, ch 3, 3 dc in first ch-1 space, [ch 1, 3 dc in next ch-1 space] twice, ch 1, (3 dc, ch 1, 3 dc) in next ch-1 space (increase made), [ch 1, 3 dc in next ch-1 space] 5 times, *ch 1, (3 dc, ch 1, 3 dc) in next ch-1 space, [ch 1, 3 dc in next ch-1 space] 8 times; repeat from * 7 more times, ch 1, 3 dc in turning ch-space, dc in 3rd ch of beginning ch—Ninety-one 3-dc groups and 90 ch-1 spaces. Fasten off A.
-
Row 12: With Wrong Side facing, draw up a loop of C in the space between the first 2 dc, ch 4, *3 dc in next ch-1 space, ch 1; repeat from * across, dc in space between last dc and beginning ch—Ninety 3-dc groups and 91 ch-1 spaces. Fasten off C.
-
Row 13: With Right Side facing, draw up a loop of B in first dc, ch 3, 3 dc in first ch-1 space, [ch 1, 3 dc in next ch-1 space] 13 times, ch 1, (3 dc, ch 1, 3 dc) in next ch-1 space (increase made), *[ch 1, 3 dc in next ch-1 space] 14 times, ch 1, (3 dc, ch 1, 3 dc) in next ch-1 space; repeat from * 3 more times, [ch 1, 3 dc in ch-1 space] 15 times, 3 dc in turning ch-space, dc in 3rd ch of beginning ch—Ninety-six 3-dc groups and 95 ch-1 spaces. Fasten off B.
-
Row 14: With Wrong Side facing, draw up a loop of F in the space between the first 2 dc, ch 4, *3 dc in next ch-1 space, ch 1; repeat from * across, dc in space between last dc and beginning ch—Ninety-five 3-dc groups and 96 ch-1 spaces. Fasten off F.
-
Row 15: With Right Side facing, draw up a loop of J in first dc, ch 3, 3 dc in first ch-1 space, *ch 1, 3 dc in next ch-1 space; repeat from * across to last ch-1 space, ch 1, 3 dc in turning ch-space, dc in 3rd ch of beginning ch—Ninety-six 3-dc groups and 95 ch-1 spaces. Fasten off J.
Granny Square (Make 12)
Notes:
- Make one granny square in each of the color sequences listed.
- Squares are worked in joined rounds with Right Side facing at all times.
- Ch-1 spaces are worked between the 3-dc groups across 3 edges of each square. No ch-1 spaces are worked between the 3-dc groups across one edge of each square (the top of the square). This shapes each square so that it is slightly narrower at the top than at the bottom.
- Each round is worked with a different color. Fasten off old color at the end of each round.
- To reduce the number of tails to weave in later, crochet over the ends as you go.
Color Sequences:
- Square #1: C, D, B, A, E, F, G, I, J, H.
- Square #2: J, G, A, I, B, F, D, H, E, C.
- Square #3: I, D, F, H, C, G, B, E, A, J.
- Square #4: F, E, J, H, G, I, C, D, A, B.
- Square #5: A, B, C, F, D, J, E, H, G, I.
- Square #6: G, H, I, J, F, E, C, B, A, D.
- Square #7: H, I, B, D, C, E, G, A, J, F.
- Square #8: D, J, F, A, C, B, I, G, H, E.
- Square #9: F, D, I, J, G, H, E, A, B, C.
- Square #10: B, C, F, I, G, D, A, H, E, J.
- Square #11: A, I, H, D, E, B, F, C, J, G.
- Square #12: E, G, J, I, H, F, D, B, C, A.
-
With first color, ch 5; join with slip st in first ch to form a ring.
-
Round 1 (Right Side): Ch 3 (counts as first dc here and throughout), 2 dc in ring, [ch 1, 3 dc in ring] 3 times, ch 1; join with slip st in top of beginning ch—12 dc and 4 ch-1 spaces. Fasten off first color.
-
Round 2: With Right Side facing, draw up a loop of 2nd color in any ch-1 space, ch 3, 2 dc in same ch-1 space, (3 dc, ch 1, 3 dc) in each of next 3 ch-1 spaces, 3 dc in same ch-1 space as joining, ch 1; join with slip st in top of beginning ch—24 dc and 4 ch-1 spaces. Fasten off 2nd color.
-
Round 3: With Right Side facing, draw up a loop of 3rd color in any ch-1 space, ch 3, 2 dc in same ch-1 space, 3 dc in next space between 3-dc groups, (3 dc, ch 1, 3 dc) in next ch-1 space (corner made), place a marker in the 3-dc group before the corner for top edge of square, *ch 1, 3 dc in next space between 3-dc groups, ch 1, (3 dc, ch 2, 3 dc) in next ch-1 space (corner made); repeat from * once more, ch 1, 3 dc in next space between 3-dc groups, ch 1, 3 dc in same ch-1 space as joining, ch 1; join with slip st in top of beginning ch—4 corners and one 3-dc group on each side. Fasten off 3rd color.
-
Round 4: With Right Side facing, draw up a loop of 4th color in first corner ch-1 space, ch 3, 2 dc in same ch-1 space, 3 dc in each space between 3-dc groups across to next corner ch-1 space, (3 dc, ch 1, 3 dc) in corner ch-1 space, [*ch 1, 3 dc in next ch-1 space; repeat from * across to next corner ch-2 space, ch 1, (3 dc, ch 2, 3 dc) in corner ch-2 space] twice, **ch 1, 3 dc in next ch-1 space; repeat from ** across to first corner ch-1 space, ch 1, 3 dc in same ch-1 space as joining, ch 1; join with slip st in top of beginning ch—4 corners and two 3-dc groups on each side.
-
Fasten off 4th color.
-
Rounds 5–10: Repeat Round 4 six times and continue to change color every round as in color sequence—4 corners and eight 3-dc groups on each side at the end of Round 10. Note: If desired, join in a different corner ch-space for each round and work as for Round 4, taking care not to work ch-1 spaces between the 3-dc groups across the top edge of the square, and working ch-1 spaces between the 3-dc groups across the other 3 edges. Work (3 dc, ch 1, 3 dc) for each top corner, and (3 dc, ch 2, 3 dc) for each lower corner.
Finishing
-
Arrange granny squares around outer edge of inner ring, as shown in Assembly Diagram. Take care to place shorter (marked) edge of each granny square next to edge of inner ring.
-
Match the ten 3-dc groups across the top edge of each granny square with eight 3-dc groups (and the ch-1 spaces between the 3-dc groups) of outer edge of inner ring. Sew the granny squares together and to the inner ring. The designer recommends sewing the squares together in groups of three and then sewing the group of three to the inner ring.
Outer Border
-
Row 1 (Right Side): With Right Side facing, join D in outer corner of ring of granny squares, to work across outer edge, ch 2, work 1 hdc in each dc, 1 hdc in each ch-1 space, and 2 hdc in each corner ch-2 space (where squares are joined) all the way across outer edge. Fasten off.
-
Row 2 (Right Side): With Right Side facing, join E in top of beginning ch-2 of Row 1, ch 1, working in back loops only slip st in each hdc across.
Note: Work with relaxed tension so as not to pull in the outer edge. Fasten off.
Inner Border
-
Row 1 (Right Side): With Right Side facing, join D in inner corner of inner ring, to work across inner edge, ch 2, 2 hdc in each space between 3-dc groups all the way across inner edge, DO NOT TURN.
-
Row 2: Working in the opposite direction (without turning piece, to work reverse hdc sts), ch 2, work hdc in each space between 2-dc groups across, slip st in beginning ch-2 of Row 1.
-
Fasten off.
Side Borders
-
Row 1 (Right Side): With Right Side facing, join D in corner, to work across side edge, hdc evenly spaced across side edge, DO NOT TURN.
-
Row 2: Ch 1, reverse sc in each st across.
-
Fasten off. Repeat across other side edge.
-
Weave in any remaining ends. Lay skirt flat on floor around tree holder, and pat into position. Note any areas that may need blocking. Block piece very, very lightly, if needed.
Want more Christmas Patterns?
Read NextTiny Crochet Pom Pom Gnomes
Your Recently Viewed Projects
Thanks for your comment. Don't forget to share!
lcarr
Sep 22, 2018
My Christmas tree skirt is old and tired looking. It was white satin with fringe, but after 30 plus years it is not white, beige, yellow, and even some red satin with some fringe. I have been looking for a new tree skirt pattern. This one is so bright and colourful. I cant wait to start picking out my yarn!
Report Inappropriate Comment
Are you sure you would like to report this comment? It will be flagged for our moderators to take action.
Thank you for taking the time to improve the content on our site.