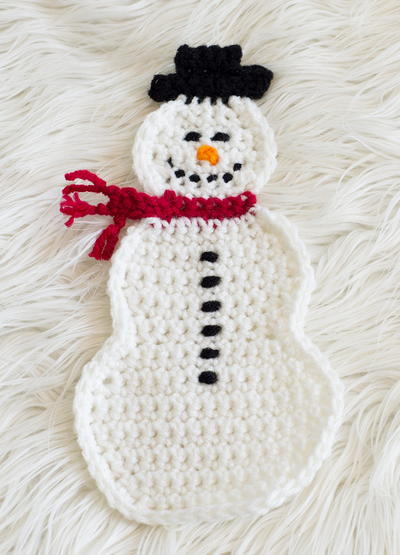
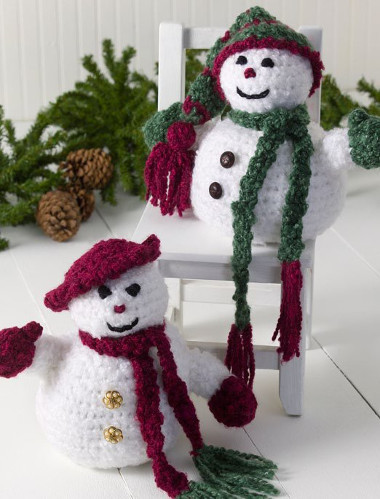
Mr. and Mrs. Snowman
Decorate your home for the winter holidays and complete a fun crochet pattern project at the same time. This Mr. and Ms. Snowman crochet pattern is cute and makes for great gifts for anyone on your list. The great thing about these cute crocheted snowmen is that they can stay out on display all winter long! Keep your home in the holiday spirit with these cute and cuddly snowmen! This cuddly and cozy couple would also make a wonderful gift for a newly married couple celebrating their first Christmas together!


Find this craft and more Christmas crochet projects in 34 Easy Crochet Christmas Gifts.
Materials:
For both snowmen
- 6.5mm [US K-10.5] crochet hook
- 1 skein Red Heart Super Saver yarn in Black (D)
- 1 skein Red Heart Light and Lofty yarn in Pine (C)
- 1 skein Red Heart Light and Lofty yarn in Wine (B)
- 2 skeins Red Heart Baby Clouds yarn in Cloud (A)
- Shank buttons: 2 fancy, 2 masculine
- Fiberfill
- 5" x 5" cardboard piece
- Hot glue gun
Abbreviations:
- dec (decrease) = draw up a loop in next 2 sc, yo and draw through 2 loops.
- inc (increase) = 2 sc in same sc.
Instructions:
Head
- Rnd 1: With A, ch 2; 10 sc in 2nd ch from hook; join with a slip st in first sc – 10 sc.
- Rnd 2: Ch 1, [sc in next sc, inc] 5 times; join – 15 sc.
- Rnd 3: Ch 1, [sc in next 2 sc, inc] 5 times; join – 20 sc.
- Rnd 4: Ch 1, [sc in next 3 sc, inc] 5 times; join – 25 sc.
- Rnd 5: Ch 1, [sc in next 4 sc, inc] 5 times; join – 30 sc.
- Rnd 6: Ch 1, [sc in next 5 sc, inc] 5 times; join – 35 sc.
- Rnd 7: Ch 1, sc in each sc around; join. Firmly stuff head with fiberfill.
- Rnd 8: Ch 1, [sc in next 5 sc, dec] 5 times; join – 30 sc.
- Rnd 9: Ch 1, [sc in next 4 sc, dec] 5 times; join – 25 sc.
- Rnd 10: Ch 1, [sc in next 3 sc, dec] 5 times; join – 20 sc.
- Rnd 11: Ch 1, [sc in next 2 sc, dec] 5 times; join – 15 sc.
- Body-Rnd 12: Ch 1, inc in first sc, sc in each sc around; join – 16 sc.
- Rnd 13: Ch 1, sc in each sc around; join.
- Rnd 14: Ch 1, [sc in next sc, inc] 8 times; join – 24 sc.
- Rnd 15: Ch 1, [sc in next sc, inc] 12 times; join – 36 sc.
- Rnd 16: Ch 1, [sc in next 3 sc, inc] 9 times; join – 45 sc.
- Rnd 17: Ch 1, [sc in next 4 sc, inc] 9 times; join – 54 sc.
- Rnds 18-25: Ch 1, sc in each sc around; join.
- Rnd 26: Ch 1, [sc in next 4 sc, dec] 9 times; join – 45 sc.
- Rnd 27: Ch 1, [sc in next 3 sc, dec] 9 times; join – 36 sc.
- Rnd 27: Ch 1, [sc in next 4 sc, dec] 6 times; join – 30 sc.
- Rnd 29: Ch 1, [sc in next 3 sc, dec] 6 times; join – 24 sc. Stuff firmly.
- Rnd 30: Ch 1, [sc in next 2 sc, dec] 6 times; join – 18 sc.
- Rnd 31: Ch 1, [sc in next sc, dec] 6 times; join – 12 sc.
- Rnd 32: Ch 1, [dec] 6 times; join – 6 sc. Fasten off. Finish stuffing. Sew opening closed.
Arms (Make 4)
- Rnd 1: With A, ch 2; 10 sc in 2nd ch from hook; join.
- Rnd 2: Ch 1, sc in back loop of each sc around; join.
- Rnds 3 and 4: Ch 1, sc in each sc around; join. Fasten off at end of Rnd 4 leaving 8" for sewing. Stuff arm firmly with fiberfill.
Mitten (Make 2 with A yarn and 2 with B yarn)
- Rnd 1: Working in unused front loops of Rnd 2, join yarn in any loop; ch 1, sc in same loop, 2 sc in next loop, [sc in next loop, 2 sc in next loop] 4 times; join – 15 sc.
- Rnds 2 and 3: Ch 1, sc in each sc around; join.
- Rnd 4: Ch 1, [sc in next sc, dec] 5 times; join – 10 sc.
- Rnd 5: Ch 1, [dec] 5 times; join – 5 sc. Fasten off. Stuff lightly with fiberfill. Sew opening closed.
- Thumbs: Working around post of any sc of Rnd 1, join yarn in any sc; ch 1, (sc, 2 dc, sc) all in same st as joining, drop loop from hook, insert hook from front to back into first sc and into dropped loop and draw loop through the sc. Fasten off.
- Sew one arm to each side of snowman in desired position.
Scarf (Make 1 with A yarn and 1 with B yarn)
- Ch 3; sc in 2nd ch from hook, sc in next ch; turn – 2 sc. Work even in rows of sc for desired length. Fasten off.
- Fringe: Using 2 strands of contrasting color, knot 3 groups of fringe along each short end. Trim ends.
Mrs. Snowman's Hat
- With B, ch 3; join with a slip st to form a ring.
- Rnd 1: Ch 3, 11 dc in ring; join with a slip st in top of ch-3 – 12 sts.
- Rnd 2: Ch 3, 2 dc in next dc, [dc in next st, 2 dc in next dc] 5 times; join in top of ch-3 – 18 sts.
- Rnd 3: Ch 3, dc in next dc, 2 dc in next dc, [dc in next 2 dc, 2 dc in next dc] 5 times; join – 24 sts.
- Rnd 4: Ch 1, sc in each st around; join.
- Rnd 5: Ch 1, * [sc, ch 2] twice in next sc; repeat from * around; join in first sc. Fasten off.
Mr. Snowman's Hat
- With C, ch 30; being careful not to twist ch, join with a slip st to form a ring.
- Rnd 1: Ch 1, sc in each ch around; join – 30 sc.
- Rnd 2: Ch 1, sc in each sc around; join.
- Rnd 3: Ch 1, [sc in next 4 sc, dec] 5 times; join – 25 sc. Fasten off.
- Rnd 4: Join B in any sc; ch 1, sc in each sc around; join. Fasten off.
- Rnd 5: Join C in any sc; ch 1, sc in each sc around; join.
- Rnd 6: Ch 1, sc in each sc around; join.
- Rnd 7: Ch 1, [sc in next 3 sc, dec] 5 times; join – 20 sc. Fasten off.
- Rnds 8-10: Repeat Rnds 4-6.
- Rnd 11: Ch 1, [sc in next 2 sc, dec] 5 times; join – 15 sc. Fasten off.
- Rnds 12-14: Repeat Rnds 4-6.
- Rnd 15: Ch 1, [sc in next sc, dec] 5 times; join – 10 sc.
- Rnd 16-18: Repeat Rnds 4-6.
- Rnd 19: Ch 1, [dec] 5 times; join – 5 sc. Fasten off.
- Rnd 20: Join C in any sc; ch 1, sc in each sc around; join. Fasten off. Sew opening closed.
- Edging: Working in remaining loops of beginning ch, join B in any loop; ch 1, [working from left to right, sc in next loop, ch 1] 30 times; join. Fasten off.
- Tassel: Wrap B around cardboard 10 times. Slip a 10" yarn length under yarn at one end and knot securely. Cut wraps at opposite side of cardboard. Wrap a 16" yarn length around tassel 1" from top. Sew to end of Mr. Snowman’s hat. Trim ends.
Finishing
- Using hot glue gun and following photo for placement, glue 2 fancy buttons to center of body of Mrs. Frosty. Glue 2 masculine buttons to center of body of Mr. Frosty. With D, embroider mouth with Straight stitches and eyes with French Knots. With B, embroider nose.
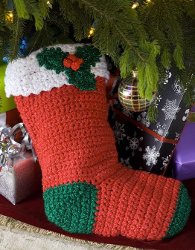
If you are looking for more great Christmas crochet patterns, this collection of Crochet Christmas Stockings will help keep you busy this winter season when you're stuck indoors.
Read NextSnowman Pot Holder Pattern
Your Recently Viewed Projects
Thanks for your comment. Don't forget to share!
mulberrygalprinces s
Aug 14, 2017
What a cute pair of snow people. I can't wait to get started on them. It's not to early to get started. I want to make more than two. Maybe a whole family on my mantel. They could wear different colored scarves. Thank you for offering these little cuties to us .
Cheryl Y
Nov 03, 2016
Oh how cute are these two? I so have to make these. The pattern is very well written and so easy to follow. Everyone needs a Mr. and Mrs. Snowman for the Holiday's. I'm thinking of making some out of plastic bag strips so they can set out side on my front deck. The pattern does not say how big they are so it will be a guessing game and I just have to make them to find out. Thank you so much for sharing this free crochet pattern.
margieelisabeth 31 39790
Dec 07, 2015
Here is my snowman! Made a few little changes to the basic shape but he definately is my favorite snowman now. Thank you!
kuhlsongs7 8817213
Dec 05, 2013
Just finished Mr. snowman. He turned out pretty cute-but larger than I expected. I thought the Baby Clouds yarn was hard to work with.
Sansankudo
Nov 14, 2010
Am I missing something on this page? Is this pattern and all of the others "Cut and Paste"? With pdf files today why are you still making readers cut and paste? Please convert to pdf files.
margieelisabeth 31 39790
Dec 07, 2015
It's not a big deal to use print friendly and make your own pdf . I'm just happy people are still offering free patterns! I don't complain when someone offers something free. )
Report Inappropriate Comment
Are you sure you would like to report this comment? It will be flagged for our moderators to take action.
Thank you for taking the time to improve the content on our site.