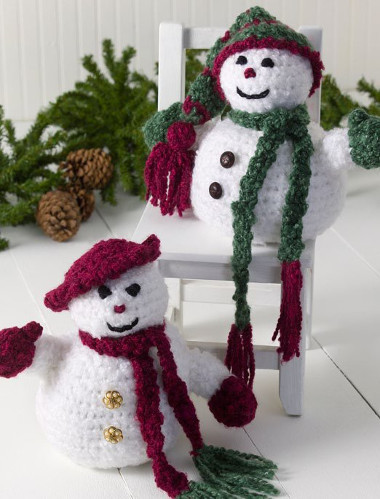
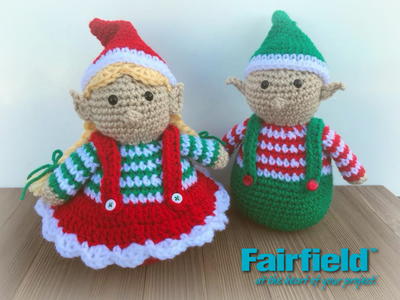
Chubby Christmas Crochet Elf Patterns

This free elf crochet pattern comes with a boy elf and girl elf! If you want more Christmas decorations to add to your home, why not crochet something? This is a great Christmas amigurumi pattern to decorate your mantel or end table. Christmas crochet patterns are a great way to destress during the frenzy of the holidays! Take a break from shopping, baking, and decorating by working on this lovely festive crochet pattern. These elves may even become a family heirloom one day!
Materials List
- Poly-Fil Premium Fiber Fill
- Poly-Fil Poly Pellets
- Worsted Weight Yarn in Red, Green, White, Yellow, and Skin Tone
- G Crochet Hook
- Safety Eyes, 9mm
- 4 Small Buttons (2 each for boy elf and girl elf)
- Fabric Scrap at least 8"-10"
- Sewing Needle and Thread
- Yarn needle
- Scissors
Instructions
GIRL ELF
-
First make the weighted pouch that you will put in the base of the elf.
Take your fabric and cut a circle that is about 8-10″ in diameter. With your needle and thread stitch a running stitch all the way around the circle. Pull the thread so that the sides scrunch up to make a bowl shape. Fill with Poly-Pellets. Pull thread to close and stitch to secure. Set aside. -
Next you will make the elf’s body.
The body is made by working in the round in a spiral, you do not need to join rounds. Begin with a magic ring. To switch colors when you make the last stitch of the round before you start a new color start the stitch as normal but when you yarn over to pull through at the end pull through the new color and you will be ready to work the next round with the new color. When working the stripes on the top half of the body do not cut your yarn after each color change, just carry it up the inside of the body. -
Round 1: with red yarn in mr, ch1, 6 sc (6 sc)
-
Round 2: 2 sc in each stitch (12 sc)
-
Round 3: [2 sc in first stitch, 1 sc in next] repeat around (18 sc)
-
Round 4: [2 sc in first stitch, 1 sc in next 2 stitches] repeat around (24 sc)
-
Round 5: [2 sc in first stitch, 1 sc in next 3 stitches] repeat around (30 sc)
-
Round 6: [2 sc in first stitch, 1 sc in next 4 stitches] repeat around (36 sc)
-
Round 7: [2 sc in first stitch, 1 sc in next 5 stitches] repeat around (42 sc)
-
Round 8: [2 sc in first stitch, 1 sc in next 6 stitches] repeat around (48 sc)
-
Round 9-16: sc in each stitch around (48 sc)
-
Switch to white yarn.
-
Round 17: work all stitches in this round in back loop only (the skirt will later be attached in the front loops, [sc2tog, sc in next 6] repeat around, switch to green at the end of the round (42 sc)
-
Round 18: sc in each stitch, switch to white at end of round (42 sc)
-
Round 19: [sc2tog, sc in next 5] repeat around, switch to green at end of round (36 sc)
-
Round 20: sc in each stitch, switch to white at end of round (36 sc)
-
Add weighted pouch to the base of the witch and begin stuffing, continue stuffing as you work.
-
Round 21: [sc2tog, sc in next 4] repeat around, switch to green at end of round (30 sc)
-
Round 22: sc in each stitch, switch to white at end of round (30 sc)
-
Round 23: [sc2tog, sc in next 3] repeat around, switch to green at end of round (24 sc)
-
Round 24: sc2tog around, switch to skin tone yarn at end of round (12 sc)
-
Round 24: 2 sc in each stitch (24 sc)
-
Round 25: [2 sc in first stitch, 1 sc in next 3 stitches] repeat around (30 sc)
-
Round 26: [2 sc in first stitch, 1 sc in next 4 stitches] repeat around (36 sc)
-
Round 27-28: sc in each stitch (36 sc)
-
Round 29: sc in first 18 stitches, 3 dc cluster in next stitch, sc in next 17 stitches (35 sc, 1 dc cluster)
-
Round 30-32: sc in each stitch (36 sc)add safety eyes a couple of rows above the nose
-
Round 33: [sc2tog, sc in next 4] repeat around (30 sc)
-
Round 34: [sc2tog, sc in next 3] repeat around (24 sc)
-
Round 35: [sc2tog, sc in next 2] repeat around (18 sc)
-
Round 36: [sc2tog, sc in next stitch] repeat around (12 sc)
-
Round 37: sc2tog around (6 sc)
-
Finish off, cut yarn, weave in ends.
Add the skirt.
With red yarn work in front loops left open on round 16.
-
Round 1: attach yarn to open loop, ch 3 (counts as first dc), dc in same stitch, dc in next stitch, [2 dc in next stitch, dc in next] repeat around, slip stitch to beginning ch to join (72 dc)
-
Round 2: ch 3 (counts as first dc), dc in each stitch around, join with slip stitch to beginning ch (72 dc)
-
Round 3: change to white yarn, ch 1, sc in same stitch, skip 1, (dc, ch 1, dc, ch 1, dc) in the next stitch, skip 1, [sc in next stitch, skip 1, (dc, ch 1, dc, ch 1, dc) in next stitch, skip 1] repeat around, slip stitch to first sc
-
Finish off and weave in ends.
Make the arms.
Make 2, starting with skin tone yarn and magic ring.
-
Round 1: ch 1, 6 sc (6 sc)
-
Round 2: 2 sc in each stitch (12 sc)
-
Round 3: 1 sc in each stitch, switch to green yarn (12 sc)
-
Round 4-11: 1 sc in each stitch alternating between green and white with each row (12 sc)
-
Finish off and cut yarn leaving long tail for sewing.
-
Sew an arm on each side of the body.
Make straps for dress.
Make 2: with red yarn ch 25.
-
Step 1: hdc in 3rd stitch from hook and each stitch to the end.
-
Step 2: finish off and cut yarn leaving long tail for sewing
-
Step 3: On each side sew a strap to the back of the elf at the top of the skirt, pull the strap over the shoulder of the elf and stitch in place on the front of the elf
-
Step 4: Stitch a small button on the front of each strap.
Make the hair.
With yellow yarn, begin with a magic ring.
-
Round 1: in mr, ch1, 6 sc (6 sc)
-
Round 2: 2 sc in each stitch (12 sc)
-
Round 3: [2 sc in first stitch, 1 sc in next] repeat around (18 sc)
-
Round 4: [2 sc in first stitch, 1 sc in next 2 stitches] repeat around (24 sc)
-
Round 5: [2 sc in first stitch, 1 sc in next 3 stitches] repeat around (30 sc)
-
Round 6: [2 sc in first stitch, 1 sc in next 4 stitches] repeat around (36 sc)
-
Round 7-10: 1 sc in each stitch (36 sc)
-
Round 11: slip stitch in first stitch, skip 2, 5 dc in next stitch, skip 2, slip stitch in next stitch, skip 2, 5 dc in next stitch, skip 2, slip stitch in next stitch
-
Cut yarn leaving long end for sewing.
-
Cut 24- 18″-20″ lengths of yellow yarn.
-
Fold the strands in half and use your hook to pull the folded end through each of the stitches not worked in round 11, pull the cut ends through the loop and tighten, this will give you strands of hair all around the head, except the two shells on the front that create the bangs.
-
Next you will need to divide the strands in half and braid them, to do this first place the hair on the head how you want it to be when it is done, this will allow you to braid the hair so that it looks right on the finished elf, make one braid on each side of the head using half of the hair for each.
-
Stitch the hair onto the head using the tail left after round 11.
-
Cut small pieces of green yarn and tie bows around the end of each braid.
Make the hat.
With red yarn, begin with magic ring.
-
Round 1: ch 1, 4 sc (4 sc)
-
Round 2: [2 sc, sc] repeat (6 sc)
-
Round 3: [2 sc, sc in next 2] repeat (8 sc)
-
Round 4: [2 sc, sc in next 3] repeat (10 sc)
-
Round 5: [2 sc, sc in next 4] repeat (12 sc)
-
Round 6: [2 sc, sc in next 5] repeat (14 sc)
-
Round 7: [2 sc, sc in next 6] repeat (16 sc)
-
Round 8: [2 sc, sc in next 7] repeat (18 sc)
-
Round 9: [2 sc, sc in next 8] repeat (20 sc)
-
Round 10: [2 sc, sc in next 9] repeat (22 sc)
-
Round 11: [2 sc, sc in next 10] repeat (24 sc)
-
Round 12: [2 sc, sc in next 11] repeat (26 sc)
-
Round 13: [2 sc, sc in next 12] repeat (28 sc)
-
Round 14: [2 sc, sc in next 13] repeat (30 sc)
-
Round 15: [2 sc, sc in next 4] repeat (36 sc)
-
Round 16: 1 sc in each stitch (36 sc)
-
Change to white yarn.
-
Round 17-18: 1 sc in each stitch (36 sc)
-
Finish off and cut yarn leaving long tail for sewing.
-
Put the hat on the head and stitch in place.
Make the ears.
-
Make 2 with skin tone yarn, start with magic ring.
-
In mr, ch 1, 6 sc, ch 2, sl st in first ch, sc in second ch, slip stitch in the first sc, finish off and cut yarn leaving long end for sewing.
-
Stitch one ear to each side of the head just under the edge of the hat and in front of the braids.
BOY ELF
-
First make the weighted pouch that you will put in the base of the elf.
Take your fabric and cut a circle that is about 8-10″ in diameter. With your needle and thread stitch a running stitch all the way around the circle. Pull the thread so that the sides scrunch up to make a bowl shape. Fill with Poly-Pellets. Pull thread to close and stitch to secure. Set aside. -
Next you will make the elf’s body.
The body is made by working in the round in a spiral, you do not need to join rounds. Begin with a magic ring. To switch colors when you make the last stitch of the round before you start a new color start the stitch as normal but when you yarn over to pull through at the end pull through the new color and you will be ready to work the next round with the new color. When working the stripes on the top half of the body do not cut your yarn after each color change, just carry it up the inside of the body. -
Round 1: with green yarn in mr, ch1, 6 sc (6 sc)
-
Round 2: 2 sc in each stitch (12 sc)
-
Round 3: [2 sc in first stitch, 1 sc in next] repeat around (18 sc)
-
Round 4: [2 sc in first stitch, 1 sc in next 2 stitches] repeat around (24 sc)
-
Round 5: [2 sc in first stitch, 1 sc in next 3 stitches] repeat around (30 sc)
-
Round 6: [2 sc in first stitch, 1 sc in next 4 stitches] repeat around (36 sc)
-
Round 7: [2 sc in first stitch, 1 sc in next 5 stitches] repeat around (42 sc)
-
Round 8: [2 sc in first stitch, 1 sc in next 6 stitches] repeat around (48 sc)
-
Round 9-16: sc in each stitch around (48 sc)
-
Switch to white yarn.
-
Round 17: [sc2tog, sc in next 6] repeat around, switch to red at the end of the round (42 sc)
-
Round 18: sc in each stitch, switch to white at end of round (42 sc)
-
Round 19: [sc2tog, sc in next 5] repeat around, switch to red at end of round (36 sc)
-
Round 20: sc in each stitch, switch to white at end of round (36 sc)
-
Add weighted pouch to the base of the witch and begin stuffing, continue stuffing as you work.
-
Round 21: [sc2tog, sc in next 4] repeat around, switch to red at end of round (30 sc)
-
Round 22: sc in each stitch, switch to white at end of round (30 sc)
-
Round 23: [sc2tog, sc in next 3] repeat around, switch to red at end of round (24 sc)
-
Round 24: sc2tog around, switch to skin tone yarn at end of round (12 sc)
-
Round 24: 2 sc in each stitch (24 sc)
-
Round 25: [2 sc in first stitch, 1 sc in next 3 stitches] repeat around (30 sc)
-
Round 26: [2 sc in first stitch, 1 sc in next 4 stitches] repeat around (36 sc)
-
Round 27-28: sc in each stitch (36 sc)
-
Round 29: sc in first 18 stitches, 3 dc cluster in next stitch, sc in next 17 stitches (35 sc, 1 dc cluster)
-
Round 30-32: sc in each stitch (36 sc)add safety eyes a couple of rows above the nose
-
Round 33: [sc2tog, sc in next 4] repeat around (30 sc)
-
Round 34: [sc2tog, sc in next 3] repeat around (24 sc)
-
Round 35: [sc2tog, sc in next 2] repeat around (18 sc)
-
Round 36: [sc2tog, sc in next stitch] repeat around (12 sc)
-
Round 37: sc2tog around (6 sc)
-
Finish off, cut yarn, weave in ends.
Make the arms.
Make 2, starting with skin tone yarn and magic ring.
-
Round 1: ch 1, 6 sc (6 sc)
-
Round 2: 2 sc in each stitch (12 sc)
-
Round 3: 1 sc in each stitch, switch to red yarn (12 sc)
-
Round 4-11: 1 sc in each stitch alternating between red and white with each row (12 sc)
-
Finish off and cut yarn leaving long tail for sewing.
-
Sew an arm on each side of the body.
Make straps for overalls.
Make 2: with green yarn ch 25.
-
Step 1: hdc in 3rd stitch from hook and each stitch to the end
-
Step 2: finish off and cut yarn leaving long tail for sewing.
-
Step 3: On each side sew a strap to the back of the elf at the top of the pants, pull the strap over the shoulder of the elf and stitch in place on the front of the elf.
-
Step 4: Stitch a small button on the front of each strap.
Make the hat.
With green yarn, begin with magic ring.
-
Round 1: ch 1, 4 sc (4 sc)
-
Round 2: [2 sc, sc] repeat (6 sc)
-
Round 3: [2 sc, sc in next 2] repeat (8 sc)
-
Round 4: [2 sc, sc in next 3] repeat (10 sc)
-
Round 5: [2 sc, sc in next 4] repeat (12 sc)
-
Round 6: [2 sc, sc in next 5] repeat (14 sc)
-
Round 7: [2 sc, sc in next 6] repeat (16 sc)
-
Round 8: [2 sc, sc in next 7] repeat (18 sc)
-
Round 9: [2 sc, sc in next 8] repeat (20 sc)
-
Round 10: [2 sc, sc in next 9] repeat (22 sc)
-
Round 11: [2 sc, sc in next 10] repeat (24 sc)
-
Round 12: [2 sc, sc in next 11] repeat (26 sc)
-
Round 13: [2 sc, sc in next 12] repeat (28 sc)
-
Round 14: [2 sc, sc in next 13] repeat (30 sc)
-
Round 15: [2 sc, sc in next 4] repeat (36 sc)
-
Round 16: 1 sc in each stitch (36 sc)
-
Change to white yarn.
-
Round 17-18: 1 sc in each stitch (36 sc)
-
Finish off and cut yarn leaving long tail for sewing.
-
Put the hat on the head, pulling it down over the back of the head.
Make the ears.
-
Make 2 with skin tone yarn, start with magic ring.
-
In mr, ch 1, 6 sc, ch 2, sl st in first ch, sc in second ch, slip stitch in the first sc, finish off and cut yarn leaving long end for sewing.
-
Stitch one ear to each side of the head just under the edge of the hat.
What's your favorite crochet item you've worked up for the holidays?
Your Recently Viewed Projects
Thanks for your comment. Don't forget to share!
Crafty Suz
Nov 13, 2018
This set of elves is absolutely adorable. They appear to be quite easy to make too. I enjoy making amigurumi characters. I love their crinkly curved ears. They'd be cute in a decorative display or as a huggable stuffy for any age. A set would make such a nice gift too. Wouldn't it be fun to match the yarn color to the hair color of the recipient?
lcarr
Sep 22, 2018
Oh how cute! Does anyone know what size these are when finished? Could they be used as door stops? I noticed there are a lot of comments that dont match the project. I guess this link is connected to another page or used to have a different craft on it.
mulberrygalprinces s
Jul 16, 2018
What a cute pair of little people. They will sit nicely on my mantle with my Christmas village. The grand kids will love them and they are very easy to make. All the directions are right there on the title page so no digging to find them. It's a great project.
princess6860504
Dec 19, 2017
Don't you think these be cute for make believe toys for the little ones in your family? I think I'd use them like the "Elf on the Shelf". What do you think? I like that the (extensive!) pattern is offered on this same page. What an original idea she has presented here.
txmlhl 4916988
Dec 15, 2017
Love the little elves. I've made several different shaped dolls. The one I remember the most was the mermaid. She had scales that were crocheted in with the stitching. Wonder what happened to her. She was a gift and you lose track of things. thanks
grannywendy3 84784 96
Dec 11, 2017
Elves are simple but family members wanted legs with bendable knees or straight with socked feet. The ears for this elve pair were simple. but I had to enlarge them to fit folks notations. I really had to adapt them for my folks so I rated this pattern at a 3 .
kimlennie 9336847
Dec 08, 2017
Christmas stockings. I have a pattern from long ago that I use every Christmas for gifts and sometimes sell. They work up fairly quickly and are so beautiful. I enjoy making them immensely.
ridiculosity 67303 43
Dec 06, 2017
I want to crochet dishcloths and scrubbies, if I can, any time of year when they are needed. I guess 'anytime' covers it.
Cheryl Y
Dec 05, 2017
I like to crochet anything that makes someone happy! I do it all from hats, gloves, mittens, afghans and toys. This Chubby Christmas Crochet Elf pattern is great and a must make on my list.. So sweet and it looks easy to do too! Thank you for sharing this Elf crochet pattern.
Report Inappropriate Comment
Are you sure you would like to report this comment? It will be flagged for our moderators to take action.
Thank you for taking the time to improve the content on our site.