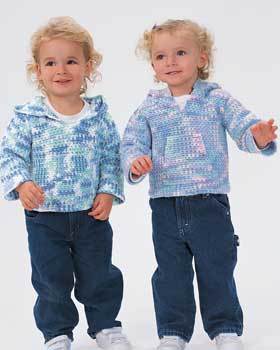
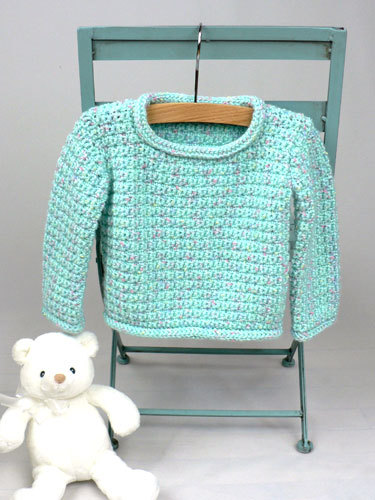
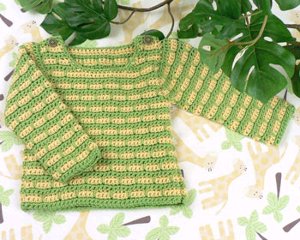
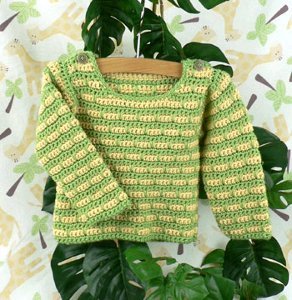
Striped Baby Sweater
Great for little girls and boys, this Striped Baby Sweater is a great way to keep warm during the cooler fall and winter months. Available in a variety of sizes, this crocheted sweater can be made for babies as young as 6 months to as old as a year. Learn how to make clothing for your kids to help you save money in the long run, since you won't have to worry about shopping at department stores every month to keep up with your growing child. This is a simple pattern and one you may find yourself coming back to time and time again.

Materials:
- US G-7 (4.5 mm) crochet hook, or size to obtain gauge
- US H-8 (5 mm) crochet hook
- 2 round buttons—5/8"/16mm diameter
- Sewing needle
- Coordinating sewing thread
- Yarn needle
- 3 (3, 6, 6) skeins Naturally Caron Spa yarn in Green Sheen (A)
- 3 (3, 3, 3) skeins Naturally Caron Spa yarn in Soft Sunshine (B)
Gauge: In stitch pattern, using H-8 (5 mm) hook, 14 sts and 20 rows = 4"/10 cm.
Finished Measurements:
- Chest 20 (21, 22, 23)"/51 (53.5, 56, 58.5) cm
- Length 11 (11 1/2, 12, 13)"/26.5 (28, 29, 32) cm
Special Terms:
- sc2tog: Single crochet 2 together – Insert hook in next stitch, yarn over and pull up a loop, (2 loops on hook), insert hook in next stitch, yarn over and pull up a loop, yarn over and draw through all 3 loops on hook.
- long-sc: Long single crochet – Insert hook in st 3 rows below indicated st, yarn over, pull up a loop to level of work, yarn over and draw through 2 loops on hook.
Instructions:
6 months (12 months, 18 months, 24 months)
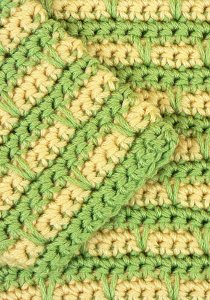
Stitch and Color Pattern
(multiple of 4 sts + 3 (5, 3, 5))
- Row 1: Sc in second ch from hook and in each remaining ch across, turn.
- Row 2: Ch 1, sc in each st across; change to B in last st, turn.
- Row 3: With B, ch 1, sc in each st across, turn.
- Row 4: Ch 1, sc in each st across; change to A in last st, turn.
- Row 5: With A, ch 1, sc in first 3 (4, 3, 4) sts, *long-sc in next st, sc in next 3 sts; repeat from * across to last 0 (1, 0, 1) st(s), sc in last 0 (1, 0, 1) st(s), turn.
- Rows 6–8: Repeat Rows 2–4.
- Row 9: With A, ch 1, sc in first 1 (2, 1, 2) sts, long-sc in next st, *sc in next 3 sts, long-sc in next st; repeat from * across to last 1 (2, 1, 2) st(s), sc in last 1 (2, 1, 2) sts, turn.
- Row 10: Ch 1, sc in each st across; change to B in last st, turn.
- Repeat Rows 3–10 for Stitch Pattern. To change color, work last stitch of old color to last yarn over. Yarn over with new color and draw through all loops on hook. Continue working with new color. Drop old color, but do not fasten off; carry old color loosely up side of work.
Back
Maintain Stitch and Color Pattern throughout.
- With larger hook and A, chain 36 (38, 40, 42).
- Row 1: Sc in second ch from hook and in each remaining ch across, turn—35 (37, 39, 41) sts.
- Continue even in Stitch Pattern until piece measures 6 3/4 (7, 7, 7 3/4)"/17 (18, 18, 19.5) cm from beginning.
Shape Armholes
- Row 1: Ch 1, slip st in first 2 sts, ch 1, work in Stitch Pattern across to last 2 sts; leave last 2 sts unworked, turn—31 (33, 35, 37) sts (excluding slip sts). ---
- Row 2: Ch 1, sc2tog, work in Stitch Pattern across to last 2 sc, sc2tog, turn—29 (31, 33, 35) sts.
- Continue even in Stitch Pattern until armhole measures 4 (4, 4 1/2, 4 3/4)"/10 (10, 11.5, 12) cm from beginning of armhole shaping.
Shape First Shoulder
- Row 1: Ch 1, work in Stitch Pattern over first 5 (5, 5, 6) sts sc2tog; leave remaining sts unworked (for neck and second shoulder), turn—6 (6, 6, 7) sts.
- Continue even in Stitch Pattern until piece measures 11 3/4 (12, 12 1/2, 13 1/2)"/30 (30.5, 32, 34.5) cm from beginning. Fasten off.
Shape Second Shoulder
- Skip 15 (17, 19, 19) unworked sts following first shoulder; join yarn with slip st in next st.
- Row 1: Ch 1, beginning in same st as join, sc2tog, work in Stitch Pattern in each remaining st across, turn—6 (6, 6, 7) sts.
- Continue even in Stitch Pattern until piece measures 11 3/4 (12, 12 1/2, 13 1/2)"/30 (30.5, 32, 34.5) cm from beginning. Fasten off.
Trim
- With RS facing and smaller hook, join A with sc in top of neck, sc evenly across neckline. Fasten off.
Front
Maintain Stitch and Color Pattern throughout.
- Work as for Back until piece measures 10 (10, 10 1/2, 11 1/2)"/25.5 (25.5, 26.5, 29.5) cm from beginning)—29 (31, 33, 35) sts.
Shape First Neck Edge and Shoulder
- Row 1: Ch 1, work in Stitch Pattern over first 8 (8, 8, 9) sts, sc2tog; leave remaining sts unworked (for neck and second shoulder), turn—9 (9, 9, 10) sts.
- Row 2: Ch 1, sc2tog, work in Stitch Pattern across, turn—8 (8, 8, 9) sts.
- Row 3: Ch 1, work in Stitch Pattern across to last 2 sts, sc2tog, turn—7 (7, 7, 8) sts.
- Row 4: Ch 1, sc2tog, work in Stitch Pattern across, turn—6 (6, 6, 7) sts.
- Continue even in Stitch Pattern until piece measures 11 1/4 (11 1/2, 12, 13)"/28.5 (29, 30.5, 33) cm from beginning.
- Buttonhole Row 1: Ch 1, work in Stitch Pattern across to last 4 sts, ch 1, skip next 2 sts, continue in Stitch Pattern over last 2 sts, turn.
- Buttonhole Row 2: Ch 1, work in Stitch Pattern across working 2 sc in the ch-1 space. Fasten off.
Shape Second Neck Edge and Shoulder
- Skip 9 (11, 13, 13) unworked sts following first neck edge; join yarn with slip st in next st.
- Row 1: Ch 1, beginning in same st as join, sc2tog, work in Stitch Pattern in each remaining st across, turn—9 (9, 9, 10) sts.
- Row 2: Ch 1, work in Stitch Pattern across to last 2 sts, sc2tog, turn—8 (8, 8, 9) sts.
- Row 3: Ch 1, sc2tog, work in Stitch Pattern across, turn—7 (7, 7, 8) sts.
- Row 4: Ch 1, work in Stitch Pattern across to last 2 sts, sc2tog, turn—6 (6, 6, 7) sts.
- Continue even in Stitch Pattern until piece measures 11 1/4 (11 1/2, 12, 13)"/28.5 (29, 30.5, 33) cm from beginning.
- Buttonhole Row 1: Ch 1, work in Stitch Pattern over first 2 sts, ch 1, skip next 2 sts, continue in Stitch Pattern across, turn.
- Buttonhole Row 2: Ch 1, work in Stitch Pattern across working 2 sc in the ch-1 space. Fasten off.
Trim
- With RS facing and smaller hook, join A with sc in top of neck, sc evenly across neckline. Fasten off.
Sleeve (Make 2)
Maintain Stitch and Color Pattern throughout.
- With larger hook and A, chain 24 (24, 26, 26).
- Row 1: Sc in second ch from hook and in each remaining ch across, turn—23 (23, 25, 25) sts.
- Row 2: Ch 1, sc in each st across; change to B in last st, turn.
- Row 3 (increase row): Ch 1, 2 sc in first st, work in Stitch Pattern across to last sc, 2 sc in last sc, turn—25 (25, 27, 27) sts.
- Rows 4–8: Beginning with Row 4, work in Stitch Pattern.
- Row 9 (increase row): Ch 1, 2 sc in first st, work in Stitch Pattern across to last sc, 2 sc in last sc, turn—27 (27, 29, 29) sts.
- Rows 10–27 (33, 33, 39): Repeat last 6 rows 3 (4, 4, 5) more times—33 (35, 37, 39) sts.
- Continue even in Stitch Pattern until piece measures 6 1/2 (7 1/2, 8, 8 1/2)"/16.5 (19, 20.5, 21.5) cm from beginning.
Shape Sleeve Cap
- Row 1 (decrease row): Ch 1, sc2tog, work in Stitch Pattern across to last 2 sts, sc2tog, turn—31 (33, 35, 37) sts.
- Row 2: Work in Stitch Pattern across.
- Rows 3–8 (10, 12, 12): Repeat last 2 rows 3 (4, 5, 5) more times—25 (25, 25, 27) sts.
- Fasten off.
Finishing
- Using sewing needle and coordinating thread, sew buttons to top of Back shoulder piece opposite Front buttonholes. Button Front and Back together. Set in sleeves, taking care to sew through both thicknesses (Front and Back) at top of shoulder. Sew sleeve and side seams.
- Using yarn needle, weave in all ends.
Read NextBaby Pullover Sweater
Your Recently Viewed Projects
Thanks for your comment. Don't forget to share!
hooking granny
Jul 29, 2011
Everything at the top of the pattern is for information. The pattern starts with the back, and it states to chain 36 for the smallest size, and for larger sizes the number of st. in the chain are given in ( ) For the front, one chains the number of st. just like for the back, depending on what size you make- Hope this helps. BACK Note: Maintain Stitch and Color Pattern throughout. 1.With larger hook and A, chain 36 (38, 40, 42).
CreativityGoddess
Apr 19, 2011
@minky2001 7697564 - Thank you for the helpful tip. I'm sure our users will appreciate it! -The Editors of FaveCrafts
minky2001 7697564
Apr 18, 2011
After a ton of stress I finally figured out something about this pattern. It confused me completely, there is a section in the begining "STITCH AND COLOR PATTERN" this section does not give a number of chains to start it, and that number is completely up to you because it is just a color and stitch guide.. IT IS NOT PART OF THE SHIRT! The shirt sharts at the next section labled "BACK".. hope this helps others from going through the stress I did because the shirt is absolutely adorable looking from the picture given.
teris
Aug 27, 2010
looking for the number of beginning chains to use for this pattern??? Thanks.
royce
Aug 10, 2010
hi , this is such a good looking sweater ... i would like to try it . i am a newbie and didnt understand multiples of 4 stitches +3(535) pls help me !!!!
Janisjonell
Aug 03, 2010
Would like to try and crochet this cute sweater, but the beginning ch (number of chains) has been omitted. Starts with row one.
Report Inappropriate Comment
Are you sure you would like to report this comment? It will be flagged for our moderators to take action.
Thank you for taking the time to improve the content on our site.