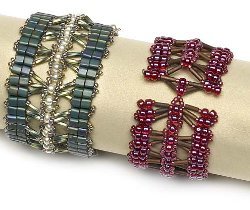
Beaded Bracelet and Earrings
Making your own Beaded Bracelet and Earrings has never been easier! Just follow these simple steps from AMACO for making polymer clay jewelry in various colors. For a fun variation on swirled beads, check out this video on using shaving cream when making clay beads.

Materials:
- FIMO® Classic Polymer Clay – Pearl (05), Blue (#37), Violet (#6), Black (#9)
- AMACO® PolyBlade
- AMACO® PolyRoller or Pasta Machine
- AMACO® Tri-Bead Roller™
- Piece of Paper
- Super Glue
- Ruler
- Scissors
- Elastic Bead Cord (length of wrist plus few inches)
- 2 Head Pins
- 2 French Ear Wires
- Round Nose Pliers
- Flush Cutter Plier
Steps:
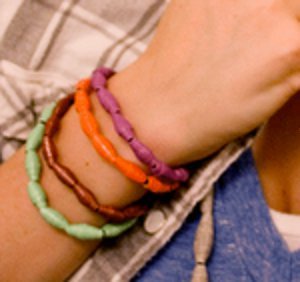
- Condition each color of clay. Mix clay colors as follows if you wish to make the beads shown in the photograph: For the blue color, mix 2 parts of Pearl with 2 parts of Blue and condition until color is blended into one. For the violet color, mix 3 parts of Pearl with 1 part of Violet and condition until color is blended into one.
- Using the Tri-Bead Roller™, roll eight round beads from the violet colored clay. Roll six oval shaped beads and two bicone shaped beads using the blue colored clay.
- To make the oval swirled colored clay, make a rectangular shaped “stack” of colors as follows: If you have a pasta machine, roll the Black clay on a thin setting. Without a pasta machine, use the clay roller and roll the Black clay as thin as possible. Roll each other single color to about 1/16" of an inch. Make a paper or cardstock template. The template should be 3/8" wide by 1" long. Lay the template over the rolled clay and cut two each of the Blue, Violet and Pearl, and roll enough Black rectangles to have one layer between each color and one on top. Assemble the stack. Rub or roll over each added rectangle to remove any trapped air.
- Roll an oval shaped bead using any of the colors of clay. Put the bead on your work surface and visually divide it into 4 equal lengths. Cut 1/4" from each end to reduce the amount of clay.
- Square up the clay “stack” with your clay blade if necessary. The goal is to have the stack very near the same width as the core bead (now shortened) that will be covered with a slice of the stack.
- Cut a thin slice from one end of the stack. Wrap the slice around the mid portion of the short oval bead. A portion of a second slice may be necessary to completely wrap colored stripes around the oval bead center. Using your fingers, gently press the colored striped clay slice into the bead form. Place the striped covered bead in the oval channel of the Tri-Bead Roller™ at the end of the channel nearest you. Place the top on and roll the bead away from you, almost to the other end of the chamber. Remove the top and place the bead back in the same chamber at the starting point. Do not turn the bead. Replace the top and roll it again to the far end of the chamber. Repeat as you choose to swirl the colors around the bead until desired pattern is achieved. The more you roll, the thinner the colors become and more tightly they wrap around the bead. Keep the bead traveling in only one direction.
- Pierce and cure all beads. Finish beads as desired, either sand with fine sandpaper and polish or coat with a finish coat compatible with polymer clay.
- To assemble the earrings, place the blue bicone bead on the head pin first, followed by a swirled oval. Using round nose pliers, create a loop in the top of the head pin close to the top bead. Run the loop of the French Ear Wires into the loop you are creating before it is closed. Finish the loop and wrap the wire around the headpin below the loop and trim excess wire from headpin with a pair of flush cutter pliers. Your earrings are ready to wear!
- To make bracelet, measure your wrist and add two inches. String beads onto elastic cord. With tape on one end of the elastic cord to hold the beads, lay it around your wrist to get a comfortable length for yourself. When you’ve added enough beads, alternating colors and shapes to fit nicely, it’s time to tie a tight double knot. A spot of super glue on the knot will hold it securely.
Tips:
- The amount of clay added to create the swirled stripes must be very nearly the same amount as the clay removed from the base bead. You might want to practice a bit with a solid colored rectangle of clay.
- The stack will be easiest to slice after the heat from handling the clay has dissipated. Use a nice sharp blade to make nice thin slices. Always use extreme caution when handling a clay blade.
- If you let beads sit for awhile and cool (body heat transfers to clay) they will be less likely to distort while handling to pierce them.
Read Next101+ Free Beading Patterns
Your Recently Viewed Projects


Thanks for your comment. Don't forget to share!
Report Inappropriate Comment
Are you sure you would like to report this comment? It will be flagged for our moderators to take action.
Thank you for taking the time to improve the content on our site.