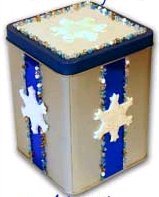
Winter Snowflake Cookie Tin
Decorate a tin with snowflakes and glitter for an adorable way to package homemade cookies this Christmas. The winter snowflake cookie tin from Beacon Adhesives is a fun and easy Christmas craft, and it makes swapping cookies even more special.
Materials:
- 4” X 6” metal tin (any color)
- Silver metallic spray paint for tin
- Blue spray paint for tin
- Paper clay or any air dry clay
- Dazzle-Tac Jewelry Glue
- Zip Dry Paper Glue
- Liquid Laminate
- 2” snowflake cookie cutter
- Blue and silver metallic craft papers
- Holographic glitter
- Assorted silver, white & blue tiny beads
- Small craft brush
- Ruler
- Pencil
- Paper cutter or scissors
- Lucite roller or old rolling pin
- Toothpick
Instructions:
- Take can outside in a cardboard box and spray the lid using the blue metallic spray paint. Let dry and apply a second coat to cover completely. Remove from box.
- Using the same box, spray the bottom of the tin with the silver paint. Once dry, repeat to cover completely.
- Cut a strip of blue metallic paper 1” wide and about 5” long. Make sure the paper meets the lid and does not fit under it. Glue strip to tin with ZIP DRY PAPER GLUE. Repeat process on the other three sides and let dry.
- Cut a 3 ½” square of silver metallic paper for the lid. Glue to lid top with ZIP DRY PAPER GLUE. Let dry.
- Roll paper clay to 1/8” thickness. Cut out five snowflakes and let dry at least 3 hours depending upon the humidity in your area.
- Paint both sides of the wooden star with 2 coats of gold paint, drying between coats. Draw lines around the edges of the star with the black marker.
- Glue one snowflake to the lid with DAZZLE-TAC and the other four onto the blue strips on the side. Hold in place for a few minutes to allow glue time to grab onto surface.
- Add a thin line of DAZZLE-TAC around the perimeter of the silver paper on the lid, one side at a time. Use a toothpick to move the tiny beads onto the glue. Repeat process on sides of can over the edges of the blue strips as shown. Let one side dry before finishing remaining sides.
Read NextChristmas Gnome Wall Decor
Your Recently Viewed Projects

Thanks for your comment. Don't forget to share!
wizardelf 1207863
Dec 17, 2010
Great project for kids when the rain comes down, use bunnies for Easter, hearts for Valentine, you get the picture, be sure to check the dollar stores for tins and glass beads.
Report Inappropriate Comment
Are you sure you would like to report this comment? It will be flagged for our moderators to take action.
Thank you for taking the time to improve the content on our site.