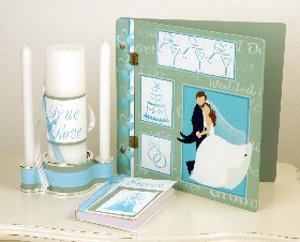
Wonderful Wedding Accessories
Create your own wedding accessories with this DIY kit from Delta Creative! It's a great way to add a personal touch to your wedding. A fantastic way to incorporate crafting into your special day.
Materials:
- Delta Creative Ceramcoat® Acrylic Paint (Turquoise 2012, Cactus Green 2463,Tahiti Blue 2650, Black 2506, White 2505, Spice Brown 2049, Santa’s Flesh 2472)
- Delta Creative Ceramcoat® All-Purpose Sealer 7005
- Delta Creative Ceramcoat® Satin Varnish 7003
- Sobo Glue
- Delta Creative Stencil Mania™
- Wedded Bliss 3 pack 97 207 0056 0107
- Delta Creative Stencil Magic®
- 1/4” Stencil Brush 983000008
- Spray Adhesive 98 210 0045
- OTHER SUPPLIES:
- Surface
- Walnut Hollow
- 13”x13” album or similar album of choice
- Wilton Unity Candle Holder
- 9”x 3” white pillar
- Two 9” White candle
- Guest book
- 1 yd. White ribbon of choice
- 1 yd. Turquoise ribbon of choice
- Brushes (Loew-Cornell La-Corneille Golden Taklon, Series 7300, Shader #6 and 12,Series 7050 Script Liner #1, Series 7350 1” Wash Brush)
- Stylus
- Transfer paper
- Tracing paper
- Palette paper
- Water containe
- Scissors
- Paper Towel
- Low-tack painters tape
- Pattern
Instructions:
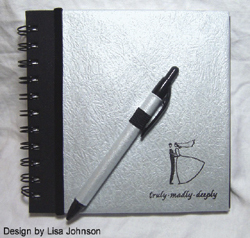
Album
Wood Preparation
- Always sand with the grain of the wood
- Using fine grit sand paper, sand off burrs and rough edges from all pieces. Remove dust.
- Apply one even coat of All-Purpose Sealer to the album only using 1”wash brush. Allow to dry thoroughly.
- Sand with fine grit sandpaper (250-300 grit). Wipe dust.
Background Instructions
- Basecoat the entire album in Cactus Green using the 1” wash brush. Tip: to basecoat is total opaque coverage. Two thin coats are preferable; this keeps you from ending up with streaky thick paint. A good tip is to load brush, never more then halfway up bristles. Start in center of area to be painted, pushing color out to pattern line. This technique will leave no ridges.
Stenciling
- Apply spray adhesive to any one of the three Wedded Bliss stencils all of the sayings were repeated randomly, covering the entire top of the album. Allow spray adhesive to dry, pat off excess spray with paper towel. Press stencil firmly in place album. Using 1/4” stencil brush, pick up small amount of White, pat on palette to remove excess paint. Using straight up and down motion pat over open areas of stencil. Repeat as many times as needed to complete the top of the album.
- Tip: Applying two thin coats is preferable; applying to heavily will cause color to bleed under edge of stencil. Covering open areas of stencil not in use with low-tack painter’s tape will keep unwanted color from appearing.
- Rectangles and Squares
- Using the pencil and ruler mark the rectangles as follows: 3”x3” for rings, 3”x4” for cake, 7”x2-3/4” for wine glasses, 6”x8” for couple and 1/2” wide stripe down edge of album. Using low-tack painter tape go around outside edges of pencil markings.
- Using the 1” wash brush basecoat all of the White rectangles.
- Using the 1” wash brush basecoat the rectangle for the couple in Turquoise plus a touch of Tahiti Blue. Remove all tape.
- Using the #1 liner band all rectangles in Tahiti Blue and then in White plus a touch of Cactus Green.
Stenciling Images
- Repeat stenciling process for each of the images, rings once, cake once, bells 7 times and wine glasses 3 times. Using the 1/4” stencil brush tap first into Tahiti Blue and then in White. Tap over open areas of stencil being used keeping the White to the top of the stencil.
Transferring Pattern
- Lay tracing paper over pattern and trace all lines except those used to denote shadows. The shadow lines are generally short straight lines and several of them. Main lines are where there are color changes. Detail lines are facial features, patterns on fabric, and etc. Lay tracing on surface and tape at top and on one side. Slide graphite paper between tracing and surface with the dark side down; draw over the main lines only. Do not add the detail lines these will be applied after the basecoating is done.
- Apply pattern for couple.
Painting Instructions Couple
- Using the #12 shader float her veil in White.
- Basecoat as follows: Using the #12 shader create the under side of her dress in White plus a touch of Cactus Green.
- Create her dress, headband and his shirt all in White using the appropriate sized brush.
- Create his clothes in Black using the #6 shader.
- Create all Santa’s Flesh areas using the appropriate sized brush.
- Basecoat his and her hair both in Spice Brown using the #6 shader.
Unity Candle Holder
- Apply an even coat of Gesso to the unity candleholder being careful not to get it on the silver.
- Using the 1” wash brush basecoat the unity candleholder in Cactus Green.
- Basecoat a 1-1/4” stripe through the center of the unity candle in a mix of equal parts White and Tahiti Blue using the #12 shader.
- Cut very close to the edges of the bouquet all the way around so it is easier to stencil with. Repeat stenciling process doing bouquet in White. Repeating as many times as needed.
Guest Book
- There is no preparation needed for the book.
- Basecoat the book and one sheet of cardstock in White using the 1” wash brush. Cut a 3-1/2” x 4” rectangle from the white cardstock.
- Basecoat the other sheet of cardstock in Cactus Green using the 1” wash brush. Cut a 4-1/2” x 5” rectangle from the green cardstock.
- Repeat stenciling process in Tahiti Blue and White placing the bride on the piece of white cardstock and “forever” at the top of the book.
- Using Sobo Glue adhere green cardstock in lower right corner, offset bride and glue in place.
- Candle Wrap
- Cut remaining white cardstock into 3-1/4” x 10” and green 3-3/4” x 10.
- Stencil True Love and dove onto the center of the white cardstock in Tahiti Blue and White.
- Glue both pieces together allow to dry.
To Finish
- Apply as many coats of Satin Varnish as desired to all pieces using the 1” wash brush.
- Wrap candle wrap around pillar candle and glue in back. Placing a piece of low-tack painter’s tape
- over the seam while the glue is drying helps keep it in place.
- Glue ribbons to candle wrap and tie around guest book.
- Craft Products
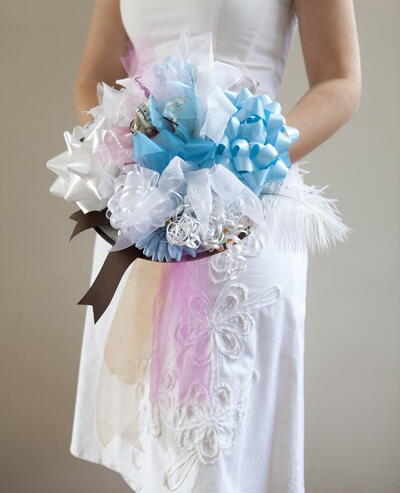
Read NextBridal Shower Ribbon Bouquet