This project was submitted by one of our readers, just like you.
DIY Wedding Sneakers

DIY Wedding Sneakers
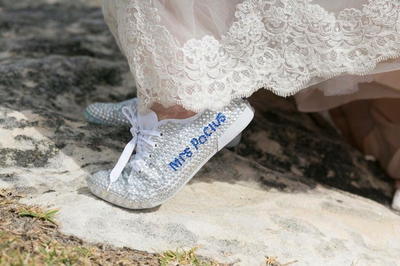
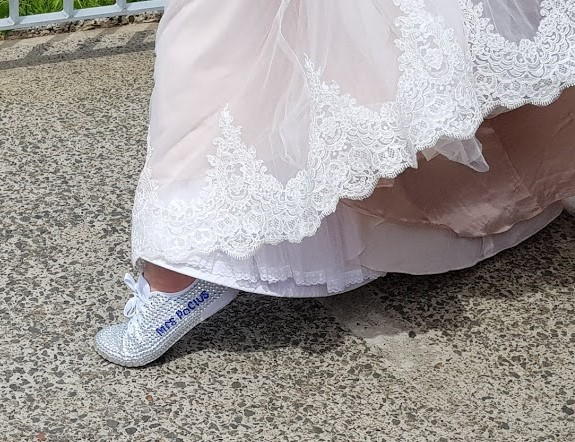
"Every girl dreams of looking stunning on their wedding day in their beautiful wedding dress and shoes. My daughter got married recently and her reception was on a cruise showboat around Sydney harbour. She was afraid the movement of the boat could cause her to fall in high heels. Not being a girly girl she has trouble working in high heels at the best of times, but she still wants to have sparkly shoes. We had a look on the internet and she could not find what she had in mind. Me being the crafty one in the family I said I would have a go at making some sparkling trainers for her. You were not going to see her shoes under the dress and her feet would still be comfortable at the end of the day."
Primary TechniqueGeneral Crafts

Instructions
-
She had her heart set on rhinestones all over a pair and trainers. I did not like the idea of spending hours glueing each stone on one by one. I had a look on the internet and I found self-adhesive diamonte rhinestone that came in a big sheet you just pulled them off and stuck them to the shoe. You could add the long strips in one go and cut the strips smaller to fill in the gaps. While I was browsing the internet I had seen trainers that said “Bride” or “MRS” and I loved this idea.
-
I used the self-adhesive diamontes around the front first when I should have started with the name first. I used a thin marker pen to write what I wanted on the trainers. I went with “MRS Pocius” which would be her new married name. It would work better to write the name in pencil. The pen I used smudged when I added the glue, but I was able to hide the smudges with the studs.
-
I wanted the name to stick out from the rest so I used dark blue rhinestones to do the name. Unfortunately, I did have to add these stones one by one which was a pain in the butt. I used Tarzan grip glue for the stones but E6000 will work perfectly too. I used the nozzle of the tube of glue to put a thin layer around each letter. I did the letters one at a time.
-
The front of the shoes looked a bit boring and the self-adhesive diamontes did not stick to the rubber so well. I went back onto the internet and found some heart-shaped rhinestones which I glued on to the front. They were really cute and the colour from the light looked great.
-
Heart Rhinestones added to the front.
-
I wanted to add the wedding date on the shoes somewhere and decided to add them to the heal of the shoe. I followed the same method of writing the words first and then filling them in with the rhinestones.

Read NextBridal Shower Ribbon Bouquet