Mod Podge Screen Print
Screen print onto a shirt, bag or any fabric with this great technique from Amy Anderson. She uses fabric Mod Podge and a sheer curtain panel for her screen printing.The snowflake design is great for holiday wearables and gift-giving.

Materials:
- Embroidery hoop - doesn't matter if it's wood or plastic
- Sheer curtain panel - I got mine for $1 at the dollar store
- Screen printing ink - any kind or colors, Speedball is great
- Mod Podge - I used Fabric
- Flat paint brush
- Sheet of paper, any kind
- Pencil
- Cotton bag
- Scissors
Instructions:
I like to jump in, so you should to. Take your sheer curtain panel and fasten it into the embroidery hoop. Screw it closed and pull the curtain tight, tight, tight.

Now turn your hoop over and cut the excess curtain material around the frame. Put the extra curtain aside and then pull your screen taut again.

Now get as crafty as you want to! You're going to need an image, so either hand draw one or print something off of the computer. I wanted a simple snowflake, so I hand drew mine (I first marked off the hoop so I wouldn't do it too big or small). Notice it would have been easier for me to print something or use a ruler, but I like to make things as difficult as possible and do lots of erasing.

Go ahead and place your screen on the design you just drew (or printed). Trace directly onto the screen with a pencil. All the tutorials I've seen use a pencil, so that's what I used. Not sure what happens if you use a pen, but I really didn't want to mess this up so I didn't try and find out.

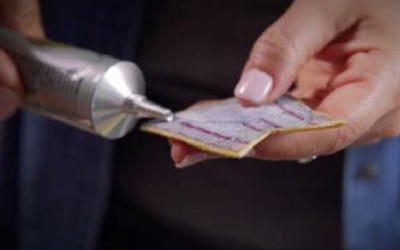
Yay, my favorite part! Using the brush, paint Mod Podge on your screen where you DON'T want the ink to go through. This is called the "resist" because it resists the ink coming through the screen. I thought about it long and hard, and I decided to use Fabric Mod Podge. Why, because if it's washable, then it would be easy to wash the ink out (Mod Podge staying behind) and then use the screen again for multiple prints. I know, I know - I'm smart.
Let your Mod Podge screen dry for a few hours until it's completely clear. I did a few layers of Mod Podge because I was nervous about the ink getting through in some areas if I didn't do it well enough. Your host is also a neurotic screen printer.

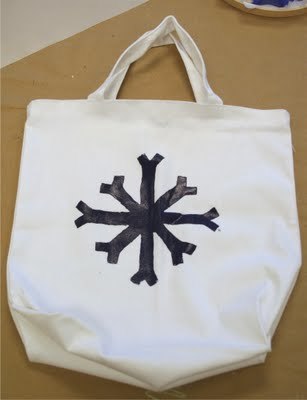
This is the second fun part - place your screen down on the bag and paint! One important thing: place something between the layers of fabric, so that the ink doesn't bleed through. You never know. Be sure when you are painting through the screen to get the corners well. I did several layers of paint before I pulled up.

Pull the screen off and allow to dry. Check out my finished project again. If you found you messed up in any areas, go back and touch up with the brush. Follow the directions on the packaging of your screen print ink to finish your project (wash or heat seal, etc.).
Once I did the bag I was more confident, so I created this mini snowflake screen in the same way that I did the large snowflake one for the bag.

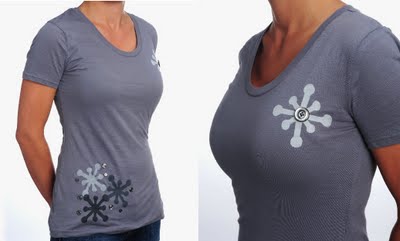
I grabbed a gray t-shirt and mixed together some black and white screen printing ink, then followed the steps I listed above. You'll notice I did several shades on the t-shirt. Gray tonal makes me happy, so printed one snowflake, then added more white. Then did it again. And again. And one more time. Finished t-shirt!
To completely finish her off, I added some buttons, because you know I love them. Great thing is that the screen is reusable, you have tons of curtain material from your sheer panel to make more and now your friends and family all want you to make them a shirt.
Read NextSummer Twist Tee-Shirt


Thanks for your comment. Don't forget to share!
FURYous1970
Feb 08, 2011
I have been looking for a way to screen print on a t-shirt for my friend's band without the expense. This looks great and easy enough for my teens to help out. Thanks!
llaaurraa
Jan 08, 2011
I am so excited now, LOL my kids and I are going to have a blast decorating some plain t shirts.
lasmto
Jan 07, 2011
This is a great idea. Think of all the things that you could create with this technique. A tablecloth with personalized printed placemats. The possibilities are endless.
Member 17896
Jun 02, 2010
Super idea. A lot cheaper than buying the screen and the blocker, etc. Thanks for the idea.
Marzapan
May 23, 2010
What a great idea! I've always loved the look of screen printing and this would be an easy way to do it. Bet you could use fabric markers if you don't have the ink!
Crafter 7401228
Apr 07, 2010
I love this idea! you are sooooo crafty....I will be trying this one, ill let you all know the outcome.
brendagram
Apr 06, 2010
to pyesquire she used a SHEER curtain panel. This is a awesome idea, I was going to toss a pair of ripped sheers!
pyesquire
Apr 06, 2010
Ok i am confused how does the ink get through the shower curtain ? Thanks Pye Pyesquire@gmail.com
A Kess
Apr 06, 2010
I love this idea! You are so handy you're like the Macgyver of crafting! -) I will definately be trying this out!
Report Inappropriate Comment
Are you sure you would like to report this comment? It will be flagged for our moderators to take action.
Thank you for taking the time to improve the content on our site.