Layered Elven Bracers
With Golden Leaves

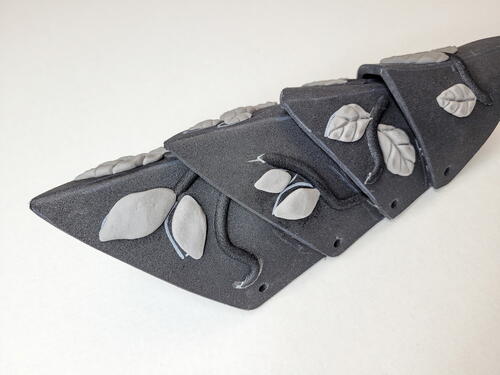
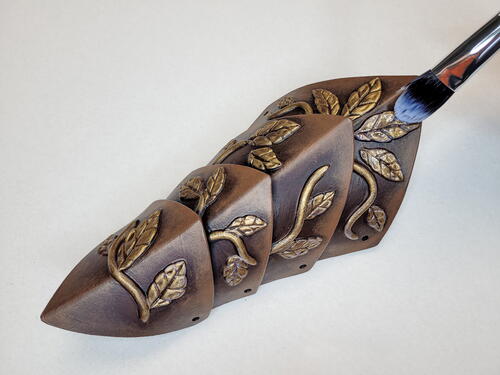
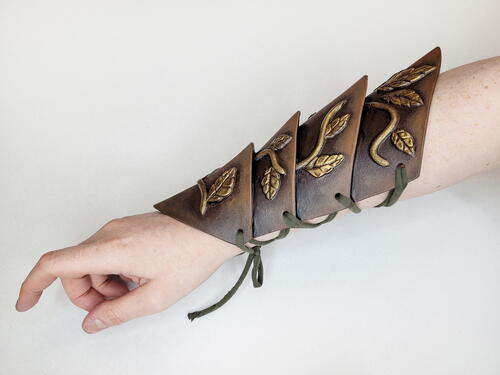
These layered vambraces (arm guards) look like they are made out of leather, but of course they are EVA foam! The brown base color and fine golden leaf decorations make these armor pieces very fitting for a wood elf character. The elegant leaves are sculpted with foam clay so they weigh next to nothing. Painted with gilding wax, the branches look like they were forged out of antique precious metals. To make these comfortable to wear, we’ll use some elastic fabric lacing in a matching color to make them close around the arms without hurting.
Materials List
-
Main Materials
- Layered Elven Bracers templates (digital pattern)
- 1 (12 x 9–inch [30 x23–cm]) sheet of 6mm EVA foam Contact cement
- 32 inches (80 cm) of EVA foam prefab half-round dowel (I used 5mm wide)
- Foam clay
- Flexible primer (black)
- Acrylic paint (dark brown, light brown)
- Wax paint (I used Rub’n Buff gold) or metallic acrylic paint
- Matte and glossy varnish(optional)
- 2 thin strips of jersey fabric (moss green)
-
Tools
- Paint marker
- Craft knife
- Cutting mat
- Heat gun
- Safety tools, including a respirator, dust mask and safety glasses
- Rotary tool with sanding drum (120-grit), or regular sandpaper
- Belt puncher or hole puncher
- Scissors
- Wooden clay modeling tool
- Brushes, sponge and a piece of cloth for painting
Instructions:
Printing the Pattern: If you want to print a pattern, be sure to set your printer to ‘not scaling’. It should print at 100%. Also make sure you pick the right paper size to print. So in the USA, you would need ‘letter’ and in Europe you would need ‘A4’. If in doubt, check what paper is in your printer It’s also important that you open the file in Acrobat reader and print from there instead from opening it in your browser and printing from there. In rare occasions, printing from a browser can warp the pattern pieces. So use Acrobat reader just to be sure! It’s a free to download program.
Preparation:
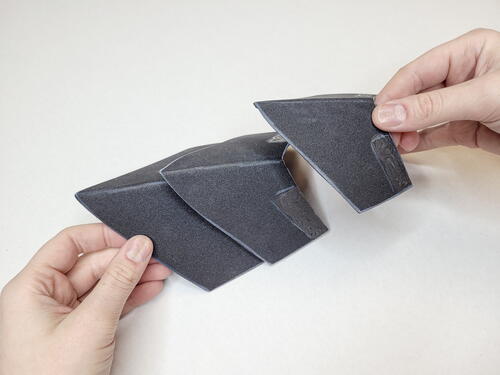
Use your template to trace and cut the wrist piece (layer 1) out of the 6mm EVA foam four times (twice mirrored). When cutting these, make sure to cut all the edges at an upward angle.
Cut layers 2, 3 and 4 out of 6mm EVA foam twice. (These won’t need to be mirrored because the pieces are symmetrical.) When cutting these layers, cut all the edges at an inward angle. This will help with the final look of the bracers.
-
Building the Wrist Part (Layer 1)
Apply a thin layer of contact cement to the middle edges of the left and right piece for the wrist part. When the glue is tacky, connect the two pieces to form the wrist part of the bracers. Repeat this step for the other bracer too. -
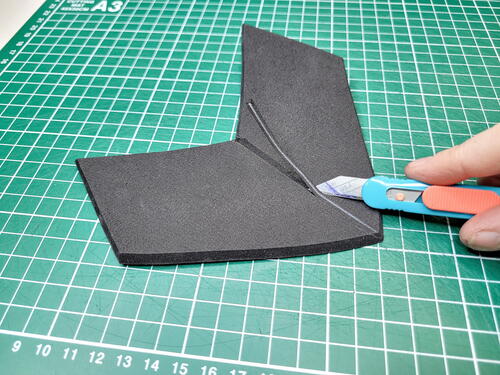
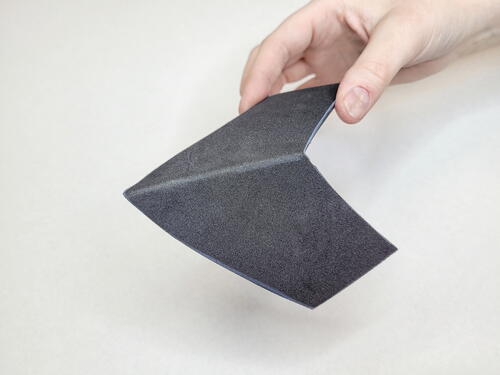
Shaping Layers 2 to 4
Place bracer layers 2, 3 and 4 on the cutting mat, upside down. Make a V-shaped cut across the middle. Make sure not to cut all the way through the foam, only about 75 percent of the way through. Remove the material that you cut away. -
Apply a bit of contact cement in the groove and when the glue is tacky, fold the foam so the groove closes. Now on the other side, a straight ridge will have formed. Repeat these steps for both bracers (six times total).
-
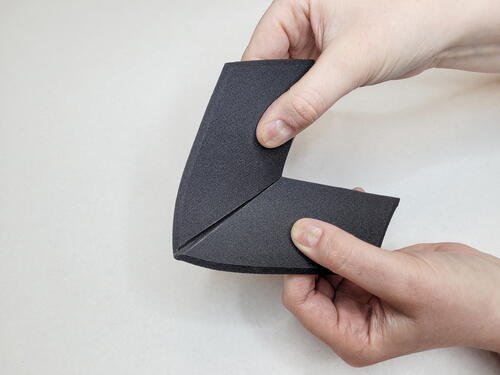
Stacking the Layers
Stack the four layers for each bracer and see how they fit on your arm. Decide where you want the pieces to be attached and mark the glue points with a paint marker so you know where to apply the glue. Apply a thin layer of contact cement to the underside of the top layer and the outside of the under layer. Only apply the glue on the sides, and not over the whole layer (see image). -
When the glue is tacky, press the layers of foam on top of each other. Repeat this until the full bracer is formed. Repeat these steps for the other bracer.
-
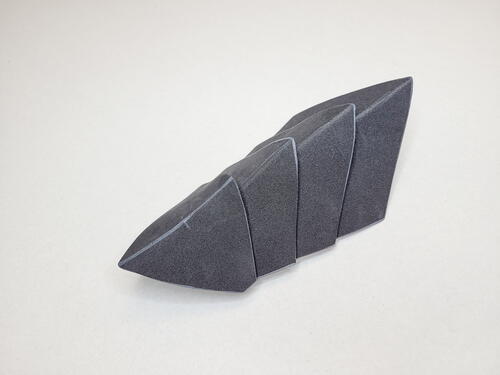
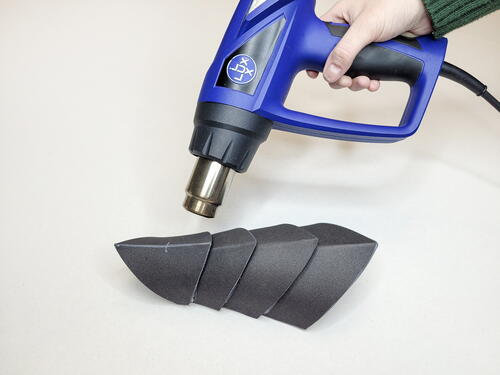
Heat-Shaping
Heat the bracer with the heat gun. When the foam is hot, you can shape it so it is more rounded. Be careful that the foam is not too hot, since you will be shaping it on your arm. When the bracer is in the desired shape, hold it for a few minutes until it is cooled down. Then the foam will stay in its new shape. Repeat with the other bracer. If you want to add the leaf details like described in steps 9 through 12, also draw the design for those on the bracers with a paint marker.
If you don’t like the leaves on the bracers or don’t feel ready to do the sculpting yet, you can simply leave them out. The bracers will also look really cool without the decorations. And when you feel more advanced, you can add the sculpted leaves. -
Optional: Cleaning Up the Edges
Skip this step if you already like how the edges of the foam look. Using the rotary tool with 120-grit sanding drum, sand the edges of the bracer until they’re smooth. The result of the sanding will look nicest when using a rotary tool, but you can also use regular sandpaper for this job. After the sanding is done, clean the foam piece by removing all of the dust. -
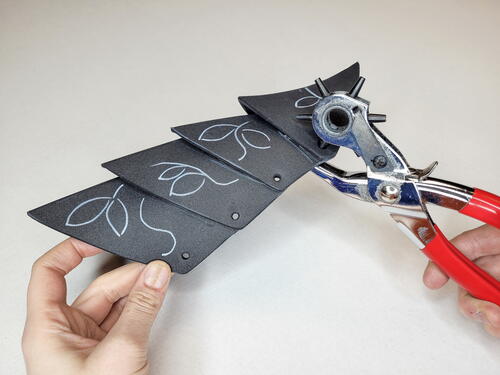
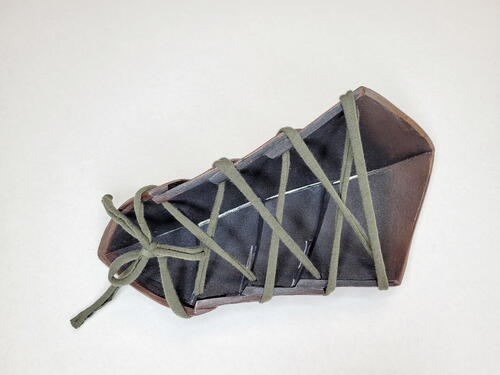
Make Holes
Mark four spots on each side of the bracer to make holes. Using the belt puncher or hole puncher, punch holes through the foam. Make sure to leave some foam around the holes to make it less prone to ripping once the armor piece is being laced up. -
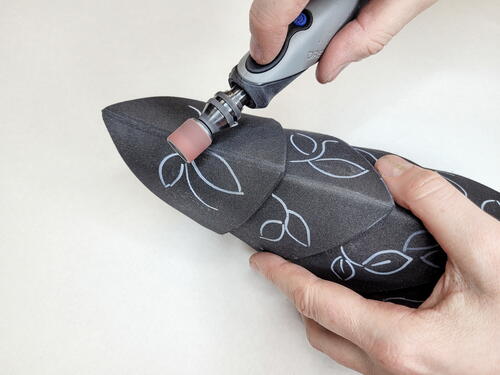
Add Stems and Foam Clay Leaves
Take the 5mm half-round dowel and lay it on your stem markings to see how long the pieces need to be and cut them to size. To make the tips pointy, cut them with a pair of scissors. Mark the bottom of the dowels with letters to prevent mixing them up when gluing them to the foam. -
Apply a thin layer of contact cement to the bottom of the dowels and on the lines where they need to go on the armor. When the glue is tacky, press the dowels on the armor pieces. Make sure that the pointy ends are pointing upwards (towards the widest part of the bracer). After you’ve laid them all down, heat the armor with the heat gun to close the pores of the foam.
-
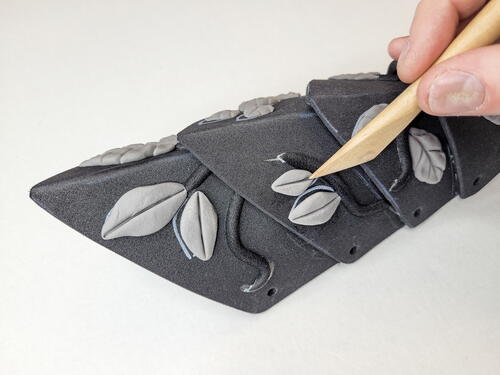
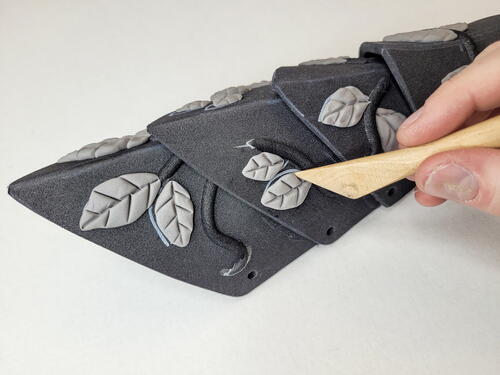
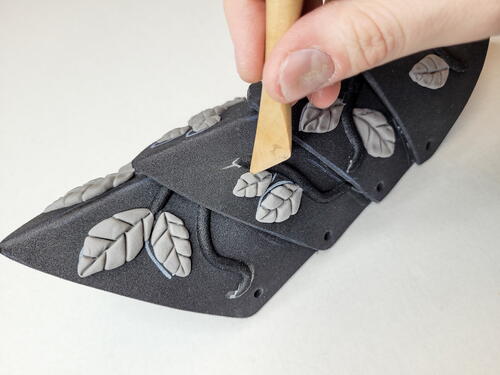
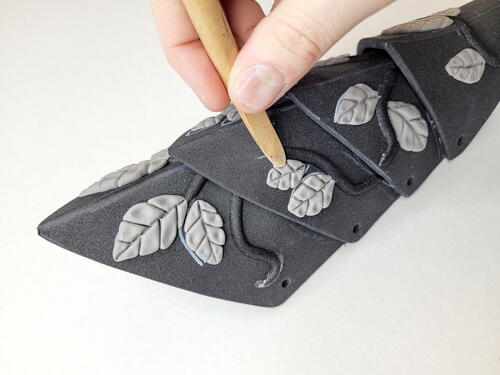
Take a bit of foam clay out of the pot and form a small flat leaf shape with it. If the foam clay is too dry, mix some water into it. Using your fingers, apply a little bit of water on the bracer where you want to place the leaf. This will make the foam clay stick better to the foam. Then place the leaf shape on the bracer and press it down a bit. Repeat this step for as many leaves as you want on both armor pieces.
-
Carve lines in the leaves to look like veins with the wooden clay modeling tool. Push the foam clay back a bit on the sides to make a bit of a scalloped edge. Exaggerate this effect by pushing outwards softly on the leaves with a rounder wooden clay modeling tool. Now set the project aside for 24 to 48 hours so the foam clay can air-dry.
-
Priming and Painting
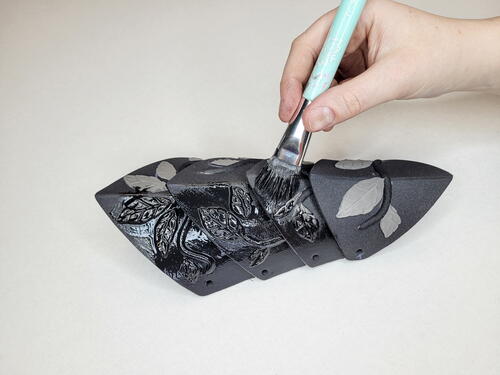
Apply a flexible primer to both pieces. Cover the complete front of each piece and a bit of the inside too (about1 inch [2.5 cm]). I used two layers of HexFlex black. Leave the primer to dry for 2 to 4 hours. -
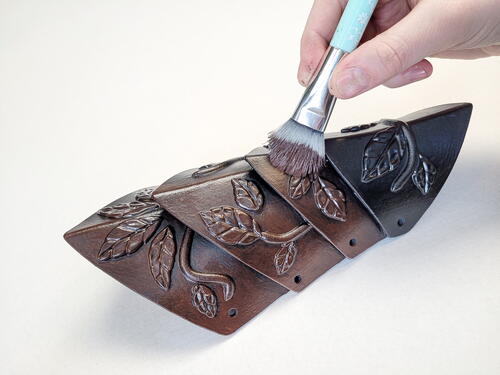
Apply a layer of brown acrylic paint on the bracers. Add more paint to the raised parts and less paint on the edges where shadows naturally occur. If your primer wasn’t black, you can also add some black paint to the shadow parts. Leave the brown paint to dry for 2 to 4 hours.
-
Take a lighter shade of brown or mix it by adding some white paint to the brown from the last step and apply some highlights. For this layer, I used a sponge to apply the paint, and I only used a little bit of paint on the sponge to create nice gradients. Add more paint on the raised parts to create even more depth. Leave the highlight layer of paint to dry for1 to 2 hours.
-
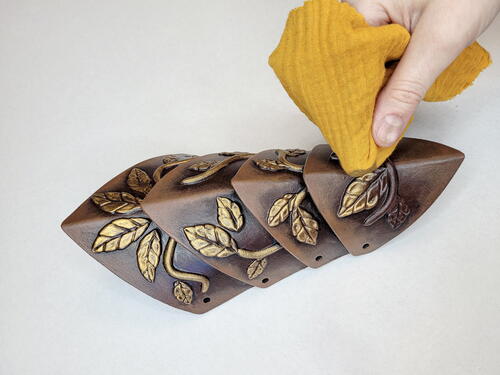
To get a beautiful golden color on the stems and leaves, apply some gilding wax like Rub ‘n Buff. I used the color Grecian Gold by Rub ‘n Buff for this project. Just apply the waxy paint onto the foam with an old piece of cloth. Only paint the raised surface, and not the shadows, to give it more depth. The gilding wax doesn’t need much time to dry, so you can continue immediately with the next step. If you can’t find gilding wax, you can use metallic acrylic paint.
-
To protect the paint job, paint or spray the whole piece with a matte acrylic varnish. In this example, I used a brush-on acrylic varnish. Leave the varnish to dry for 2 to 4 hours.
-
This step is optional, but if you want the leaves to look more like real shiny metal, apply a layer of glossy varnish on the leaves and stems with a brush. Leave the whole paint job to dry overnight before continuing to the next step.
-
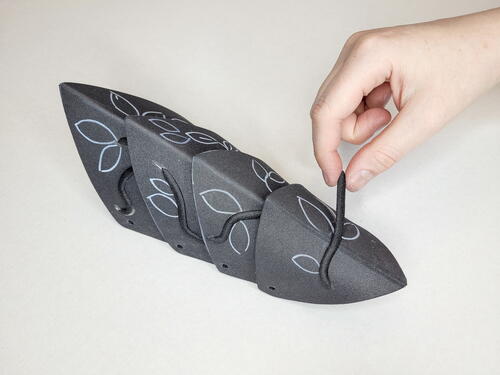
Make It Wearable
Loop the strips of jersey fabric through the holes in the bracers to serve as lacing. Don’t lace it too tight, because the material is foam after all, and it could rip from too much pressure.
Because of the stretchy laces, the armor pieces will be comfortable to wear.


Get Creative! Ideas for Variations
Make the bracers look even more like leather by adding texture to the foam. One way is to use a rolled-up ball of aluminum foil to “stamp” a leather texture in the foam after it’s been heated up with a heat gun. And another way is to use a rough sponge to apply the second layer of primer and work messy. That way you’ll get texture on the foam that can make it look like leather.
If you want the bracers to look like metal instead of leather, paint them with a metallic color instead of brown. Add edges of thin strips of 2mm EVA foam around the layers to give it some extra detail.
You can wear the bracers over arm warmers to make it more comfortable against the skin. Simply buy arm warmers or sew them with a piece of elastic fabric.
In the example, the bracers are closed by lacing them up with stretchy material, but you can also glue straps with Velcro or buckles to them for the attachments. Or hot glue some Velcro to the underside of the bracers and attach them to a piece of clothing.
Credit:
Reprinted with permission from The Beginner’s Guide to Cosplay Armor & Props by Joyce Van Den Goor. Page Street Publishing Co. 2023. Photo credit: Pascal Deguelle + Joyce Van Den Goor.
Read NextGreek Goddess Crochet Shawl Pattern