Casserole Tote
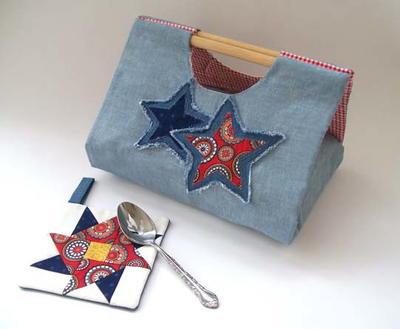
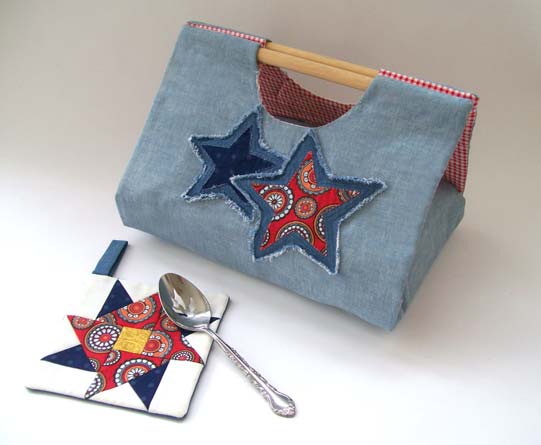
Follow the step-by-step instructions from Baby Lock to sew an attractive tote for your 9" X 13" casserole dish, perfect for bringing to pot luck gatherings. Applique stars cut from fabric remnants add fun decoration to the casserole tote.
Materials:
- Baby Lock Sewing Machine
- Baby Lock Imagine Serger
- 1 yard 45" wide cotton fabric for cover
- 1 yard 45" wide cotton fabric for lining
- 1 yard cotton batting
- Denim and cotton remnants for star appliqués
- 4 cones Maxi-Lock serger thread
- 1 spool all-purpose thread
- Assorted colors Embroidery thread
- Stabilizer (Optional)
- Two 13" pieces of 5/8" dowel rod
- 5" sew-on hook and loop tape
Instructions:
Machine Set-Up:
- Stitch: Straight Stitch Center Position
- Needle and Bobbin: All-purpose thread
- Needle type: Schmetz™ #80 Universal needle
- Serger Set-Up:
- Set Imagine for 4-thread serging, stitch selector A, length 3.0 and width 7.5.
- Place Maxi-Lock serger thread in the needles and loopers.
Cutting and Preparation:
Cut 1 pattern piece from each of the cotton fabrics (Diagram 1). Cut a rectangle 12-3/4" x 3-1/4" for the spoon pocket.
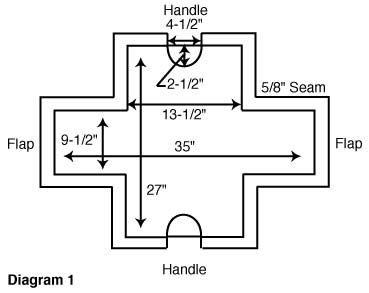
Note: Be sure to add the 5/8" seam allowance on the outside edges as shown
Construction:
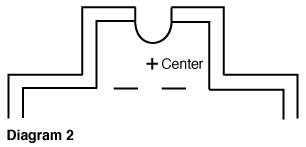
- Mark the center of both handle sides of the tote on outer fabric only (Diagram 2).
To Add Machine Embroidery (Optional):
Hoop one side of the outer fabric with the stabilizer. Embroider your selected design using your center marking as a guide for positioning the design. When complete, disconnect the embroidery unit and thread for normal straight stitch sewing.
To Add Appliqué Stars:
Cut four stars from the cotton remnants varying the size slightly.
Stitch the stars to the remnant of denim. Straight stitch around the outside of the stars ¼” from the edge. Then cut the denim out another ¼” from the stitching line, so the denim stars are now ½” bigger than the center star.
Fray the edges of the denim stars. Appliqué two or three stars using your center marking as a guide for positioning the design. Use the remaining star(s) on the pocket side.
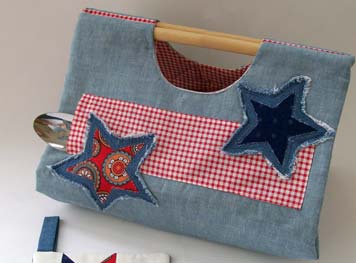
- Serge finish all four sides of the pocket rectangle. Press the serging under on two long sides and one short side. Turn under 5/8" on the remaining short side and stitch one side of 1" piece of hook and loop tape to wrong side of pocket piece.
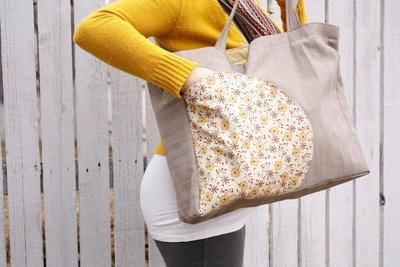
- Center the pocket horizontally on the opposite handle side, using the center mark as a reference point. Stitch the other half of 1" piece of hook and loop tape to outer fabric for pocket closure. Stitch close to edges of pocket, attaching to outer fabric.
- Place completed outer fabric and lining fabric right sides together. Place batting piece on top. Stitch 5/8" seam around sides except for circle cuts for handles. Trim seam allowances and turn right side out.
- Serge finish each circle cut edge, single layer. Press the serged edge to the wrong side using the serged edge as seam allowance. Slide dowel pieces into each handle area (Diagram 3).
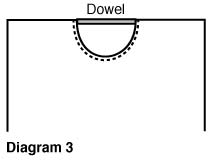
- With the dowel to the LEFT of the presser foot, stitch the front and lining pieces together around the circle, and secure the dowel from slipping out of the handle. (Dowel must be to the left of the presser foot. This will place the bulk of the fabric to the inner area of your sewing machine; however, your needle bar will hit the dowel if it is placed to the right). Repeat for the other side.
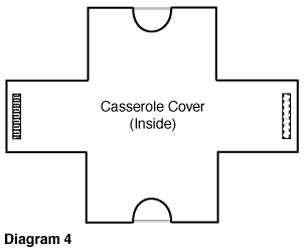
- Stitch remaining 4" of hook and loop tape to the inner folding sides of the casserole cover, about 5/8" in from seam edge (Diagram4).
Read NextQuilted Book Bag Pattern
Your Recently Viewed Projects
Elvann
Feb 21, 2012
I am fairly new to sewing and do not know what the term "chopstick" means. Can you tell me?
shedelmon 6500948
Feb 18, 2012
For a stronger bag try using upholstery fabric, I have made bigger versions of this bags which my nieces use for laundry coming home from college and they are really strong...
spoiled
Apr 30, 2010
If we do not have a serge machine, are we still using regular thread for this project?
Crafter 17954
Feb 28, 2010
I agree with sewgirls comment and suggestions. Will be following her ideas
Jolylady
Feb 28, 2010
I make these all the time however I cut two separate criss-cross pieces and then stitch them together. I leave a pocket open in the bottom and put a piece of lightweight wood in the bottom of it for stability. The wood is removable for washing as I leave one side open. I also use quilted fabric with a different pattern on each side.
MamaSmurf5000
Feb 27, 2010
Thanks for the idea of putting in a servig utensil pocket on the outside.
sewgirl1
Feb 27, 2010
We made these years ago in an FCE workshop. You don't have to have a serger, and of course, you don't have to have a Babylock sewing machine - any machine will do. We made them out of double faced quilted fabric and did not line them. I don't think their method of sewing the dowel in is very practical. You will need to take the dowel out when you wash the carrier. We just sewed a channel loose enough to slide the dowel in and then it can be taken out for washing. We also sewed a pocket on the inside to hold a serving spoon. It is a great carrier and I have made many as gifts. When I go to pot-lucks, many people want one and I am sure that if I had the time, I could make them and sell them.
Rosie R
Feb 16, 2010
What if we don't own a Baby Lock Sewing Machine or Serger? Is it possible for us to sew this project anyway??????
Report Inappropriate Comment
Are you sure you would like to report this comment? It will be flagged for our moderators to take action.
Thank you for taking the time to improve the content on our site.

