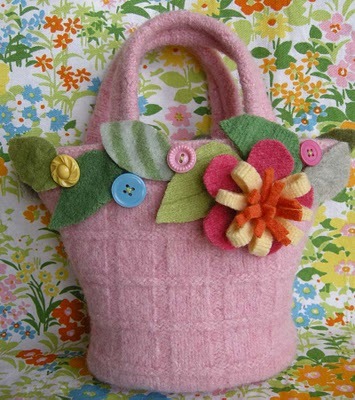
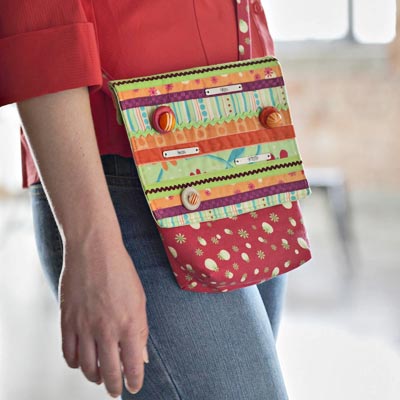
Bright Stripe Bag
Use four, bright coordinating fabrics to create a beautiful stripe bag adorned with ribbons, ric-rac and embellishments. This colorful stripe bag by Pat Sloan would be a cherished present for Mother's Day.
Materials:
- 4 -- 1/8-yard pieces coordinating prints (flap)
- 1/2 yard red print (bag, strap)
- 1/3 yard green print (bag and flap linings)
- 12x50" thin cotton batting
- 1/4 yard fusible fleece
- 7 or more 10" lengths of ribbon, yarn, rickrack, or other trim
- Assorted embellishments such as beads, charms, and antique buttons
- Diagrams
Finished Bag: 7-1/2x8-1/4"
Quantities are for 44/45"-wide, 100% cotton fabrics. All measurements include a 1/4" seam allowance. Sew with right sides together unless otherwise stated.
Cut the Fabrics- To make the best use of your fabrics, cut the pieces in the order that follows.
From each of four coordinating prints, cut:
- 2 -- 1-1/2x9" strips
From red print, cut:
- 2 -- 2x42" strips
- 2 -- 8x9-1/2" rectangles
From green print, cut:
- 1 -- 8-1/2" square
- 2 -- 8x10⁻¹/2" rectangles
From thin cotton batting, cut:
- 1 -- 3/4x48" strip
- 1 -- 9" square
From fusible fleece, cut:
- 2 -- 8x9-1/2" rectangles
Assemble and Embellish Flap
- Referring to Diagram 1, cover the 9" batting square with the eight coordinating print 1-1/2x9" strips, overlapping strip edges by about 3/8". Topstitch through all layers along each strip raw edge to make flap front.
- Cover raw edges where strips overlap with 10" lengths of ribbon, yarn, rickrack, or other trim; machine-stitch in place. To couch yarn or small cording, zigzag over it with clear monofilament thread. Sew wide ribbons in place with a straight stitch along both edges or a wide zigzag stitch. Attach rickrack and other narrow trims with a straight stitch down the center. If beaded trim has a decorative header (like this purse trim’s satin ribbon), you don’t have to hide it in a seam; straight-stitch in place instead.
- Hand-stitch any small beads or charms as desired, placing them at least 1" away from the flap front raw edges. (Attaching these small embellishments now ensures that most knots will be hidden inside the finished flap.)
- Trim flap front to 8-1/2" square. With right sides together, sew the flap front and the green print 8-1/2" square on all sides, leaving an opening for turning in the center of the top edge (Diagram 2). Turn right side out and press, turning under raw edges. Topstitch 1/8" from alledges to complete the flap.
Assemble Bag
Body and Lining
- Following the manufacturer’s instructions, press the fusible fleece 8x9-1/2" rectangles onto backs of the red print 8x9- 1/2" rectangles; let cool. Sew together red print rectangles along both 9-1/2"-long edges (the sides) and one 8" edge (the bottom) to make the bag body (Diagram 3). Press seams open.
- To box a bottom corner of the bag body, match the bottom seam and side seam; stitch across the resulting triangle 1" from the point (Diagram 4). Trim the seam allowance to 1/4". Repeat to box the remaining bottom corner. Turn bag body right side out.
- Join green print rectangles along 10-1/2"-long edges (the sides) and one 8" edge (the bottom) to make the bag lining. Press seams open.
- Repeat Step 2 to box the bottom corners of the bag lining. Do not turn bag lining right side out.
- With wrong sides together, insert bag lining into the bag body; the lining should extend 1" above bag body. Fold lining top edge under 1/2" twice; topstitch through all layers close to folded edge of lining (Diagram 5).
- Referring to Diagram 6, lap the top edge of the flap 1-1/2" over the top edge of the bag back; flap will extend slightly beyond bag side edges. Being careful not to catch bag front in stitching, topstitch across flap two or three times to secure.
Finish Bag
- Cut and piece red print 2x42" strips to make a 2x49" handle strip.
- Press under 1/4" along each long edge of the red print handle strip. Insert the batting 3/4x48" strip under one fold; batting strip should end 1/2" from handle strip ends. Fold the handle strip in half along the batting edge and topstitch 1/8" from folded edges to make the handle (Diagram 7).
- Turn under handle ends 1/2". Referring to Diagram 8, position ends along flap top edge, 3/4" from flap sides. Topstitch in place, being careful not to catch bag front in stitching.
- Hand-stitch buttons and larger charms to flap, stacking two or more buttons if desired.
Read NextFabric Scraps Tote Bag
Your Recently Viewed Projects

Thanks for your comment. Don't forget to share!
cherlfair2110 5632 336
Mar 03, 2013
great to use up all the lovely little pieces you didn't want to throw away.
elnisi
Oct 13, 2012
this reminds me of Seminole clothing very nice and it looks easy. my granddaughter will like it.
Crafter 4609009
Aug 23, 2010
I would like to see the diagrams that are metioned in the patteern directions.Is there any way of securing the flap to the bag.I am making the bags for little girls to carry items while visiting a theme park.
Report Inappropriate Comment
Are you sure you would like to report this comment? It will be flagged for our moderators to take action.
Thank you for taking the time to improve the content on our site.