Golden Hour Queen Quilt
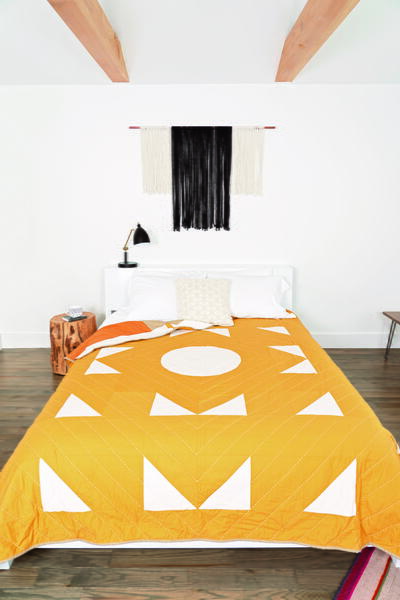
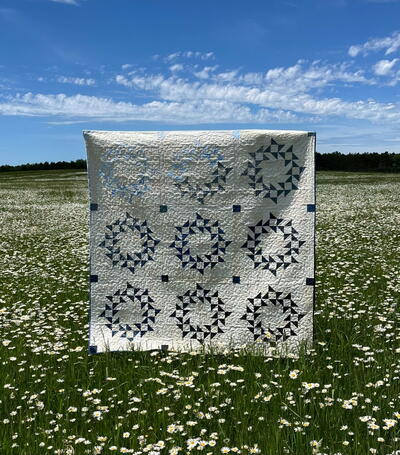
THE GOLDEN HOUR QUEEN QUILT, inspired by the magical golden hour that’s amplified in coastal California, uses just two colors and two shapes to capture the simple beauty of this time of day. The central circle represents the setting sun, with half square triangles radiating outwards, casting golden light over everything. This simple design highlights the geometric shapes. The two-tone color combination and classic structure roots this quilt in tradition, but it's still quite modern, with its large-scale piecing and reliance on negative space. I wanted to give this quilt an extra special finish, so I decided on a hand-quilted diamond design that radiates out from the center, reinforcing the radiating sunbeams. And to bring a bit of shimmer and sparkle, I used a warm metallic linen for the backing and the binding.
Size: 90 x 90" (228.6 x 228.6 cm)
Materials List
-
Fabric: Yarrow, 6 yards (5.5 m)
- 2 pcs. - Dimension: 901/2 x 51/2" (229.9 x 14 cm)
- 2 pcs. - Dimension: 801/2 x 51/2" (204.5 x 14 cm)
- 2 pcs. - Dimension: 641/2 x 81/2" (163.8 x 21.6 cm)
- 2 pcs. - Dimension: 481/2 x 81/2" (123.2 x 21.6 cm)
- 24 pcs. - Dimension: 81/2 x 81/2" (21.6 x 21.6 cm)
- 16 pcs. - Dimension: 901/2 x 51/2" (229.9 x 14 cm)
- 1 pc. - Dimension: 321/2 x 321/2" (82.5 x 82.5 cm)
-
Fabric: Natural, 11/2 yards (1.4 m)
- 16 pcs. - Dimension: 9 x 9" (22.9 x 22.9 cm)
- 1 pc. - Dimension: 181/2 x 181/2" (47 x 47 cm)
-
Fabric: Metallic Camel Linen (Yarn Dyed), 62/3 yards (6.1 m)
- 2 pcs. - Dimension: 94" (238.8 cm) x WOF
- 3 pcs. - Dimension: 81/2" (21.6 cm) x WOF
- 9 pcs. - Dimension: 21/2" (6.3 cm) x WOF
- Fabric: Batting, 96 x 96" (243.8 x 243.8 cm)
-
Diagrams:
Diagram 1
Diagram 2
Diagram 3
Diagram 4
Diagram 5
Diagram 6
Diagram 7
Instructions
Step 1: Cut the Fabric
-
Take full advantage of your yardage by using the chart on page 143 and the diagram above to cut the Yarrow fabric into designated pieces.
Note: click any image for larger version. -
Cut your Natural fabric into designated pieces according the table. Cut your Metallic Camel fabric into the backing pieces and strips for the binding, trimming the selvedge off. Set the binding, backing and any leftover fabric aside for later.
Step 2: Make the Half Square Triangles
-
Starting with your 9" (22.9-cm) Yarrow squares, mark a crease diagonally from corner to corner and place each square on top of a 9" (22.9-cm) Natural square, pinning on either side of the crease. Repeat until you’ve paired all your 9" (22.9-cm) squares together—there should be sixteen total. For detailed photos and tips on making two-at-a-time HSTs, refer to the Technique Tutorial on page 57.
-
Then, you’ll sew 1⁄4" (6 mm) to the left of the crease, using the edge of your presser foot as a guide. Because you’re sewing so many HSTs at once, I’d recommend chain piecing. That means that once you’ve sewn the first square, pause for a moment and without breaking your thread, feed your next square through your machine with that same 1⁄4" (6 mm) left of the crease. Continue until you’ve sewn to the left side of the crease on all sixteen squares. At the end, snip your threads, flip your chain of squares around and repeat on the opposite side of the crease.
-
When all your squares have been sewn on both sides of the crease, snip the threads connecting each square. Then, using your ruler and rotary cutter, cut along each crease. You’ll want to press your seams open before trimming each square down to 81⁄2 x 81⁄2" (21.6 x 21.6 cm). You should end up with 32 identical half square triangles.
Step 3: Cut + Piece the Inset Circle
-
Make the following templates using the method on page 89. You’ll use these templates to trace the curves onto your fabric.
- Template A (181⁄2" [47 cm])
- Template B (171⁄2" [44.5 cm])
-
Place your 18 1⁄2" (47-cm) Natural square on your cutting mat, and fold it in half. Place Template A on top of the folded square, lining up the straight edge of the template with the folded edge of the fabric, and carefully cut around the template. Unfold it, and you should have a perfect circle.
-
Using the same method above, cut circles out of the center of your 321⁄2" (82.6-cm) Yarrow square with Template B. Because the square is larger than your template, make sure the template is centered. Discard the circle you cut out, and keep the surrounding square with a hole in the center.
-
Next, you’ll sew your Natural circle into your large Yarrow square using the Inset Circles method detailed on page 92. Fold both pieces of fabric into quarters and make a crease at each fold. Lay out your Natural circle on your workspace, then place your Yarrow square on top of the circle, centering the hole over the circle and lining up the creases. Find your first crease on the Yarrow square and flip that edge over to the other side, lining up both curved edges and aligning the creases. Pin in place, and repeat with the remaining three creases. This will keep your fabric evenly spaced as you sew. Then, with the Natural circle on the bottom, slowly sew along the edge with a 1⁄4" (6-mm) seam allowance, smoothing the wrinkles and adjusting the fabric to bring the edges together as you go.
Step 4: Assemble the Quilt Top
-
Start by taking your HSTs and 81⁄2" (26-cm) squares and using the diagrams above as a guide, assemble two each of Rows A through D. Press your seams open.
-
When you’ve sewn two of each row, you’ll begin to construct the quilt top starting from the middle and working your way out. All the points of your Natural triangles should be pointing toward the center. Take your 32 1⁄2" (82.5-cm) square with the inset circle and sew both Row As onto opposite sides of the square. Then, making sure your seams line up, sew each Row Bs onto the open two sides of the square. When you’ve sewn your Rows A and B onto the central square, use the same method to sew both 48 1⁄2" (123.2-cm) Yarrow strips onto opposite sides of the square, then both 64 1⁄2" (163.8-cm) Yarrow strips onto the other two sides to create a larger square.
-
Repeat the previous steps to sew both Row Cs and Row Ds onto your growing square, then your 80 1⁄2" (204.5-cm) and 90 1⁄2” (229.9-cm) strips to complete your quilt top. Before sewing the longer Row C and D, it’s helpful to pin the row to the square at each seam to make sure each seam at the end of the Row lines up with the seams on the square. This ensures squared corners and a neater finish.
Step 5: Finish the Quilt
-
Sew the two 94" (238.8-cm) x WOF Metallic Camel pieces together along the long edge, and press the seams open. Then sew all three 8 1⁄2" (21.6-cm) x WOF strips together along the short edges, and press those seams open. Sew that pieced strip to the long edge of the 94" (238.8-cm) piece, press the seams open and trim the leftover fabric to square up your quilt back.
-
Following the steps outlined on page 15, press all your seams open and iron to smooth the quilt top and backing fabric. Baste, quilt and bind using your preferred method.
Inspiration
There’s something about the California coast that amplifies the magical, golden quality of light the hour or so before sunset. It may be the sea spray floating in the air that creates atmosphere and depth of field that’s unlike any other time of the day, but it’s breathtakingly beautiful. Everything during that hour looks magical, almost sparkly, and it’s what made me fall in love with California. The Golden Hour Queen Quilt was inspired by that glittery gold moment of the day—one that’s meant to be captured and shared.
Read NextThe Lazy Quilter's Quilt

