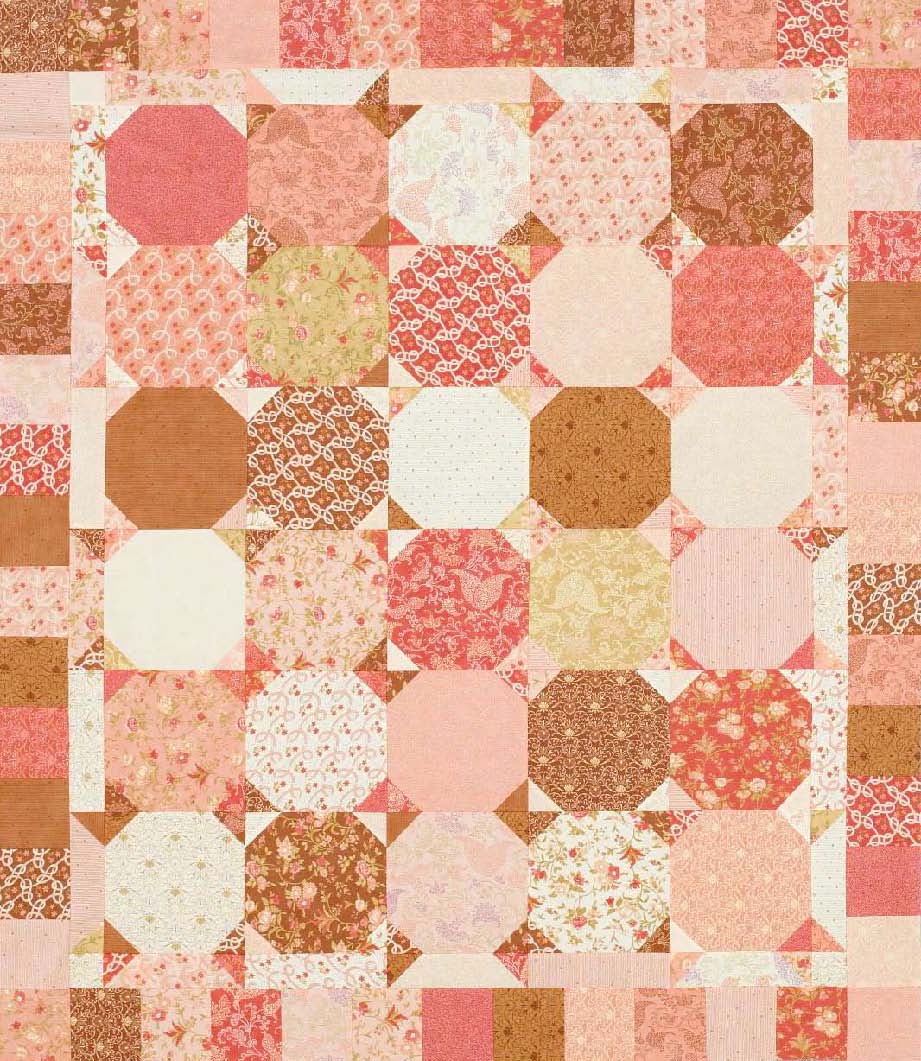
Sweet Snowballs Quilt
Follow this free quilt pattern by Pat Sloan to create a sweet, lap-sized quilt. The large snowball quilt blocks come together quickly.
Materials:
- 3/4 yard total assorted cream prints (blocks, inner border)
- 1 1⁄4 yards total assorted peach prints (blocks, inner and outer borders)
- 1⁄3 yard total assorted green prints (blocks, inner and outer borders)
- 1 1⁄4 yards total assorted coral prints (blocks, inner and outer borders, binding)
- 7⁄8 yard total assorted brown prints (blocks, inner and outer borders)
- 3 3⁄8 yards backing fabric
- 59×67" batting
Finished quilt: 52 1⁄2×60 1⁄2"
Finished block: 8" square
Quantities are for 44/45"-wide, 100% cotton fabrics. Measurements include 1⁄4" seam allowances. Sew with right sides together unless otherwise stated.
Cut Fabrics
Cut pieces in the following order.
From assorted cream prints, cut:
- 7—8 1⁄2" squares
- 12—2 1⁄2×8 1⁄2" rectangles
From assorted peach prints, cut:
- 9—8 1⁄2" squares
- 10—2 1⁄2×8 1⁄2" rectangles
- 25—4 1⁄2" squares
From assorted green prints, cut:
- 2—8 1⁄2" squares
From remaining assorted cream, peach, and green prints, cut:
- 58—2 1⁄2" squares
From assorted coral prints, cut:
- 6—8 1⁄2" squares
- 13—4 1⁄2" squares
- 6—2 1⁄2×42" binding strips
From assorted brown prints, cut:
- 6—8 1⁄2" squares
- 14—4 1⁄2" squares
From remaining assorted coral and brown prints, cut:
- 88—2 1⁄2" squares
Assemble Blocks
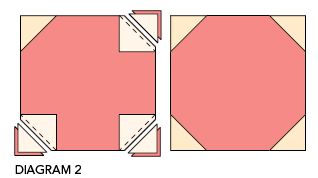
- Set aside four assorted cream print 2 1⁄2" squares. Use a pencil to draw a diagonal line on wrong side of each remaining assorted cream print 2 1⁄2" square and on each assorted peach, green, coral, and brown print 2 1⁄2" square. (To prevent fabric from stretching as you draw the lines, place 220-grit sandpaper under each square.)
- Align a marked cream print 2 1⁄2" square with one corner of a coral print 8 1⁄2" square (Diagram 1; note direction of marked line). Sew on drawn line; trim excess fabric, leaving 1⁄4" seam allowance. Press open attached triangle.

- Referring to Diagram 2 for the direction of the drawn lines, repeat Step 2 to add assorted cream print 2 1⁄2" squares to remaining corners of coral 8 1⁄2" square to make a dark block. The 2 1⁄2" squares need not match, but they should contrast in value with larger square. The dark block should be 8 1⁄2" square ncluding seam allowances.
- Repeat steps 2 and 3 with remaining assorted coral and brown print 8 1⁄2" squares and assorted cream, peach, and green print 2 1⁄2" squares to make 11 dark blocks total.
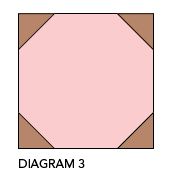
- Using assorted cream, peach, and green 8 1⁄2" squares and assorted coral and brown print 2 1⁄2" squares, repeat steps 2 and 3 to make 19 light blocks (Diagram 3).
Assemble Quilt Center
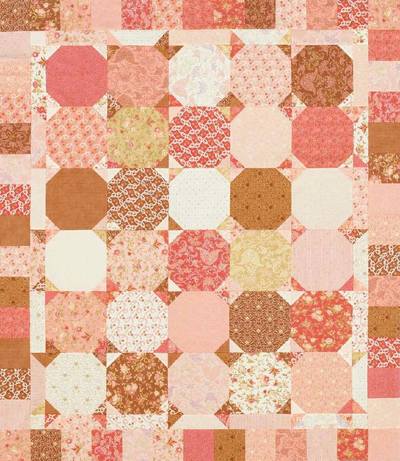
- Referring to photograph and Quilt Assembly Diagram, lay out blocks in six horizontal rows. When you are pleased with the arrangement, sew together blocks in each row. Press seams in one direction, alternating direction with each row.
- Join rows to make quilt center. Press seams in one direction. The quilt center should be 40 1⁄2×48 1⁄2" including seam allowances.
Assemble and Add Inner Border
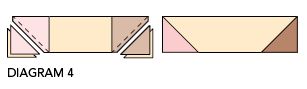
- Align a remaining marked print 2 1⁄2" square with one end of a cream or peach print 2 1⁄2×8 1⁄2" rectangle (Diagram 4; note direction of marked line). Sew on drawn line; trim excess fabric, leaving 1⁄4" seam allowance. Repeat on opposite end using another marked print 2 1⁄2" square. (The squares do not need to match or offer as much contrast in value as in the blocks.) Press open attached triangles to make a border unit. The border unit should be 2 1⁄2×8 1⁄2" including seam allowances. Repeat to make 11 border units total.
- Referring to Quilt Assembly Diagram, sew together two border units and three peach print 2 1⁄2×8 1⁄2" rectangles to make a top inner border strip. Press seams toward rectangles. The top inner border strip should be 2 1⁄2×40 1⁄2" including seam allowances. Add top inner border strip to top edge of quilt center. Press seam toward border.
- Join three border units and two cream or peach print 2 1⁄2×8 1⁄2" rectangles to make a bottom inner border strip (Quilt Assembly Diagram). Press seams toward rectangles. The bottom inner border strip should be 2 1⁄2×40 1⁄2" including seam allowances. Add bottom inner border strip to bottom edge of quilt center. Press seam toward border.
- Sew together three border units and three cream or peach print 2 1⁄2×8 1⁄2" rectangles to make a side inner border strip (Quilt Assembly Diagram). Press seams toward rectangles. The side inner border strip should be 2 1⁄2×48 1⁄2" including seam allowances. Repeat to make a second side inner border strip.
- Sew a cream print 2 1⁄2" square to each end of side inner border strips. Press seams toward squares. Add side inner border strips to remaining edges of quilt center. Press seams toward border.
Assemble and Add Outer Border
- Sew together 11 assorted peach, coral, and brown print 4 1⁄2" squares to make a short outer border strip. Press seams in one direction. The short outer border strip should be 4 1⁄2×44 1⁄2" including seam allowances. Repeat to make a second short outer border strip.
- Join 15 assorted peach, coral, and brown print 4 1⁄2" squares to make a long outer border strip. Press seams in one direction. The long outer border strip should be 4 1⁄2×60 1⁄2" including seam allowances. Repeat to make a second long outer border strip.
- Sew short outer border strips to short edges of quilt center. Add long outer border strips to remaining edges to complete quilt top. Press all seams toward outer border.
Finish Quilt
- Layer quilt top, batting, and backing; baste. Quilt as desired.
- Bind with coral print binding strips.

Read NextGolden Hour Queen Quilt
Your Recently Viewed Projects
Thanks for your comment. Don't forget to share!
Weberme
May 23, 2017
I have not yet completed a quilt yet so I do not quite know if this is the quilt to start with but is so cool looking. I love the snowball effect it creates something so different then all the others. I am amazed at how you make these snowball squares. I really like this tutorial and I think I can follow it. Would be great too if there was a video. I am surly going to keep this on my list of things to do. What level is this? Anyone start with this quilt?
Report Inappropriate Comment
Are you sure you would like to report this comment? It will be flagged for our moderators to take action.
Thank you for taking the time to improve the content on our site.