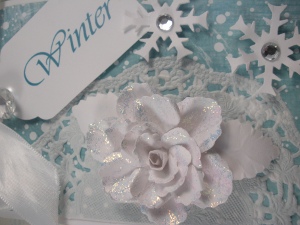
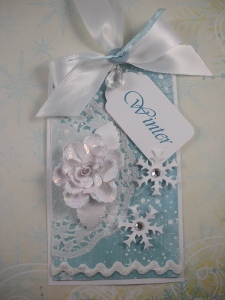
Winter Rose Gift Tag
Add some flair to your gifts with a homemade winter rose gift tag from Sue Eldred. Use these fun Christmas crafts to get your creative juices flowing!

Materials:
- Fabri Tac (Beacon Adhesives)
- #968 Tradition Strips Paper (Fancy Pants)
- White Cardstock
- Diamond Glitter Glue (Ranger Industries)
- Adhesive Diamond Rhinestones (Mark Richards)
- 4 ½” White Paper Doily
- 1” White Satin Ribbon (2 ft.)
- Chandelier Crystals & Jump Ring (Heidi Swapp)
- White Rick Rack, Small blue button, 1/8” Light Teal Ribbon
- Small & Large Foam Mounting Squares
- Small Round Paintbrush
- Double Stick Tape Runner
- Computer Generated Font: Vivaldi-72 pt.
- Mc Gill’s Paper Blossoms Punches:
64503 Floral Petals Punch
64502 Birch Leaf Punch
64500 Alpine Snowflake
65800 Tool Kit
65900 Molding Mat - Additional Mc Gill Punches:
98400 Tall Scallop Tag
97500 Small Snowflake
83300 Corner Rounder
53600 3/16” Hole Punch
52400 1/8” Hole Punch
Instructions:
Rose Assembly:
- Punch Floral Petals 6 times with White Cardstock. To create a smaller rose, discard the largest 6 petals.
- Place the petals on the Craft Molding Mat. With the large ball stylus #8, move the stylus around in small circular motions with medium pressure shape each petal. The petals will start to curl on the edges.
- Place the tweezers at the smaller, defined end of the petal. Use your index finger and thumb to pinch the shape around the end of the tweezers.
- Holding the pinched end between your finger and thumb, use the tweezers to grasp the side of the shape and roll back to form petal.
- After all the petals have been shaped. Lay the petals on the craft mat and paint each petal with the diamond glitter glue. Allow to dry. (option: you can also paint the rose when fully assembled)
- Punch a snowflake out of white cardstock. Lay the snowflake on the Craft Molding Mat, use the #8 stylus and move in small circular motion in the center of the snowflake. The snowflake will cup up. This will be used as our flower base.
- Start with the cupped snowflake. Working with the largest petals first, dip the end of each individual petal into the glue and adhere the petal to the snowflake base. Continuing with the next largest petals to the smallest, glue to the base one by one until you get to the center. The last couple of small petals curl inward to create center.
- Punch two leaves from the White cardstock.
- Shape the underside of each leaf with the #8 stylus. (step #3)
- With the small end stylus #2 draw veins onto each leaf. Paint Diamond Glitter Glue onto the leaves. Allow glitter glue to dry and then glue leaves to rose.
Tag Assembly:
- Cut a piece of white cardstock 3 ½” x 6” and round the top two corners.
- Cut a piece of scrapbook paper 3 ¼” x 5 ¾”, round the top two corners.
- Fold the white paper doily in half and carefully glue onto the left side of the snowflake paper layer. Add white rickrack on the bottom of the snowflake paper layer.
- Adhere Snowflake layer onto the White Cardstock layer to create tag. Punch a 1/8” hole in the top of the tag.
- Loop 12” white satin ribbon through hole and tie tight with teal ribbon. Fold remaining ribbon in third and tie the center with same teal ribbon. Thread light blue button onto teal ribbon and tie knot. Add Chandelier Crystal to jump ring and onto teal ribbon. Trim ribbon ends
. - Punch 8 large snowflakes and two small snowflakes. To create a sturdy snowflake, glue two of the same size snowflakes together to make four large snowflakes and one small snowflake. Paint each snowflake with Diamond Glitter glue. Allow to dry.
- Print the word “Winter” onto white cardstock and punch with the Tall Scallop Tag.
- Mount with large foam mounting squares onto the top of the tag.
- Glue Glittered White Rose to left side of the tag over the white paper doily.
- To create a dimensional snowflake, adhere large snowflake slightly off-centered with small foam mounting square to same size snowflake. Add diamond rhinestone to the center of each snowflake. Glue dimensional snowflakes onto tag.
- Add small diamond rhinestone to center of small snowflake, mount onto corner of the “Winter Tag”.
Read NextDIY Christmas Etched Plates
Your Recently Viewed Projects
Thanks for your comment. Don't forget to share!
Report Inappropriate Comment
Are you sure you would like to report this comment? It will be flagged for our moderators to take action.
Thank you for taking the time to improve the content on our site.