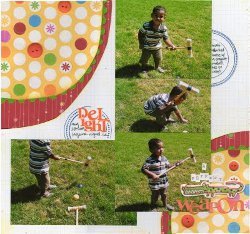
Thrifty Double Sided Paper
Crafting with paper can be so much fun, especially if you love both sides of the patterns on the paper. This Thrifty Double Sided Paper project is a great way to save money and still create fun scrapbook ideas at the same time.

Materials:
- 1 sheet of double sided paper (white one side, yellow dots on other side)
- 1 sheet of single sided paper (for the background - I actually used a double sided paper that I only liked one side of)
- About 15" ricrac trim
- Stamps (I used Technique Tuesday)
- A Couple Buttons
- Alpha Stickers
- Diecut shape (this one is from Prima)
Instructions:
- Cut two rounded corners off the double sided paper. My cuts are rough and that is okay but if you are really concerned about the cuts being round, trace the edge of a plate and then cut the corners out. The reason I cut these corners off is because they had flowers on them which I did not want on my page.
- Trim the cut out pieces until they are smaller than the cutout.
- Glue ric rac to the back of rounded side of the cutouts. Adhere the center piece of the paper to the background paper. Then add the cutouts. Some of the background paper will peek through.
- Add photos, stamps, and some sticker letters for a title.